The Magnet Forensics Weekly CTF has been running since October and sets one question each week using an image that changes each month. The October questions were based on an Android filesystem dump, and November’s related to a compromised Hadoop cluster built on Ubuntu Linux. The December challenges return to more familiar territory for me – Windows memory analysis!
These questions use the memory image from the Magnet Virtual Summit 2020, which I first examined during the MVS CTF earlier this year. You can find the rest of my Magnet Weekly CTF write-ups here.
The Week 9 question (all seven parts of it!) was written by Aaron Sparling, and begins with recovering the user’s notes on changing one of their passwords. Let’s go!
Part 1 (25 points)
The user had a conversation with themselves about changing their password. What was the password they were contemplating changing too. Provide the answer as a text string.
I like to use Volatility for memory analysis; version 2.6.1 was installed on my SIFT VM. As usual we begin by determining which profile is best to use with the image using the imageinfo plugin. I’m also piping the output to tee so that everything is written to a text file for reference later on.
vol.py -f memdump.mem imageinfo | tee /mnt/hgfs/Shared/mwctf/windows-memory/out/imageinfo.txt
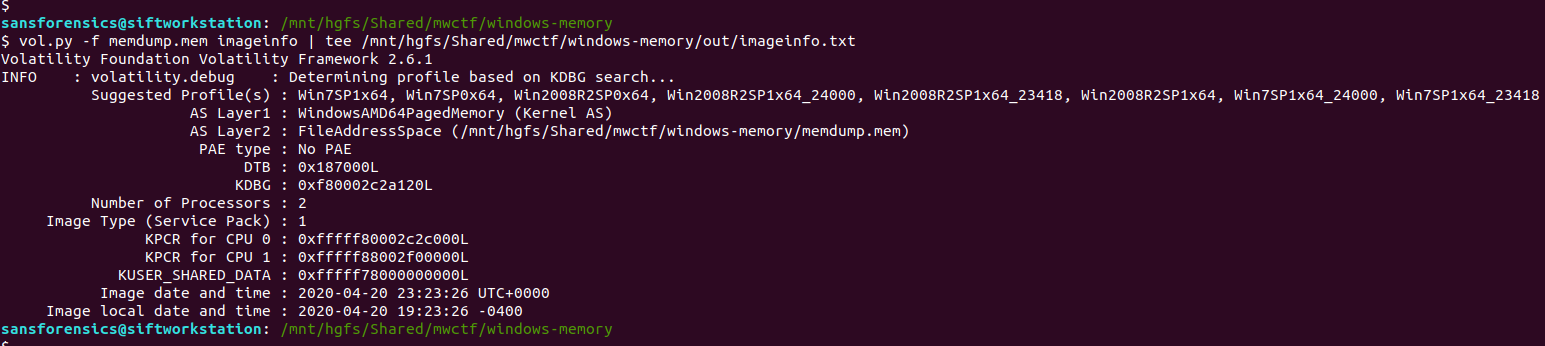
The imageinfo plugin suggested the Win7SP1x64 profile, which seems sensible enough. The next plugin I like to run is pstree; this will show most of the processes that were running when the memory was captured, giving us an idea of what was happening on the host.
vol.py -f memdump.mem pstree | tee /mnt/hgfs/Shared/mwctf/windows-memory/out/pstree.txt
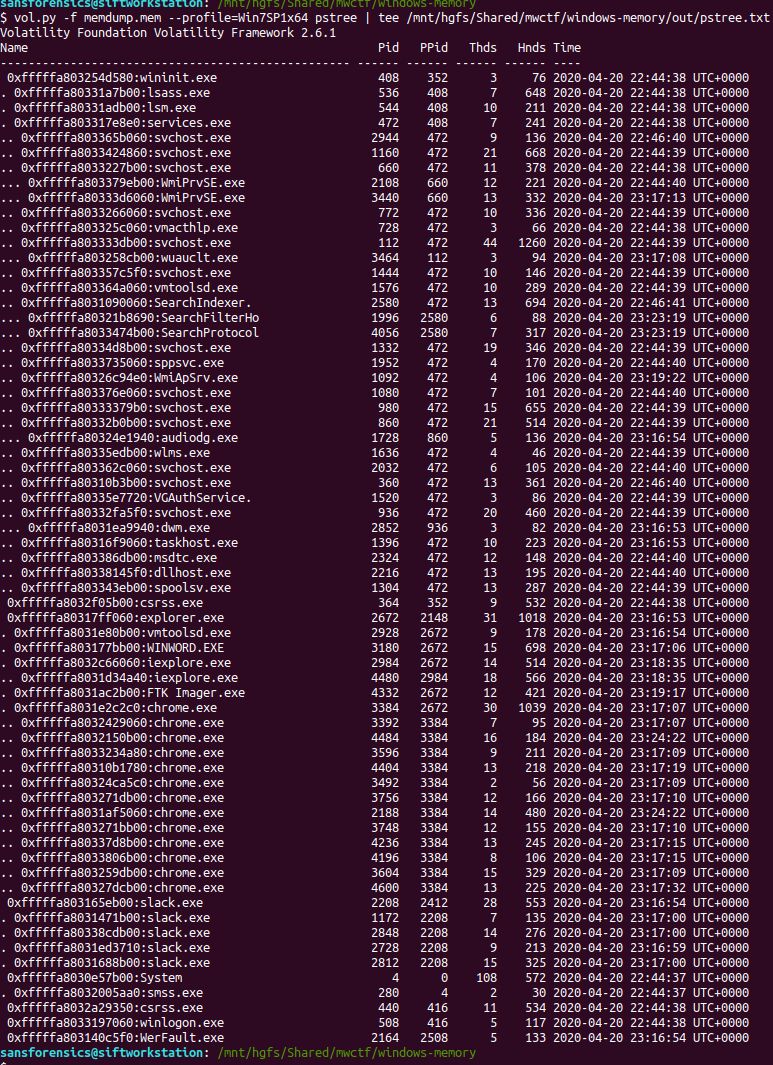
The question references the user having a conversation so I started off by dumping the memory from the Slack processes and examining the output of strings, but I didn’t find anything useful. Next, I looked at the WINWORD.EXE (PID: 3180) process. Perhaps the user wrote their conversation into a file? I started with the cmdline plugin in the hope that Word was opened with a file path in the command line.
vol.py -f memdump.mem --profile=Win7SP1x64 cmdline -p 3180 | tee /mnt/hgfs/Shared/mwctf/windows-memory/out/cmdline-3180.txt

Unfortunately not, but there are other ways of determining which files a process was using. The handles plugin, with a filters on the process and handle types will output a list of all of the files in use by the Word process.
vol.py -f memdump.mem --profile=Win7SP1x64 handles -p 3180 -t File | tee /mnt/hgfs/Shared/mwctf/windows-memory/out/handles-3180-file.txt
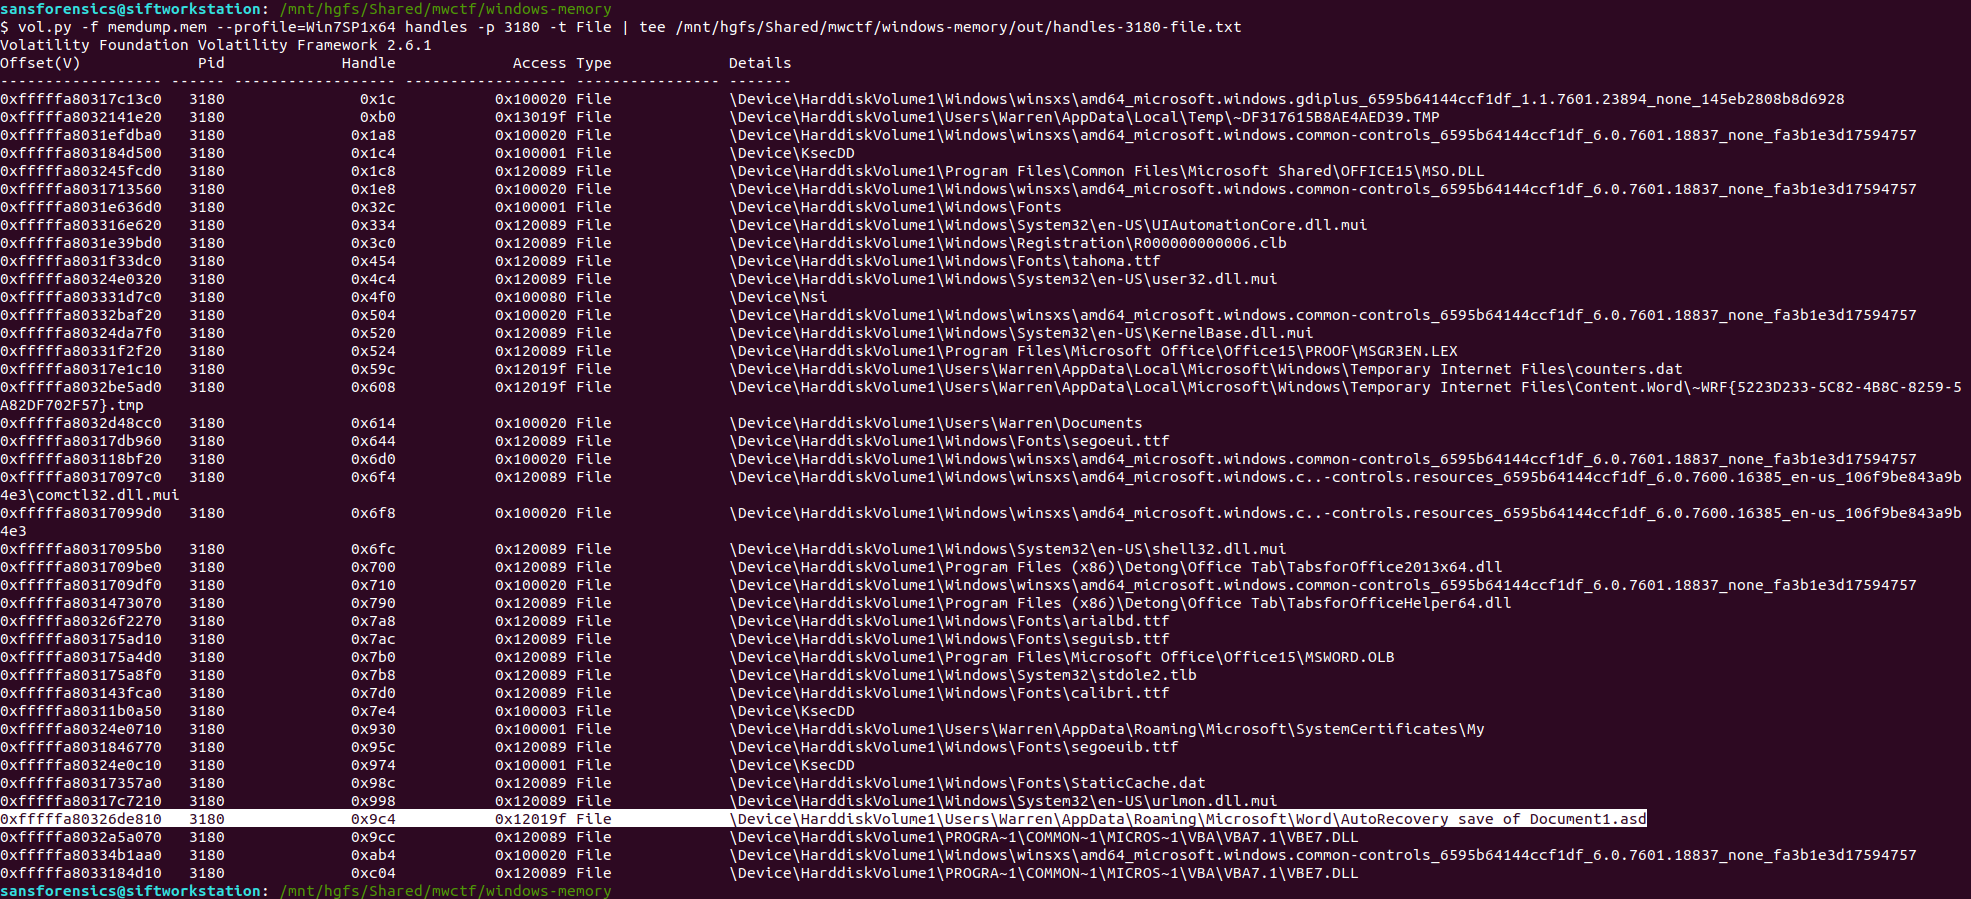
One file stood out – AutoRecovery save of Document1.asd – from user Warren’s profile. This file might not exist on disk anymore, but we can probably extract it from the memory dump. The first step is to run the filescan command, saving the output to a file for use later.
vol.py -f memdump.mem --profile=Win7SP1x64 filescan | tee /mnt/hgfs/Shared/mwctf/windows-memory/out/filescan.txt
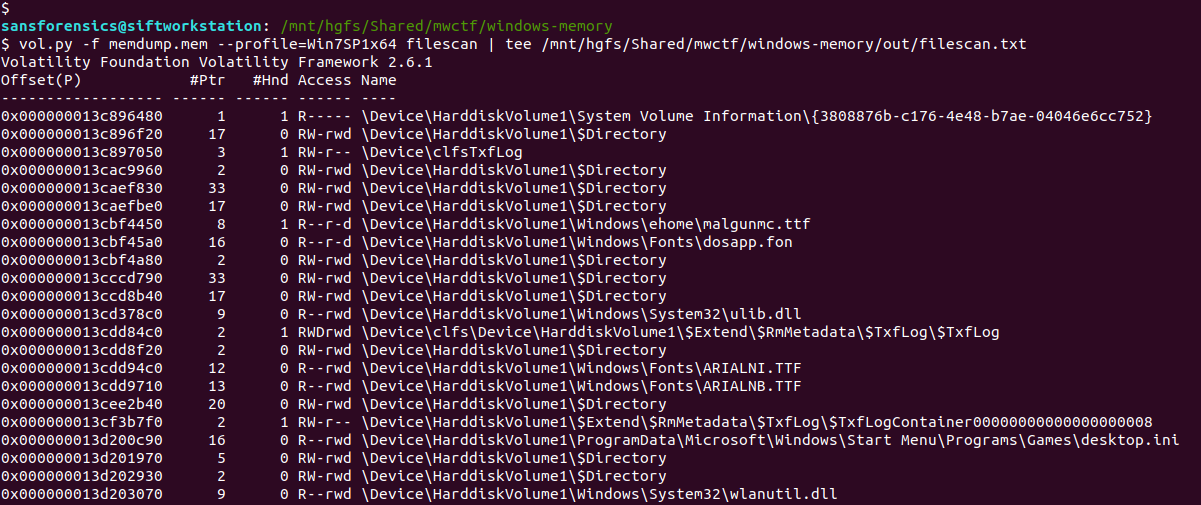
Next I used grep to locate the physical offset of the file, then ran the dumpfiles Volatility plugin to extract the file from the memory image.
grep "AutoRecovery save of Document1.asd" out/filescan.txt
vol.py -f memdump.mem --profile=Win7SP1x64 dumpfiles -Q 0x000000013e6de810 -D. -n

Opening the extracted file with LibreOffice, we can see the user’s conversation with themselves, and their proposed new password.

Flag (Part 1)
wow_this_is_an_uncrackable_password
Part 2 (15 points)
What is the md5 hash of the file which you recovered the password from?
This part is easy enough. We have already extracted the auto-recovery document so all we need to do is calculate the MD5 hash.
md5sum file.None.0xfffffa803316f710.AutoRecovery\ save\ of\ Document1.asd.dat

Flag (Part 2)
af1c3038dca8c7387e47226b88ea6e23
Part 3 (15 points)
What is the birth object ID for the file which contained the password?
On a NTFS filesystem, every entry in the Master File Table (MFT) contains a number of GUIDs which make up the $OBJECT_ID attribute. While the Object ID might change over the life of the file, the Birth Object ID is a record of the first Object ID assigned and should never change.
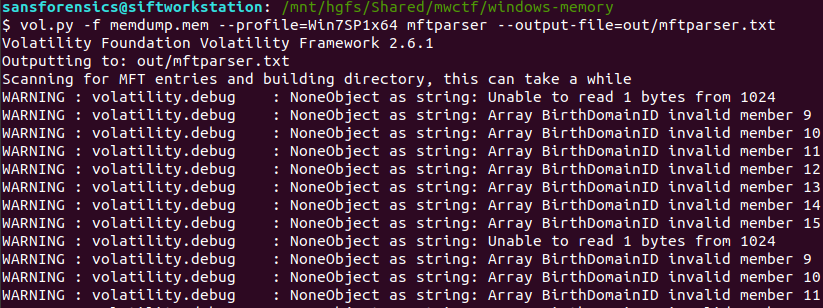
We can extract the MFT as it existed at the time of the memory capture using Volatility’s mftparser plugin. You will almost always want to redirect the output of mftparser to a file and, as per the warning, the parser can take a while (although more likely minutes than hours!) The other warnings during the extraction don’t appear to have had any ill effect on the rest of the analysis.
vol.py -f memdump.mem --profile=Win7SP1x64 mftparser --output-file=out/mftparser.txt
Once mftparser has completed we can search for the MFT entry related to the AutoRecovery file using grep; the -B 20 and -A 11 options print the 20 lines before the matching line, and 11 lines after, just to keep the output tidy.
grep -B 20 -A 11 "AutoRecovery save of Document1.asd" out/mftparser.txt
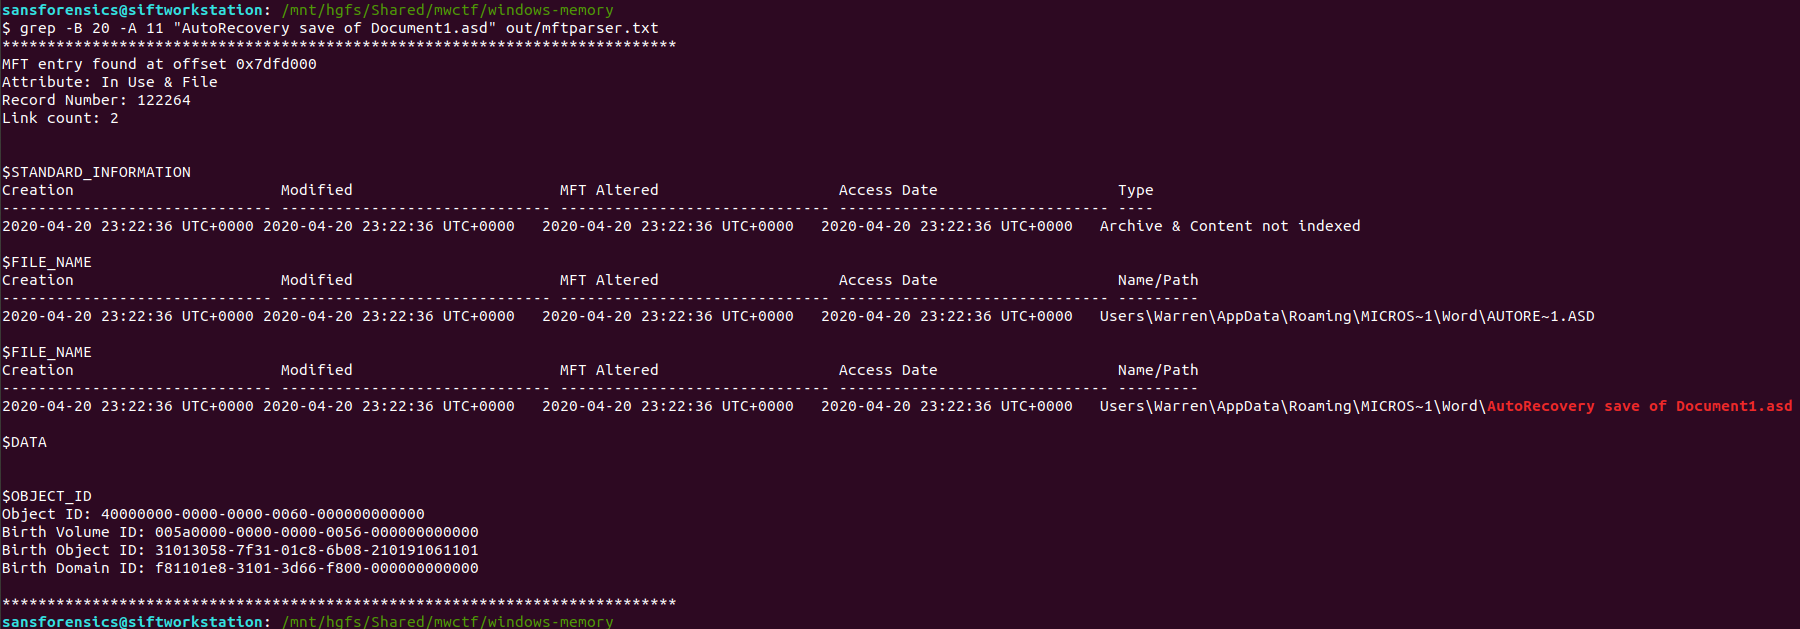
The $OBJECT_ID attribute is printed at the bottom of the entry, including the Birth Object ID value.
Flag (Part 3)
31013058-7f31-01c8-6b08-210191061101
Part 4 (20 points)
What is the name of the user and their unique identifier which you can attribute the creation of the file document to?
Format: #### (Name)
We know that the AutoRecovery document was stored in the profile for user Warren. We could dig into the registry to link each ProfileImagePath to its SID and RID values, but a big part of memory analysis is quick wins and I know that the hashdump plugin will print the username, RID, and NTLM hash for each local account on the box. Based on the format hint in the question, the RID and username are all we need for now.
vol.py -f memdump.mem --profile=Win7SP1x64 hashdump | tee /mnt/hgfs/Shared/mwctf/windows-memory/out/hashdump.txt

There we go – user account Warren has RID 1000. Not too surprising as this is the only user account other than the built-in Administrator and Guest accounts, but now we have confirmed it. The NTLM hash isn’t really of any use to us at the moment, but credentials and hashes are always nice to have around.
Flag (Part 4)
1000 (Warren)
Part 5 (25 points)
What is the version of software used to create the file containing the password?
Format ## (Whole version number, don’t worry about decimals)
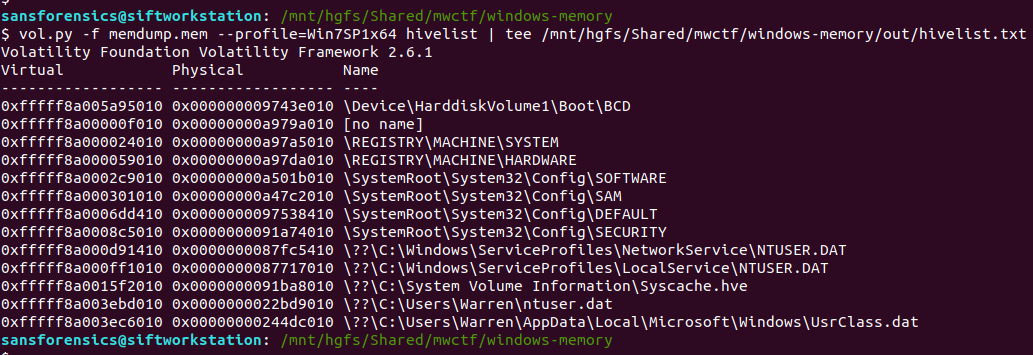
Ok now we have to dig into the registry! Volatility has a printkey plugin that is smart enough to query each registry hive it finds and print all of the results, but we can be more targeted by specifying which registry hive we are interested in first. The hivelist plugin displays the virtual and physical offsets for each of the hives it is able to find. Again, this will likely be useful later on so write the output to a file.
vol.py -f memdump.mem --profile=Win7SP1x64 hivelist | tee /mnt/hgfs/Shared/mwctf/windows-memory/out/hivelist.txt
I looked in the ntuser.dat hive associated the Warren user account. This hive contains, among other useful things, data about software installed by the user. Now we have the offset for the hive, we can run the printkey plugin and pull the data relating to the Microsoft Office installation.
vol.py -f memdump.mem --profile=Win7SP1x64 printkey -o 0xfffff8a003ebd010 -K "SOFTWARE\Microsoft\Office"

Now, I wasn’t completely sure of the answer at this point. The Subkeys 11.0, 12.0, 14.0, and 15.0 all relate to Office versions, but which one is correct? After a bit more digging I found another registry key, this time in the HKLM\Software hive, that confirmed which version was correct.
vol.py -f memdump.mem --profile=Win7SP1x64 printkey -o 0xfffff8a0002c9010 -K "Classes\Word.application\curVer"
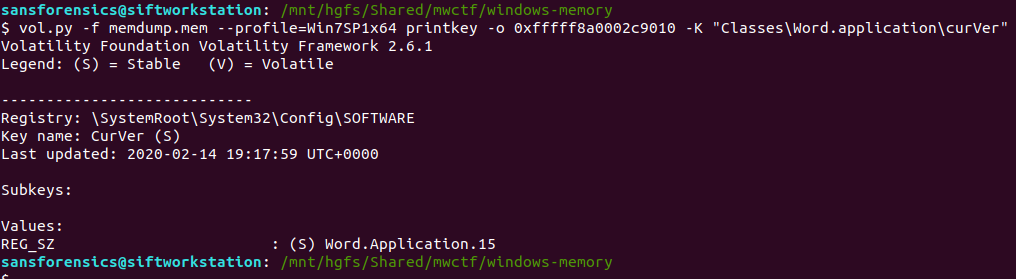
Version 15 corresponds to Microsoft Office 2003, but thanks to the format hint we know that 15 is enough.
Flag (Part 5)
15
Part 6 (20 points)
What is the virtual memory address offset where the password string is located in the memory image?
Format: 0x########
This part caused me the most trouble. I knew how to easily find the physical offset using the strings utility and grep, but how to find the virtual offset? I recalled that Volatility has its own strings plugin, and after reading some Volatility documentation, I was able to link the physical offset to the virtual one.
Rather than outputting every string in the image, the Volatility strings plugin takes a specially formatted list of physical offsets and strings as an input, displaying the matching virtual offsets. Cool. First thing is to build the input list in the following format:
<physical offset (decimal)>:<string>
After some trial and error involving sed, awk, and cut I gave up and used the Windows Sysinternals strings64.exe utility (as suggested by the Volatility documentation!) which creates this form of output by default. Dropping back to my Windows 7 host, I dumped the strings64.exe output to my shared directory:
>strings64.exe -o memdump.mem > out/strings-physical-dec.txt

Back to SIFT and we can see that we have the required format: physical offsets in decimal representation, and the associated strings, colon-separated.
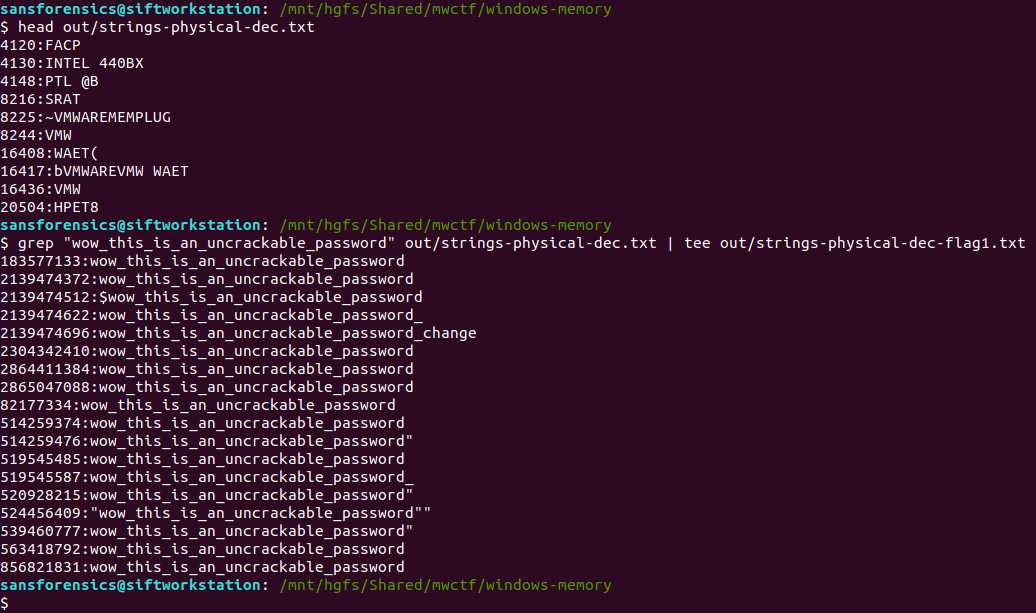
We are only really interested in the strings matching the password from Part 1, so we filter these using grep, writing the result to a file – this will be the input for the Volatility strings plugin.
head out/strings-physical-dec.txt
grep "wow_this_is_an_uncrackable_password" out/strings-physical-dec.txt | tee out/strings-physical-dec-flag1.txt
Now that the input file is formatted correctly we can throw Volatility’s own strings plugin at the image.
vol.py -f memdump.mem --profile=Win7SP1x64 strings -s out/strings-physical-dec-flag1.txt | tee out/volstrings-flag1.txt
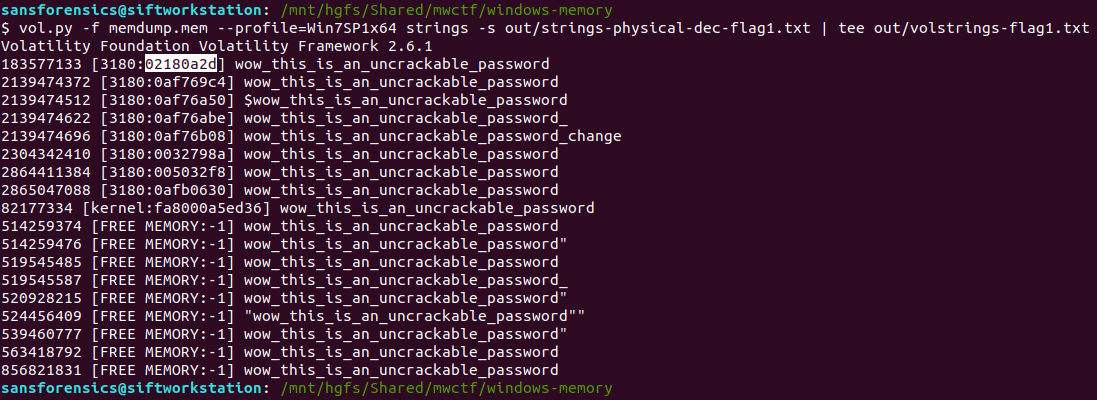
The output format is as follows:
<physical offset (decimal)> [<pid>:<virtual offset (hex)>] <string>
I wasn’t sure which of the resulting virtual offsets was the correct one so tried the first match, which was accepted.
Flag (Part 6)
0x02180a2d
Part 7 (20 points)
What is the physical memory address offset where the password string is located in the memory image?
Format: 0x########
Ok, this one was much easier. We already have the physical offset, only it is represented in decimal and the format hint specifies a hex representation. No problem though, CyberChef can fix that easily!
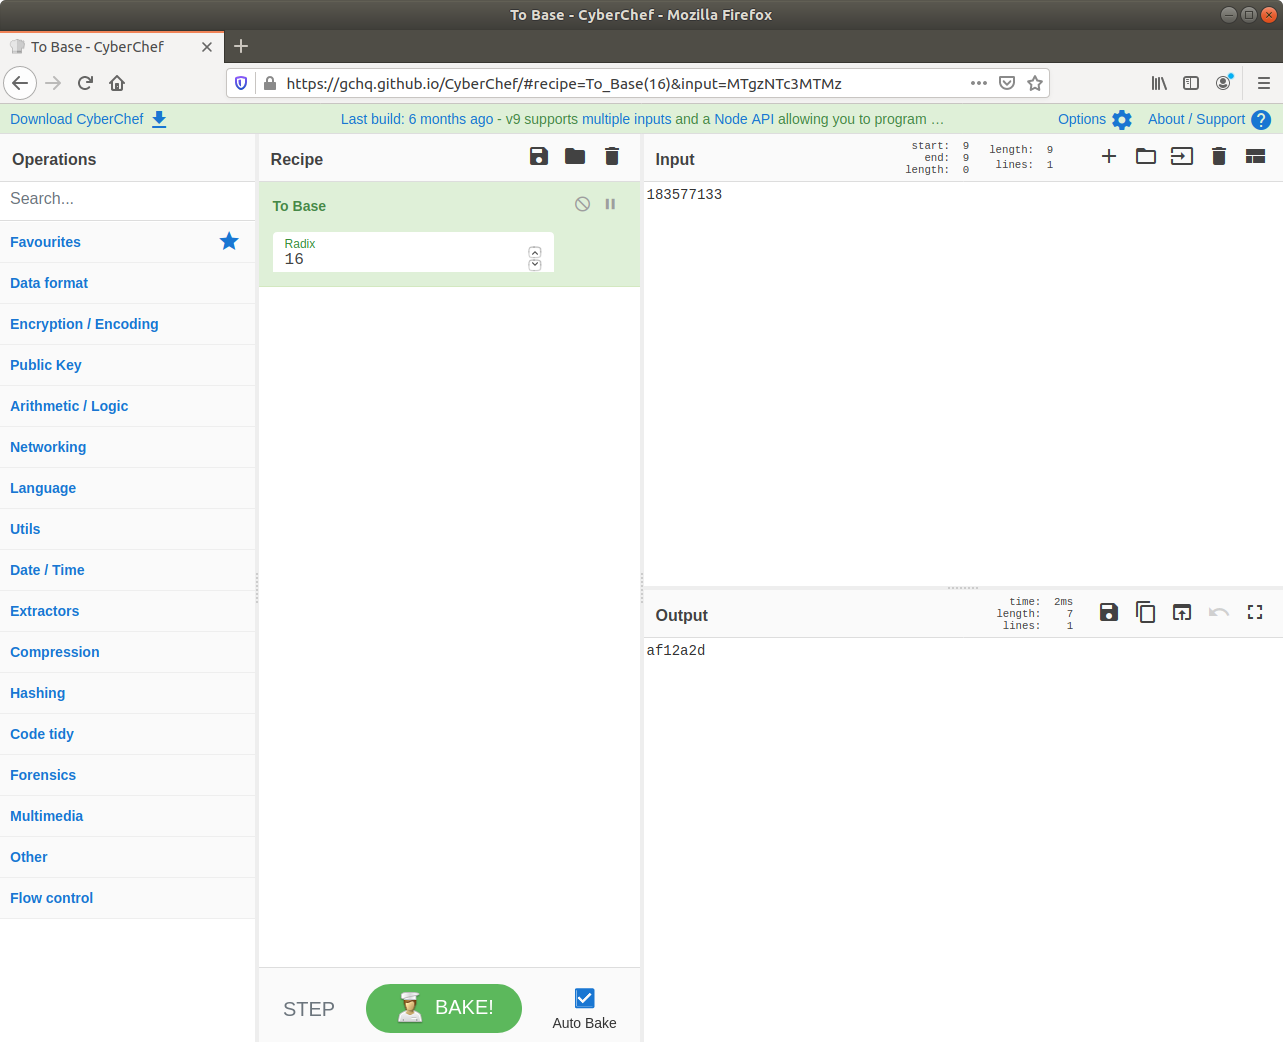
There we go. Solved. But just to make sure I also ran strings over the memory image from within my SIFT VM with the -t x flag to specify that offsets should be printed as hex rather than decimal. Searching for the password with grep returns a single hit, matching nicely with the value from CyberChef.
strings -t x memdump.mem > out/strings-physical-hex.txt
grep "wow_this_is_an_uncrackable_password" out/strings-physical-hex.txt

Flag (Part 7)
0xaf12a2d
1 thoughts on “Magnet Weekly CTF – Week 9”